> For the complete documentation index, see [llms.txt](https://docs.parallels.com/landing/llms.txt). Markdown versions of documentation pages are available by appending `.md` to page URLs; this page is available as [Markdown](https://docs.parallels.com/landing/pd-ag/getting-started/configuring-the-single-sign-on-sso-integration-with-parallels-my-account/optional-how-to-divide-users-into-groups-and-assign-them-sublicenses.md).
# \[OPTIONAL] How to Divide Users into Groups and Assign Them Sublicenses
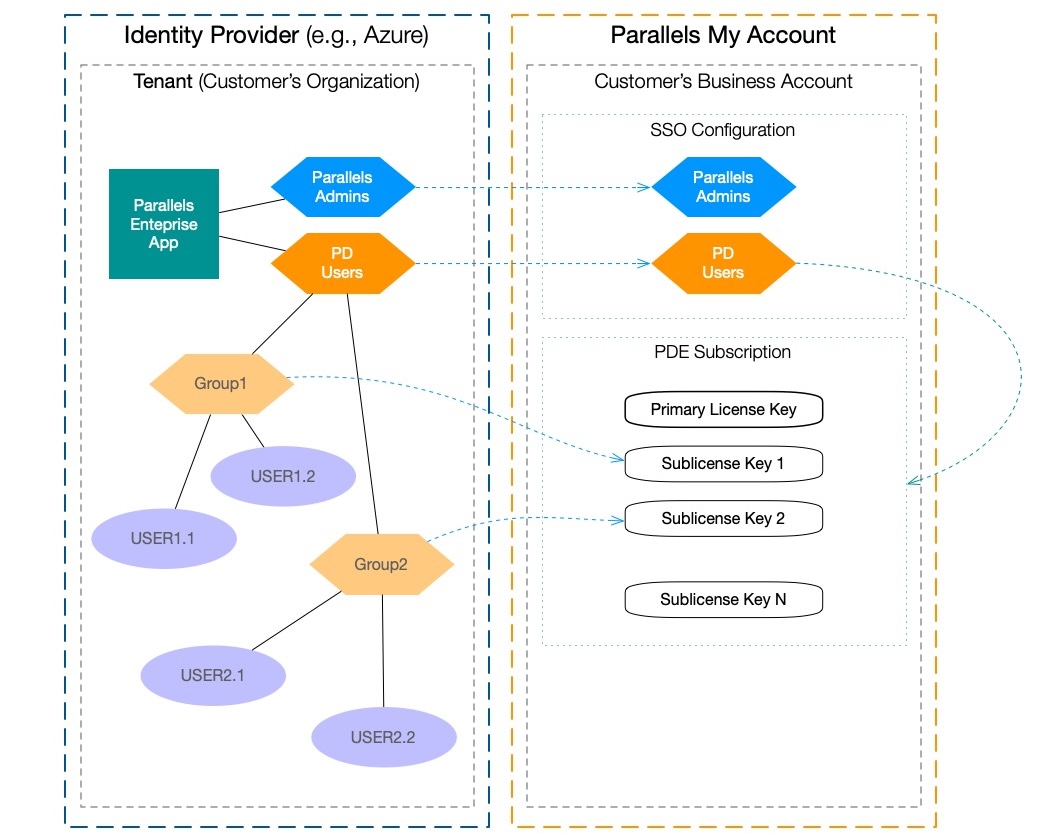
By default, the integration process between Parallels My Account and your identity provider, described in [this chapter](/landing/pd-ag/getting-started/configuring-the-single-sign-on-sso-integration-with-parallels-my-account/starting-the-integration-process-in-parallels-my-account.md), implies that all users of Parallels Desktop for Mac in your company will end up in one user group.
However, as explained in [this chapter](/landing/pd-ag/getting-started/dividing-users-into-groups/dividing-users-into-groups-with-sublicenses.md), it may be beneficial to spread your end users across multiple groups, depending on their departments or functions within the company. This will enable administrators to provision tailored [Golden Images](/landing/pd-ag/preparing-virtual-machines-for-deployment-and-securing-them/golden-images.md) or set their own restrictions for each individual group of users, as described in [this chapter](/landing/pd-ag/preparing-virtual-machines-for-deployment-and-securing-them/policies.md) of the Parallels Management Portal section of this guide.
{% hint style="warning" %}
**Attention**: All the users that need to activate Parallels products using SSO still have to **also** be included in the main user group created as part of the [SSO setup process](/landing/pd-ag/getting-started/configuring-the-single-sign-on-sso-integration-with-parallels-my-account/starting-the-integration-process-in-parallels-my-account.md).
{% endhint %}
The goal of this chapter is to explain the intricacies of the grouping process and prevent potential activation or policy application issues. As a result of these procedures, you will end up with distinctive groups of Parallels Desktop users tied to specific sublicense keys, to which you can apply specific policies and restrictions and provision different golden images.
### Preparation
{% hint style="danger" %}
**Warning**: Under no circustances should you attempt to configure a multi-group setup without first establishing a working, well-tested configuration with just one user group as described in the [main SSO integration guide](/landing/pd-ag/getting-started/configuring-the-single-sign-on-sso-integration-with-parallels-my-account/starting-the-integration-process-in-parallels-my-account.md) and having a working plan how to revert to that.
{% endhint %}
You may choose to divide your company's Parallels Desktop users into entirely new groups or use the groups that already exist in your IdP setup. However, we strongly recommend you to plan before acting:
1. Create an organizational chart with all planned subdivisions.
2. List the concrete differences in their access requirements that may warrant individual virtual machine images and the application of specific policies. Check the list of available policies [here](/landing/pd-ag/preparing-virtual-machines-for-deployment-and-securing-them/policies.md).
3. Itemize the number of Parallels Desktop licenses that each group may need. Consider, which users need guaranteed access, and which groups will suffice on "first come, first served" principle. Compare the sum total of required licenses with the overall number of license seats in your Parallels Desktop Enterprise Edition setup. Create the respective [subgroups](/landing/pd-ag/getting-started/dividing-users-into-groups/dividing-users-into-groups-with-sublicenses.md) in Parallels My Account to see if the numbers add up.
{% hint style="info" %}
**Note**: Any users not included in the mapped SSO groups will be activated using the quota from the **primary license key** seats pool. Golden Images will be assigned, and policies will be applied accordingly.
{% endhint %}
### Terminology
For the purposes of this guide, the most important term on your IdP's side is a unique **group identifier**, which, depending on your IdP, can also be known as UUID, Object ID, or group name. Another important term is a **SAML token**: a file which contains information about a user and is sent by IdP to the service provider (in this case, Parallels) during the SSO authentication process. The individual meaningful pieces of information in **SAML tokens** are called **claims**.
What binds these three terms together is that certain **claims** in **SAML tokens** contain **group identifiers**, allowing Parallels service to see what groups the authenticated user is included in on the IdP side.
{% hint style="info" %}
**Note**: If you follow the previous default SSO integration procedure, your Parallels application **SAML token** may only contain **claims** with the **group identifiers** of the two manually populated default groups assigned to the Parallels Desktop for Mac app, i.e. `Administrators` and `Parallels Desktop Users`, and not any other existing groups that an employee may be part of.\
\
We recommend that you change that using the details from the **Step (3)** of the [Mapping existing groups to the Parallels Desktop app in your IdP](#mapping-existing-groups-to-the-parallels-desktop-app-in-your-idp) section below. This way the **SAML tokens** will contain **claims** with the **identifiers** of all the groups a user is part of, ensuring correct policy assignment.
{% endhint %}
### Group structure
Some IdPs allow administrators to create hierarchical user group structures to better reflect the organizational structure of the company, e.g., a "`Product`" group that would include subgroups like "`Engineers`", "`Designers`", "`QA`", etc. In this case, a member of the "`Engineers`" subgroup would have at least two **group identifiers** in their **SSO claim**: one for the "`Product`" group, and one for the "`Engineers`" subgroup.
{% hint style="info" %}
**Note**: While a **SAML token** may contain claims with specific **group identifiers**, it will not contain information on the hierarchical relationships between those groups. E.g., if a user is a member of `Group 1.1`, a subset of `Group 1`, their **SAML token** will simply contain **group identifiers** for both groups.
{% endhint %}
### Mapping existing groups to the Parallels Desktop app in your IdP
With the above information in mind, your overall process to divide the Parallels Desktop for Mac users in your organization into individually managed groups should include the following steps:
1. Evaluate which existing groups of users may need which specific policies and restrictions. Read [this chapter](https://docs.parallels.com/parallels-desktop-enterprise-administrators-guide/parallels-management-portal/policies) carefully.
2. Plan the user allocation. Consider how many users from each affected group may need to activate and use Parallels Desktop for Mac, which will require guaranteed service (reserved sublicense keys), and which will be better off on a first-come, first-served basis (dynamic sublicense keys). Read more about the difference [here](/landing/pd-ag/parallels-desktop-licensing-guide/managing-subscriptions-licences-and-seats/creating-additional-license-keys.md).
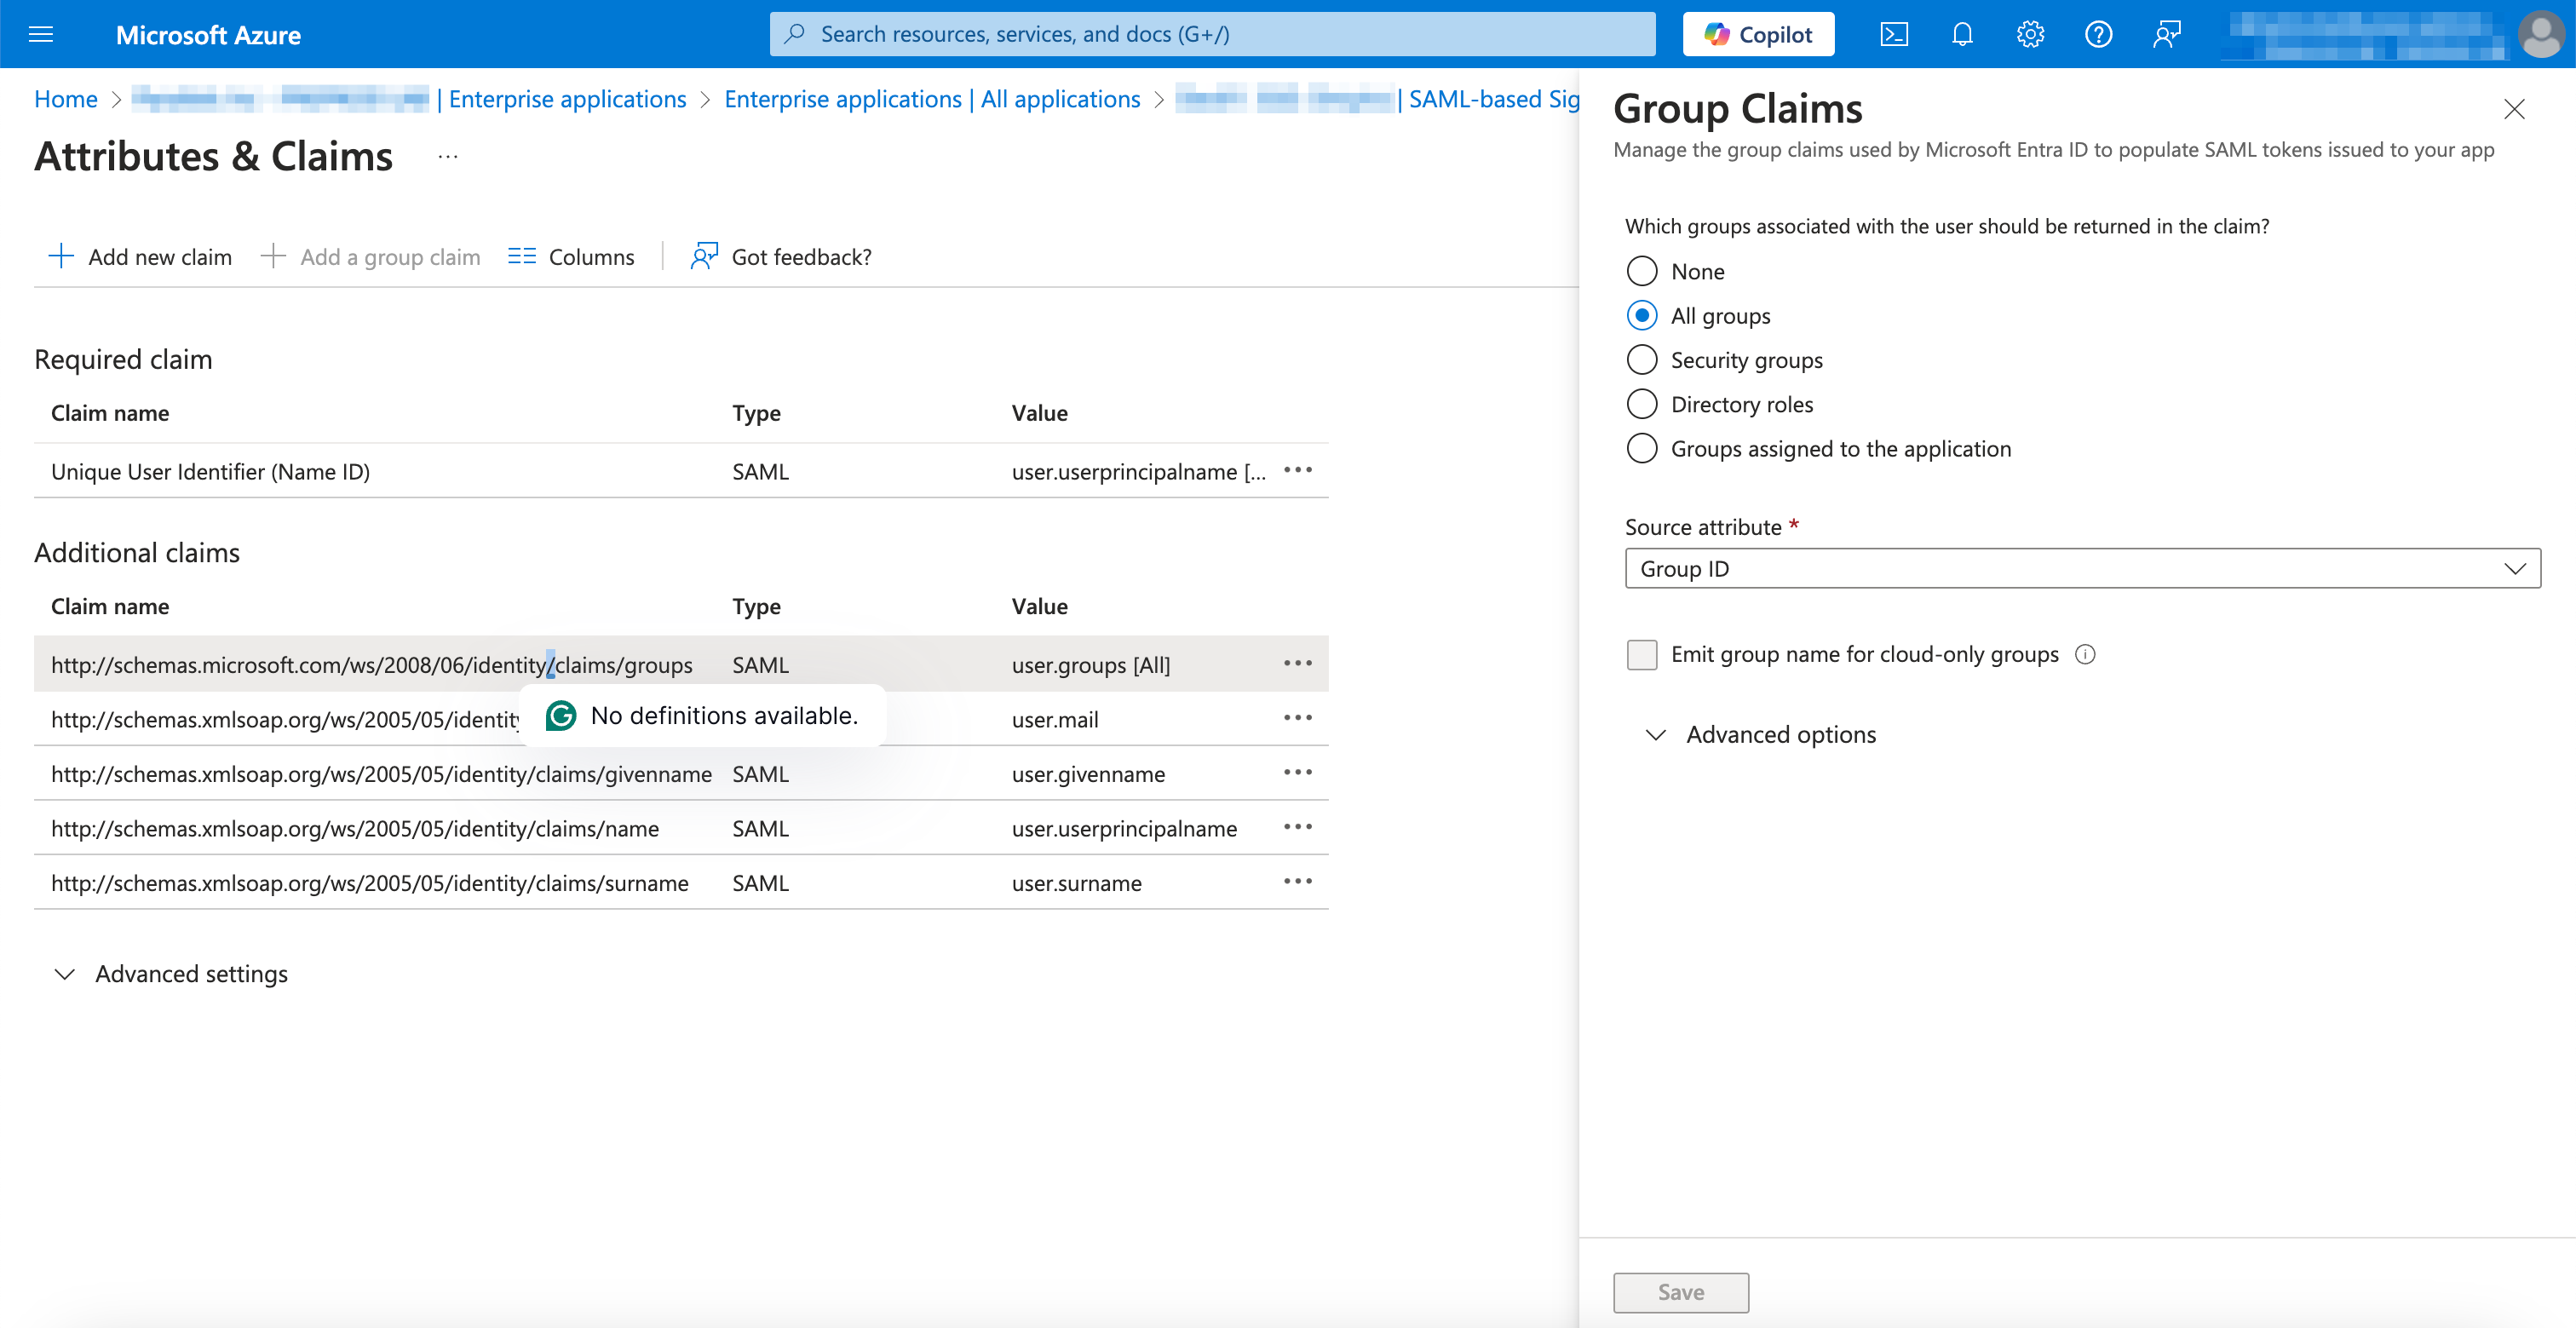
3. Ensure the correct settings of the Parallels Desktop application on your IdP side so that the **SAML token** exchanged during the SSO authentication process includes the **group identifiers** for all the groups a user belongs to.\
\
In Microsoft Azure/Entra ID, follow this path **Home** → **Entra ID** (formerly **AD**) → **Enterprise applications** → **Select Application** → **Single sign-on** → **2. Attributes & Claims** -> **Edit** and make sure the **Group Claims** setting is set to **All Groups** and not **Groups assigned to the application**.
Once you make this change, the Parallels service will receive information about all user groups a given user is a member of on a SSO sign-on attempt, and will deduct the seat from a specific license key accordingly.\
\
**Note**: In the case of Okta, you have to map pre-existing groups to the application directly.
4. \[IMPORTANT] Ensure that your Microsoft Azure/Entra ID setup identifies users correctly:
1. Go to **MS Azure Home** > **Entra ID** (formerly **AD**) > **Enterprise applications**.
2. Select the Parallels enterprise application in the list, click on it to open the application’s home page, and choose **Provisioning** in the **Manage** section on the left-hand side panel.
3. Open the **Attribute mapping** tab and click on **Provision Microsoft Entra ID Users**. There, under the **Attribute Mappings** section, locate the **externalId** parameter, click **Edit**, change the **Source attribute** parameter from **mailNickname** to **objectId**, and click **OK**. Click **Save** in the top left corner.
**Note**: Without this step, there may be a mixup in product license provisioning between users with similar names.
5. To benefit from tailored policies and license key quotas, create sublicense keys as directed in [this chapter](/landing/pd-ag/getting-started/dividing-users-into-groups/dividing-users-into-groups-with-sublicenses.md). To map a user group on the IdP side with a specific sublicense key, take this group's **group identifier** and add it to the selected key in Parallels My Account.\
\
In the case of Microsoft Azure/Entra ID, the group identifiers can be found by following this path: **Home** -> **Microsoft Entra ID** (former AD) -> **Enterprise Applications** -> Select **Application** -> **Users and groups** -> Select **Group** -> **Object ID.**\
\
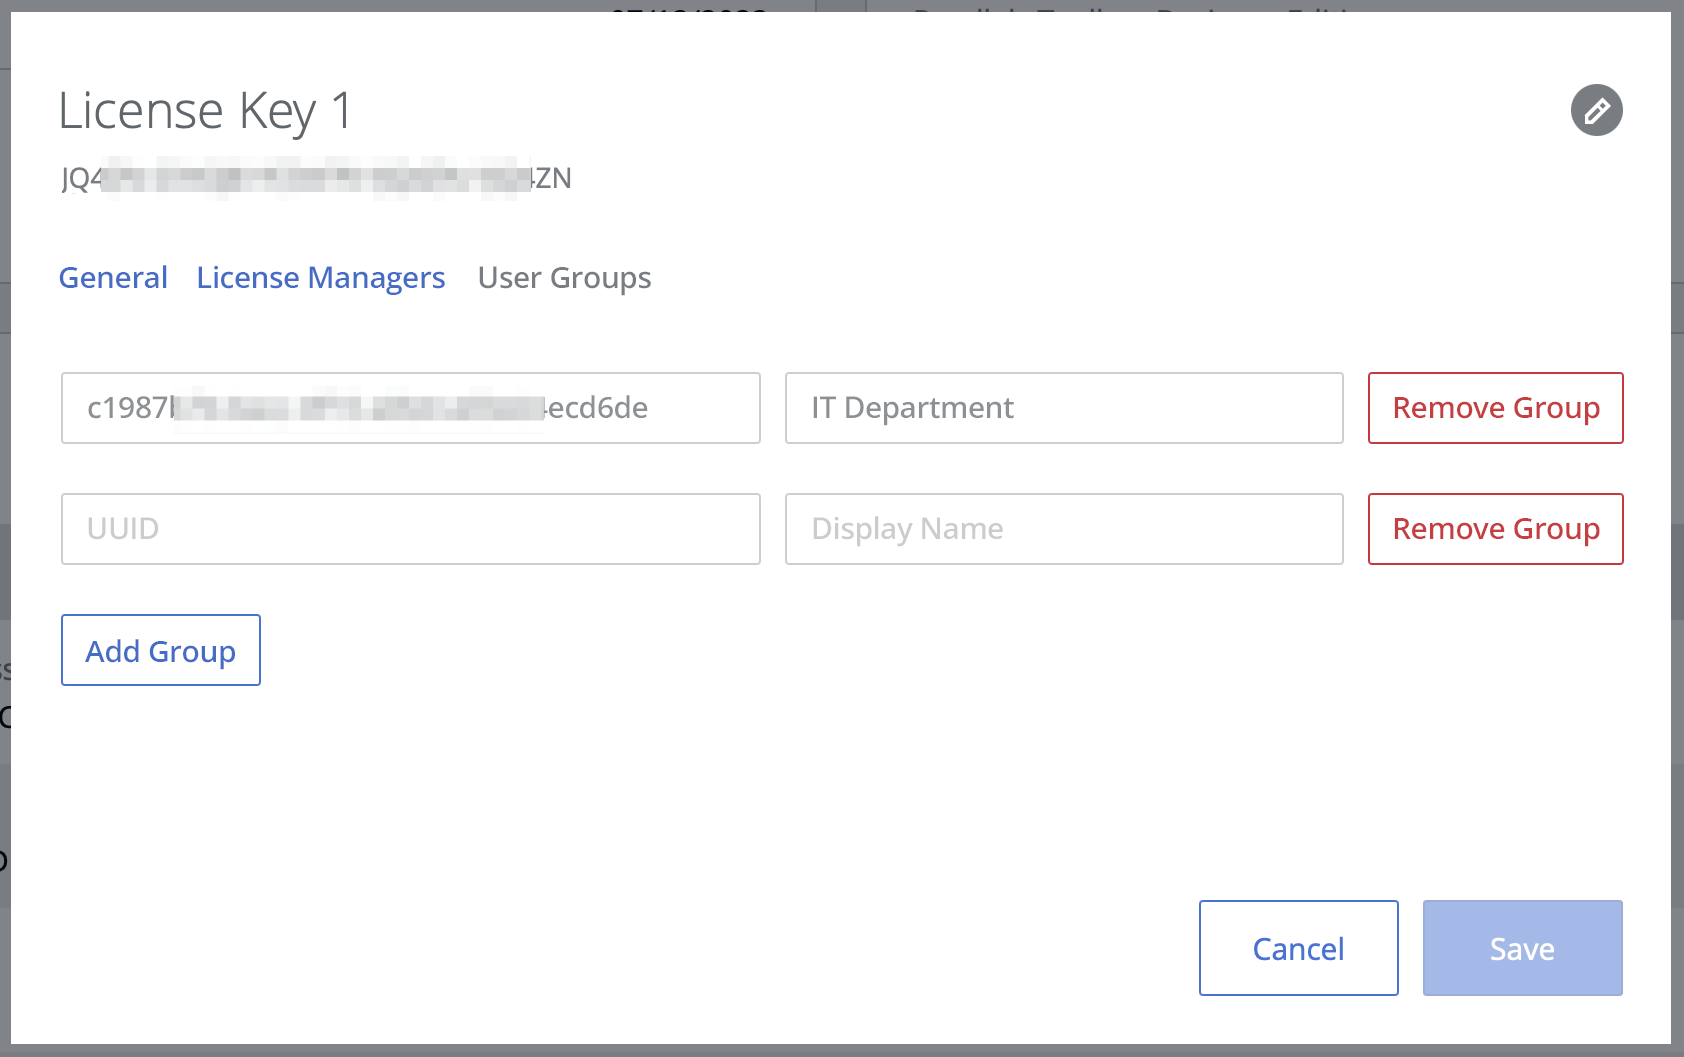
To paste the value in Parallels My Account, linking the group to a specific sub-license key, open Parallels My Account and follow this path: Find the **Parallels Desktop for Mac Enterprise Edition** product card -> Click on the **Subscription Details** line -> scroll down to the **License Keys** section. Click the cogwheel symbol to open that sublicense key's card and switch to the **User Groups** tab. Click **Add Group** and paste the group's name and UUID (Object ID) in the respective fields. Note that in the case of Okta, the user group UUIDs are the same as the group names, as described in the respective [subchapter](/landing/pd-ag/getting-started/configuring-the-single-sign-on-sso-integration-with-parallels-my-account/starting-the-integration-process-in-parallels-my-account/configuring-sso-integration-with-okta.md).
**Note**: You can assign more than one user group to a specific license key.\
\
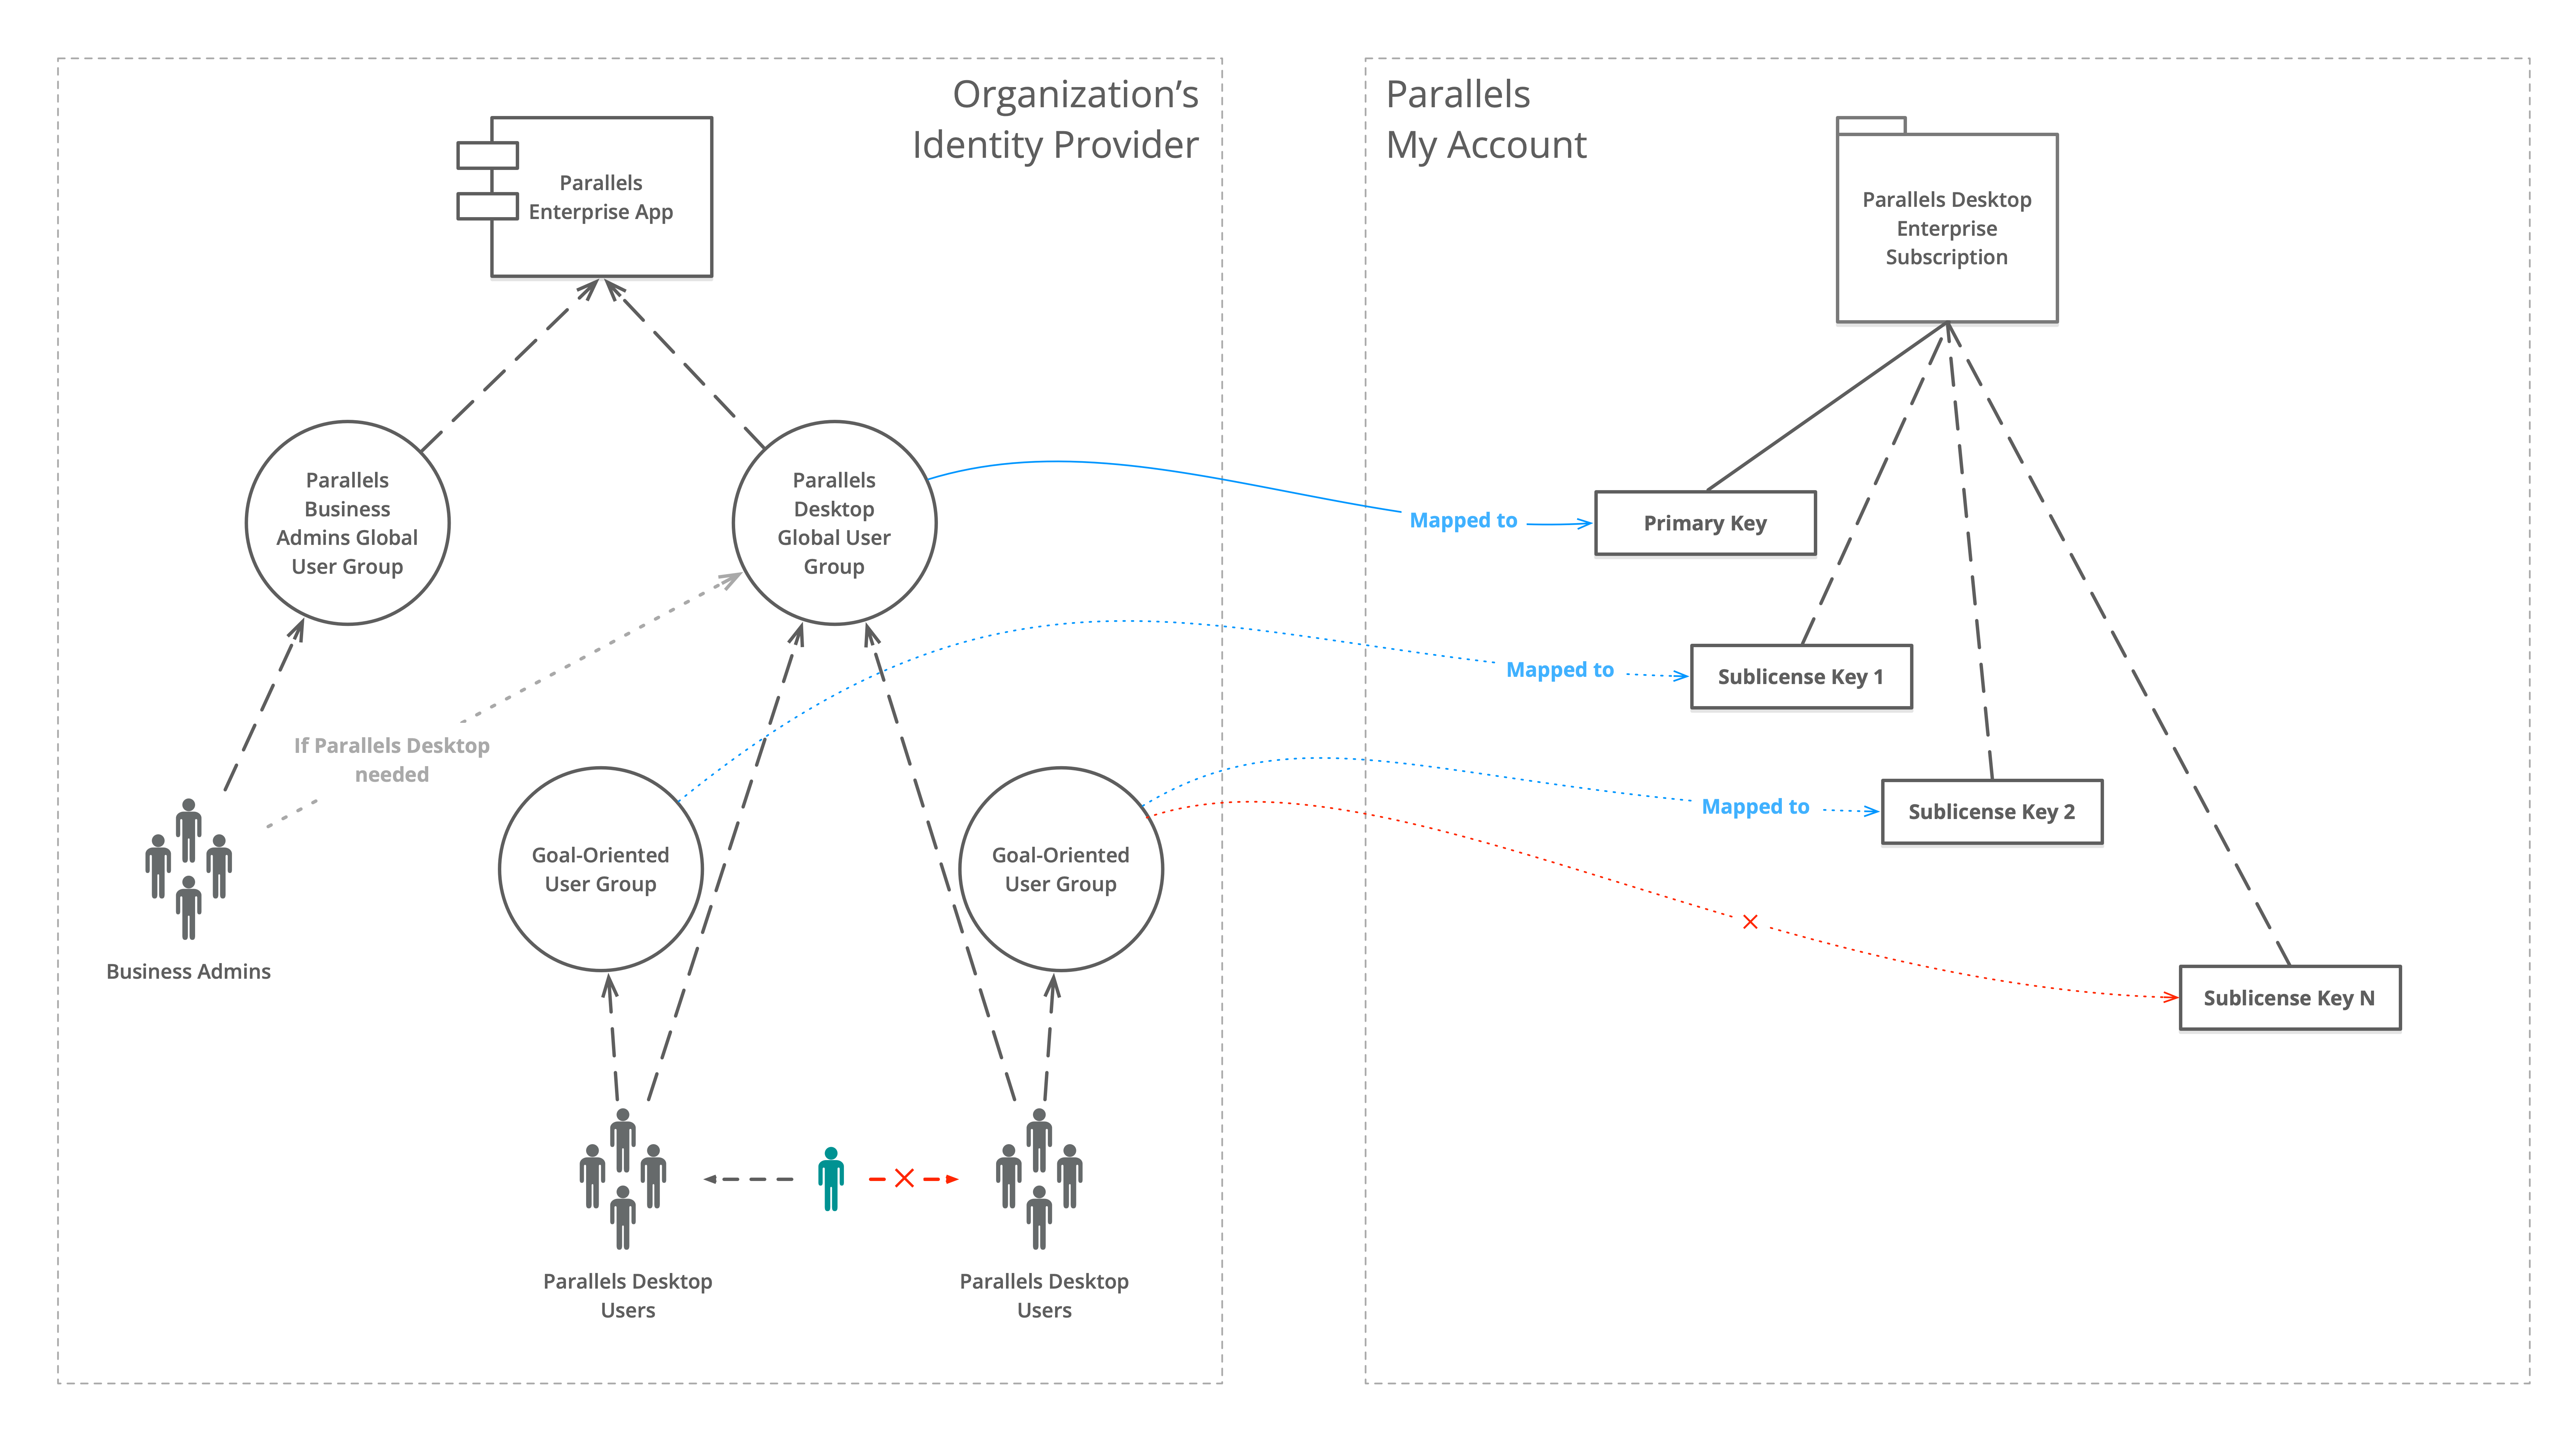
When dividing your users into groups and subgroups and assigning those groups to sublicense keys, your priority should be to ensure that no single user is simultaneously a member of two groups (directly or via a hierarchical structure) that are assigned to two different keys. Such a setup may lead to their license seat being assigned from the wrong sublicense.
\
Once you have added all the groups you want, click **Save**.
Now, your users can activate their copies of Parallels Desktop for Mac using their groups' assigned quotas, and you can apply group policies as you see fit.
### Troubleshooting
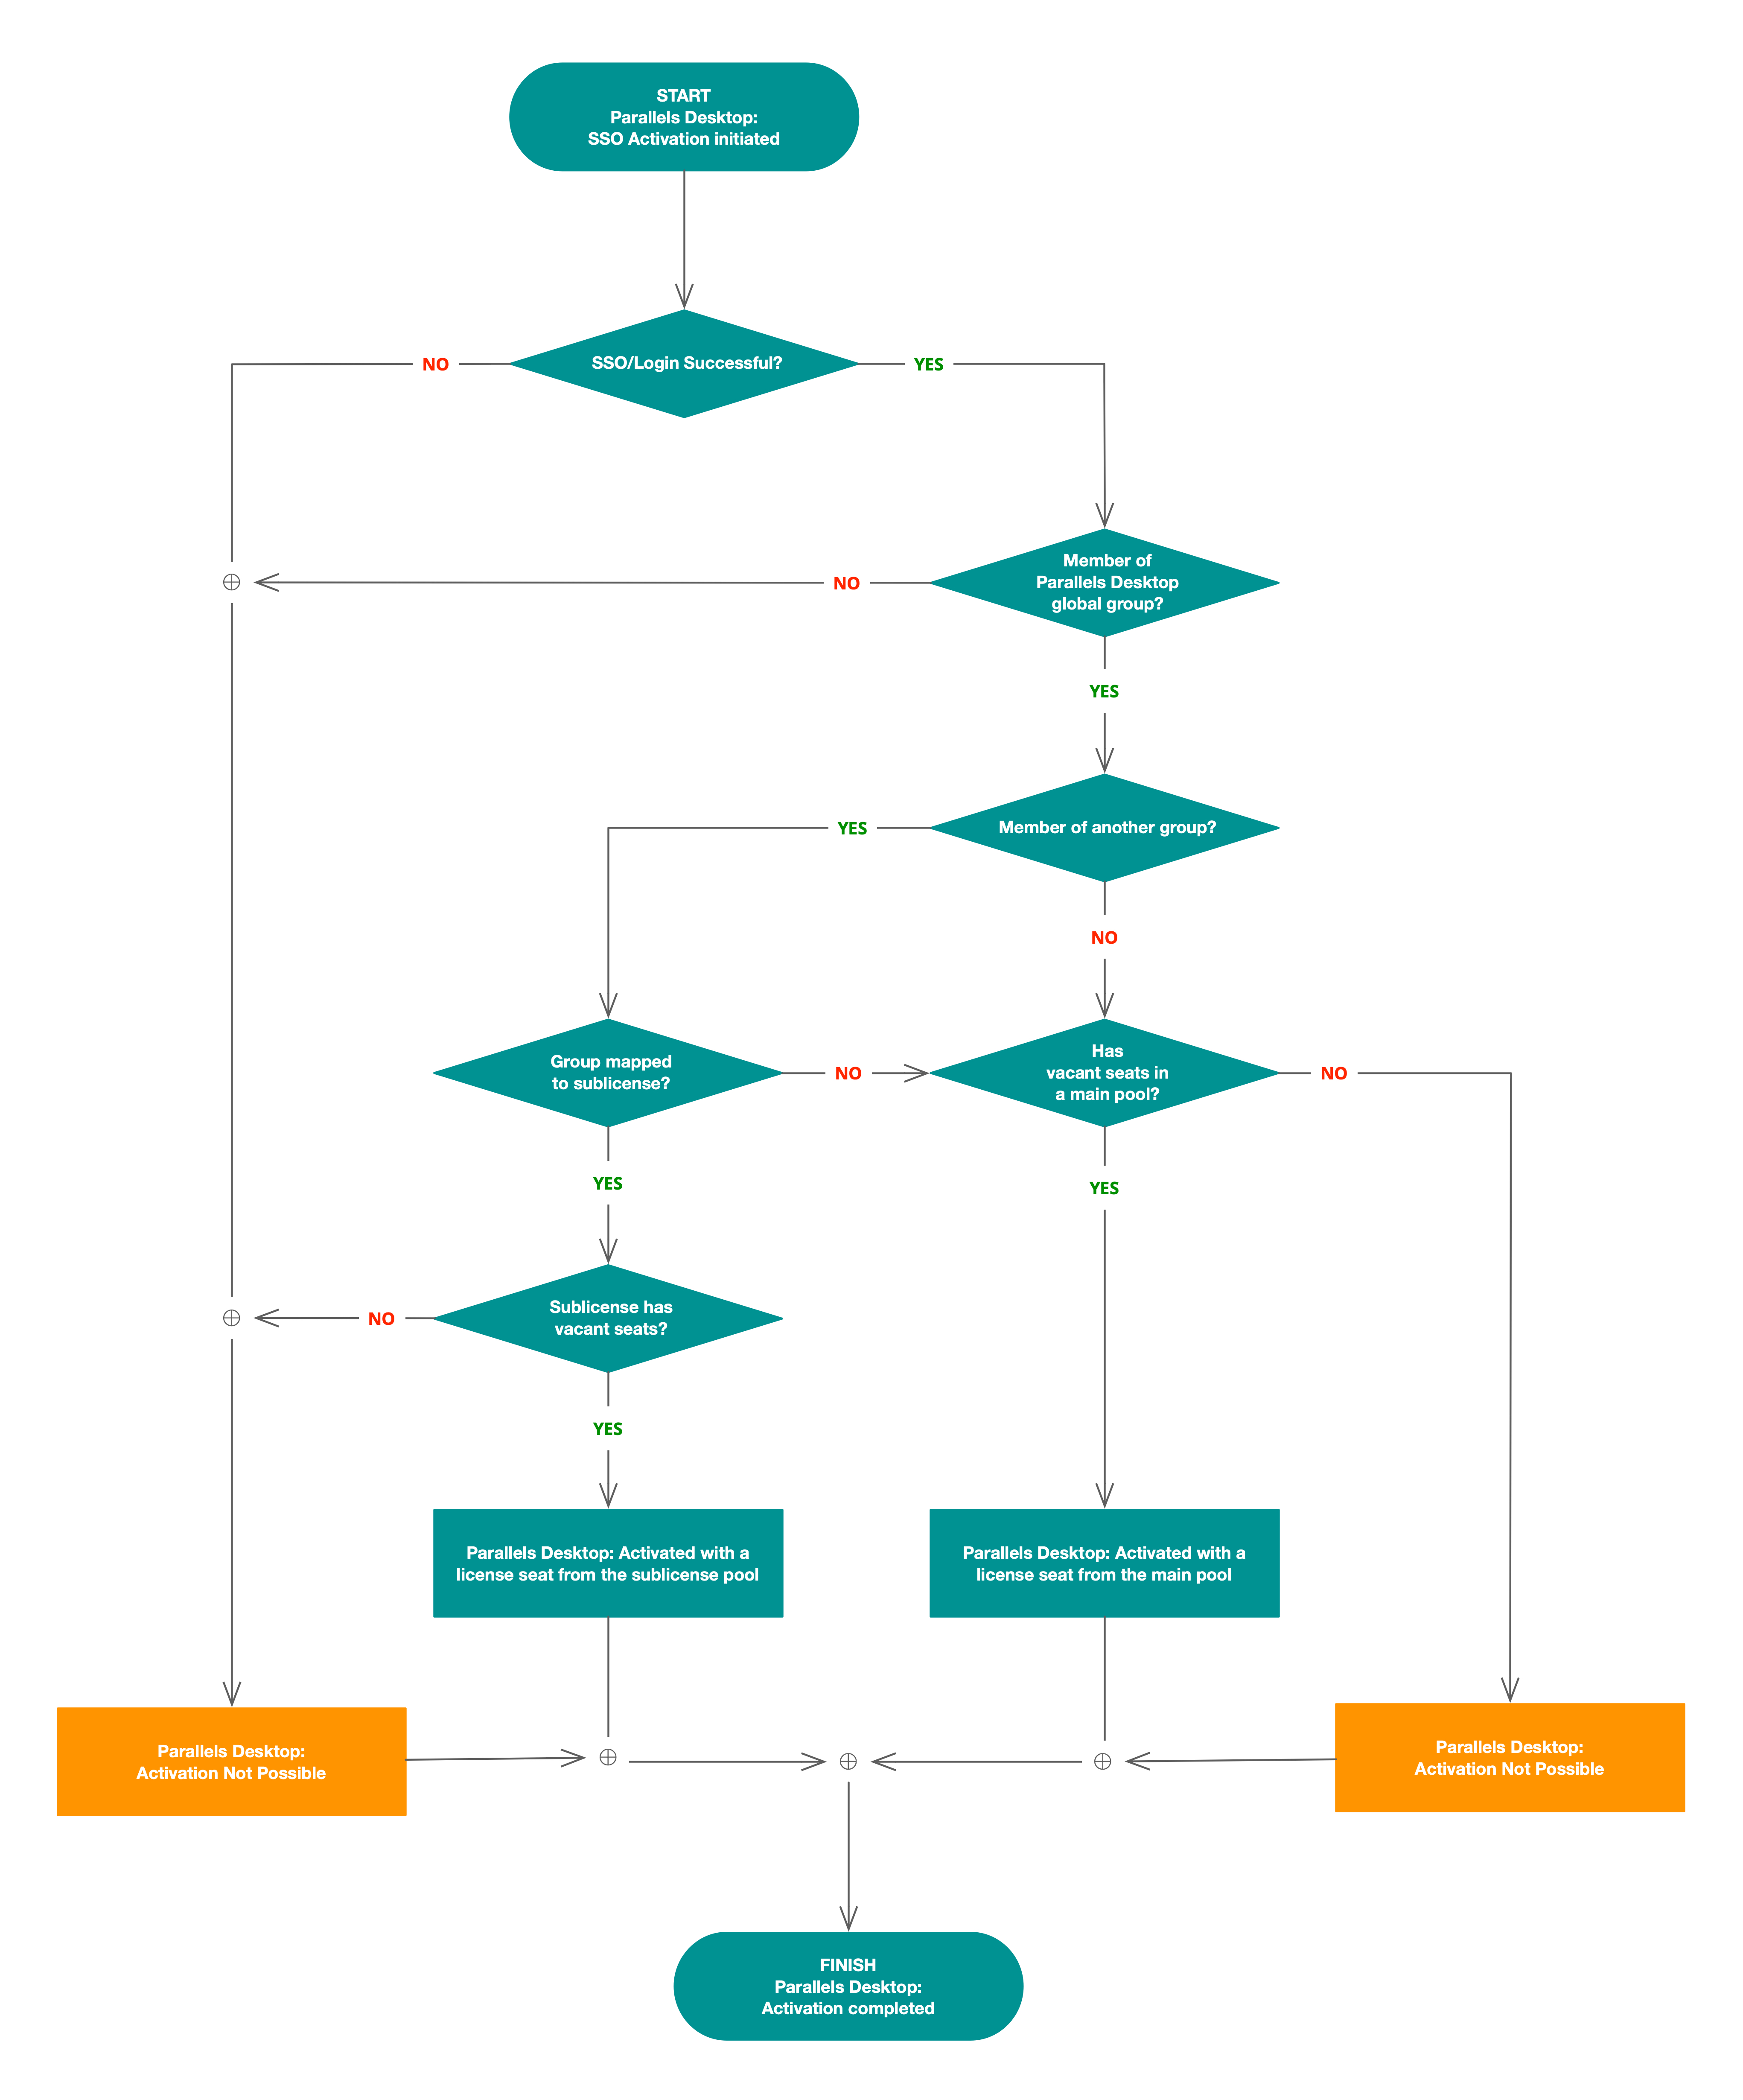
The chart below will help you troubleshoot your multi-group setup, showing the possible reasons why an SSO process may fail.
---
# Agent Instructions
This documentation is published with GitBook. GitBook is the documentation platform designed so that both humans and AI agents can read, navigate, and reason over technical content effectively. Learn more at gitbook.com.
## Querying This Documentation
If you need additional information that is not directly available in this page, you can query the documentation dynamically by asking a question.
Perform an HTTP GET request on the current page URL with the `ask` query parameter, and the optional `goal` query parameter:
```
GET https://docs.parallels.com/landing/pd-ag/getting-started/configuring-the-single-sign-on-sso-integration-with-parallels-my-account/optional-how-to-divide-users-into-groups-and-assign-them-sublicenses.md?ask=&goal=
```
`ask` is the immediate question: it should be specific, self-contained, and written in natural language.
`goal` is optional and describes the broader end goal you are ultimately trying to accomplish on behalf of the user. GitBook uses it to tailor the answer towards what is most useful for that goal.
The response will contain a direct answer to the question and relevant excerpts and sources from the documentation.
Use this mechanism when the answer is not explicitly present in the current page, you need clarification or additional context, or you want to retrieve related documentation sections.