> For the complete documentation index, see [llms.txt](https://docs.parallels.com/landing/llms.txt). Markdown versions of documentation pages are available by appending `.md` to page URLs; this page is available as [Markdown](https://docs.parallels.com/landing/pd-ag/getting-started/configuring-the-single-sign-on-sso-integration-with-parallels-my-account/starting-the-integration-process-in-parallels-my-account.md).
# Starting the Integration Process in Parallels My Account
Follow the instructions to begin the process of configuring SSO integration in Parallels My Account:
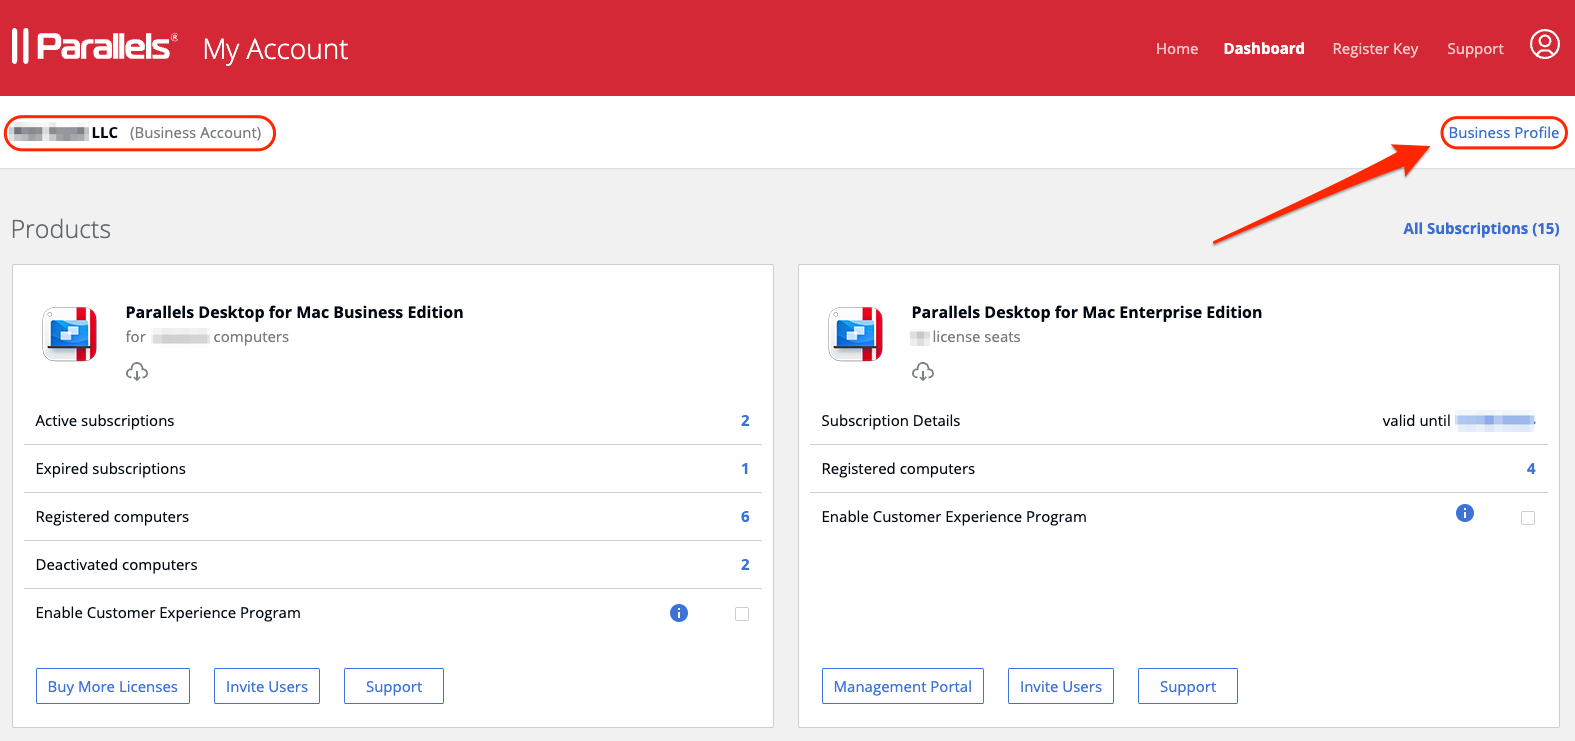
1. Log into your Parallels account using your email address and password (but not using the **Continue with SSO** option). We recommend that you use your corporate email address and a password that is different from your main one. Go to the [**Dashboard**](https://my.parallels.com/dashboard) page, and make sure that your business account is selected as the current workspace in the top-left corner.
2. Click the [**Business Profile**](https://my.parallels.com/profile/business/general) item in the business account navigation menu (top-right corner).
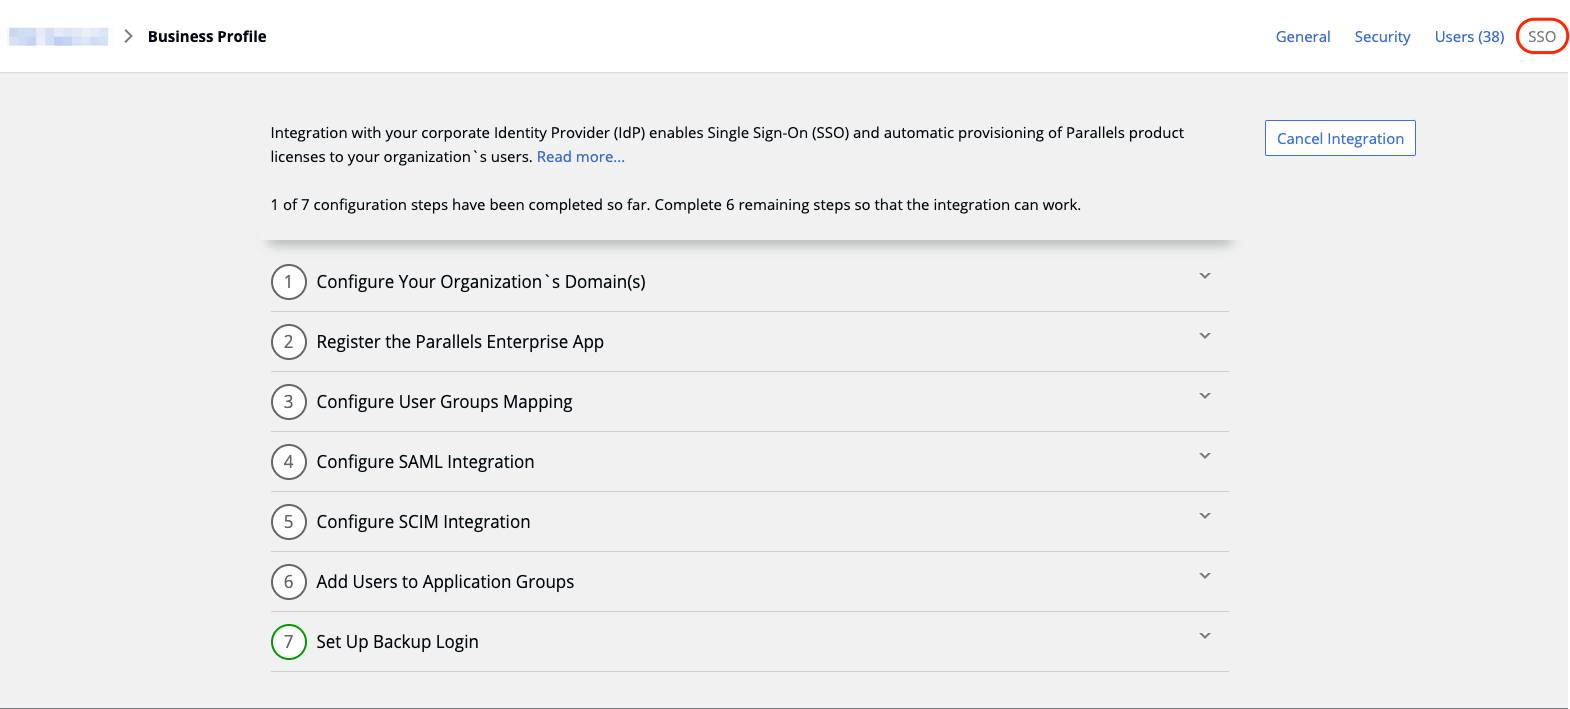
3. Once on the **Business Profile** page, choose the [**SSO**](https://my.parallels.com/profile/business/idp_integration) menu item in the top-right corner to open the IdP Integration configurator page.
4. When on the IdP Integration configurator page, click **Start Configuring** to begin setting up the integration between the Parallels My Account service and your identity provider. You will have to complete the configuration in 7 steps. Each step is represented on the page by a separate list item. Uncompleted steps are marked as gray, and the successfully completed ones become green. The configuration process is successfully completed when all seven items on the list are marked green.
5. Start with **Step 1** (**Configure Your Organization's Domain(s)**), then continue until all seven steps are completed. Click on the title of each step’s section to expand it, and follow the instructions provided. The SSO integration will not start working until all the steps are complete.\
\
However, completing all steps at once is not mandatory—you can interrupt the process at any time and continue later. The information entered at the previous steps persists between sessions.\
\
Read the sub-chapters in this section for step-by-step setup guides specific to one of the officially supported IdP providers. If your provider is not on the list but supports SAML 2.0 and SCIM 2.0, we recommend referring to the steps described in the [Entra ID sub-chapter](/landing/pd-ag/getting-started/configuring-the-single-sign-on-sso-integration-with-parallels-my-account/starting-the-integration-process-in-parallels-my-account/configuring-sso-integration-with-azure-entra-id.md) and applying them according to your IdP's documentation.
6. When all configuration steps are completed (marked green), the Activate Integration button becomes available at the top of the page. Click the button to activate the integration between Parallels My Account and your Organization’s IdP. You can deactivate the integration anytime by clicking the Deactivate button at the top of the page.
Once the above steps have been completed, proceed to the respective chapter that covers integration with your IdP provider.
---
# Agent Instructions
This documentation is published with GitBook. GitBook is the documentation platform designed so that both humans and AI agents can read, navigate, and reason over technical content effectively. Learn more at gitbook.com.
## Querying This Documentation
If you need additional information that is not directly available in this page, you can query the documentation dynamically by asking a question.
Perform an HTTP GET request on the current page URL with the `ask` query parameter, and the optional `goal` query parameter:
```
GET https://docs.parallels.com/landing/pd-ag/getting-started/configuring-the-single-sign-on-sso-integration-with-parallels-my-account/starting-the-integration-process-in-parallels-my-account.md?ask=&goal=
```
`ask` is the immediate question: it should be specific, self-contained, and written in natural language.
`goal` is optional and describes the broader end goal you are ultimately trying to accomplish on behalf of the user. GitBook uses it to tailor the answer towards what is most useful for that goal.
The response will contain a direct answer to the question and relevant excerpts and sources from the documentation.
Use this mechanism when the answer is not explicitly present in the current page, you need clarification or additional context, or you want to retrieve related documentation sections.