> For the complete documentation index, see [llms.txt](https://docs.parallels.com/landing/llms.txt). Markdown versions of documentation pages are available by appending `.md` to page URLs; this page is available as [Markdown](https://docs.parallels.com/landing/pd-ag/getting-started/configuring-the-single-sign-on-sso-integration-with-parallels-my-account/starting-the-integration-process-in-parallels-my-account/configuring-sso-integration-with-google-workspace.md).
# Configuring SSO Integration with Google Workspace
Follow the steps below one by one to integrate Parallels My Account with Google Workspace.
### (1) Configure Organization's Domain(s)
A domain is a part of the email addresses (after the @ symbol) used by the end users in your organization. When end users try to log in to Parallels My Account using SSO, they are prompted to enter their work email address. Parallels My Account checks the domain part of the email address and recognizes that the user belongs to your organization. Click on the title of **Step 1** to expand it, and read the instructions carefully.
* Add one or more domains your organization uses.
* Each domain must be unique and can only be registered to **one** business account that your organization has registered with Parallels.
* Make sure to add only the domains your organization can control.
The Parallels My Account service verifies the domain ownership by checking a specific TXT record that must be added to the DNS host of the corresponding domain. Make sure that all domains added to the list are verified before proceeding with the next steps.
Depending on the software and/or provider, a TXT record may take up to 72 hours to propagate. You can check whether it's been configured using the following command:
```
$ dig TXT {yourdomain}.{com}
```
### (2) Create User Groups and Register Parallels Enterprise App and Configure SAML Settings
Registering the Parallels enterprise application (required for integrating with the Parallels My Account service) in the IdP Directory allows you to configure the SSO-related parameters and correctly provision the integration between your IdP and the Parallels My Account service.
With Google Workspace, it is simpler to first create the necessary user groups for the app. At least two groups are required: one for users with business account privileges in Parallels My Account (enabling them to manage issuing license seat quotas etc.) and at least one for the users who need to activate Parallels Desktop for Mac on their computers.
To create a group in Google Workspace, do the following:
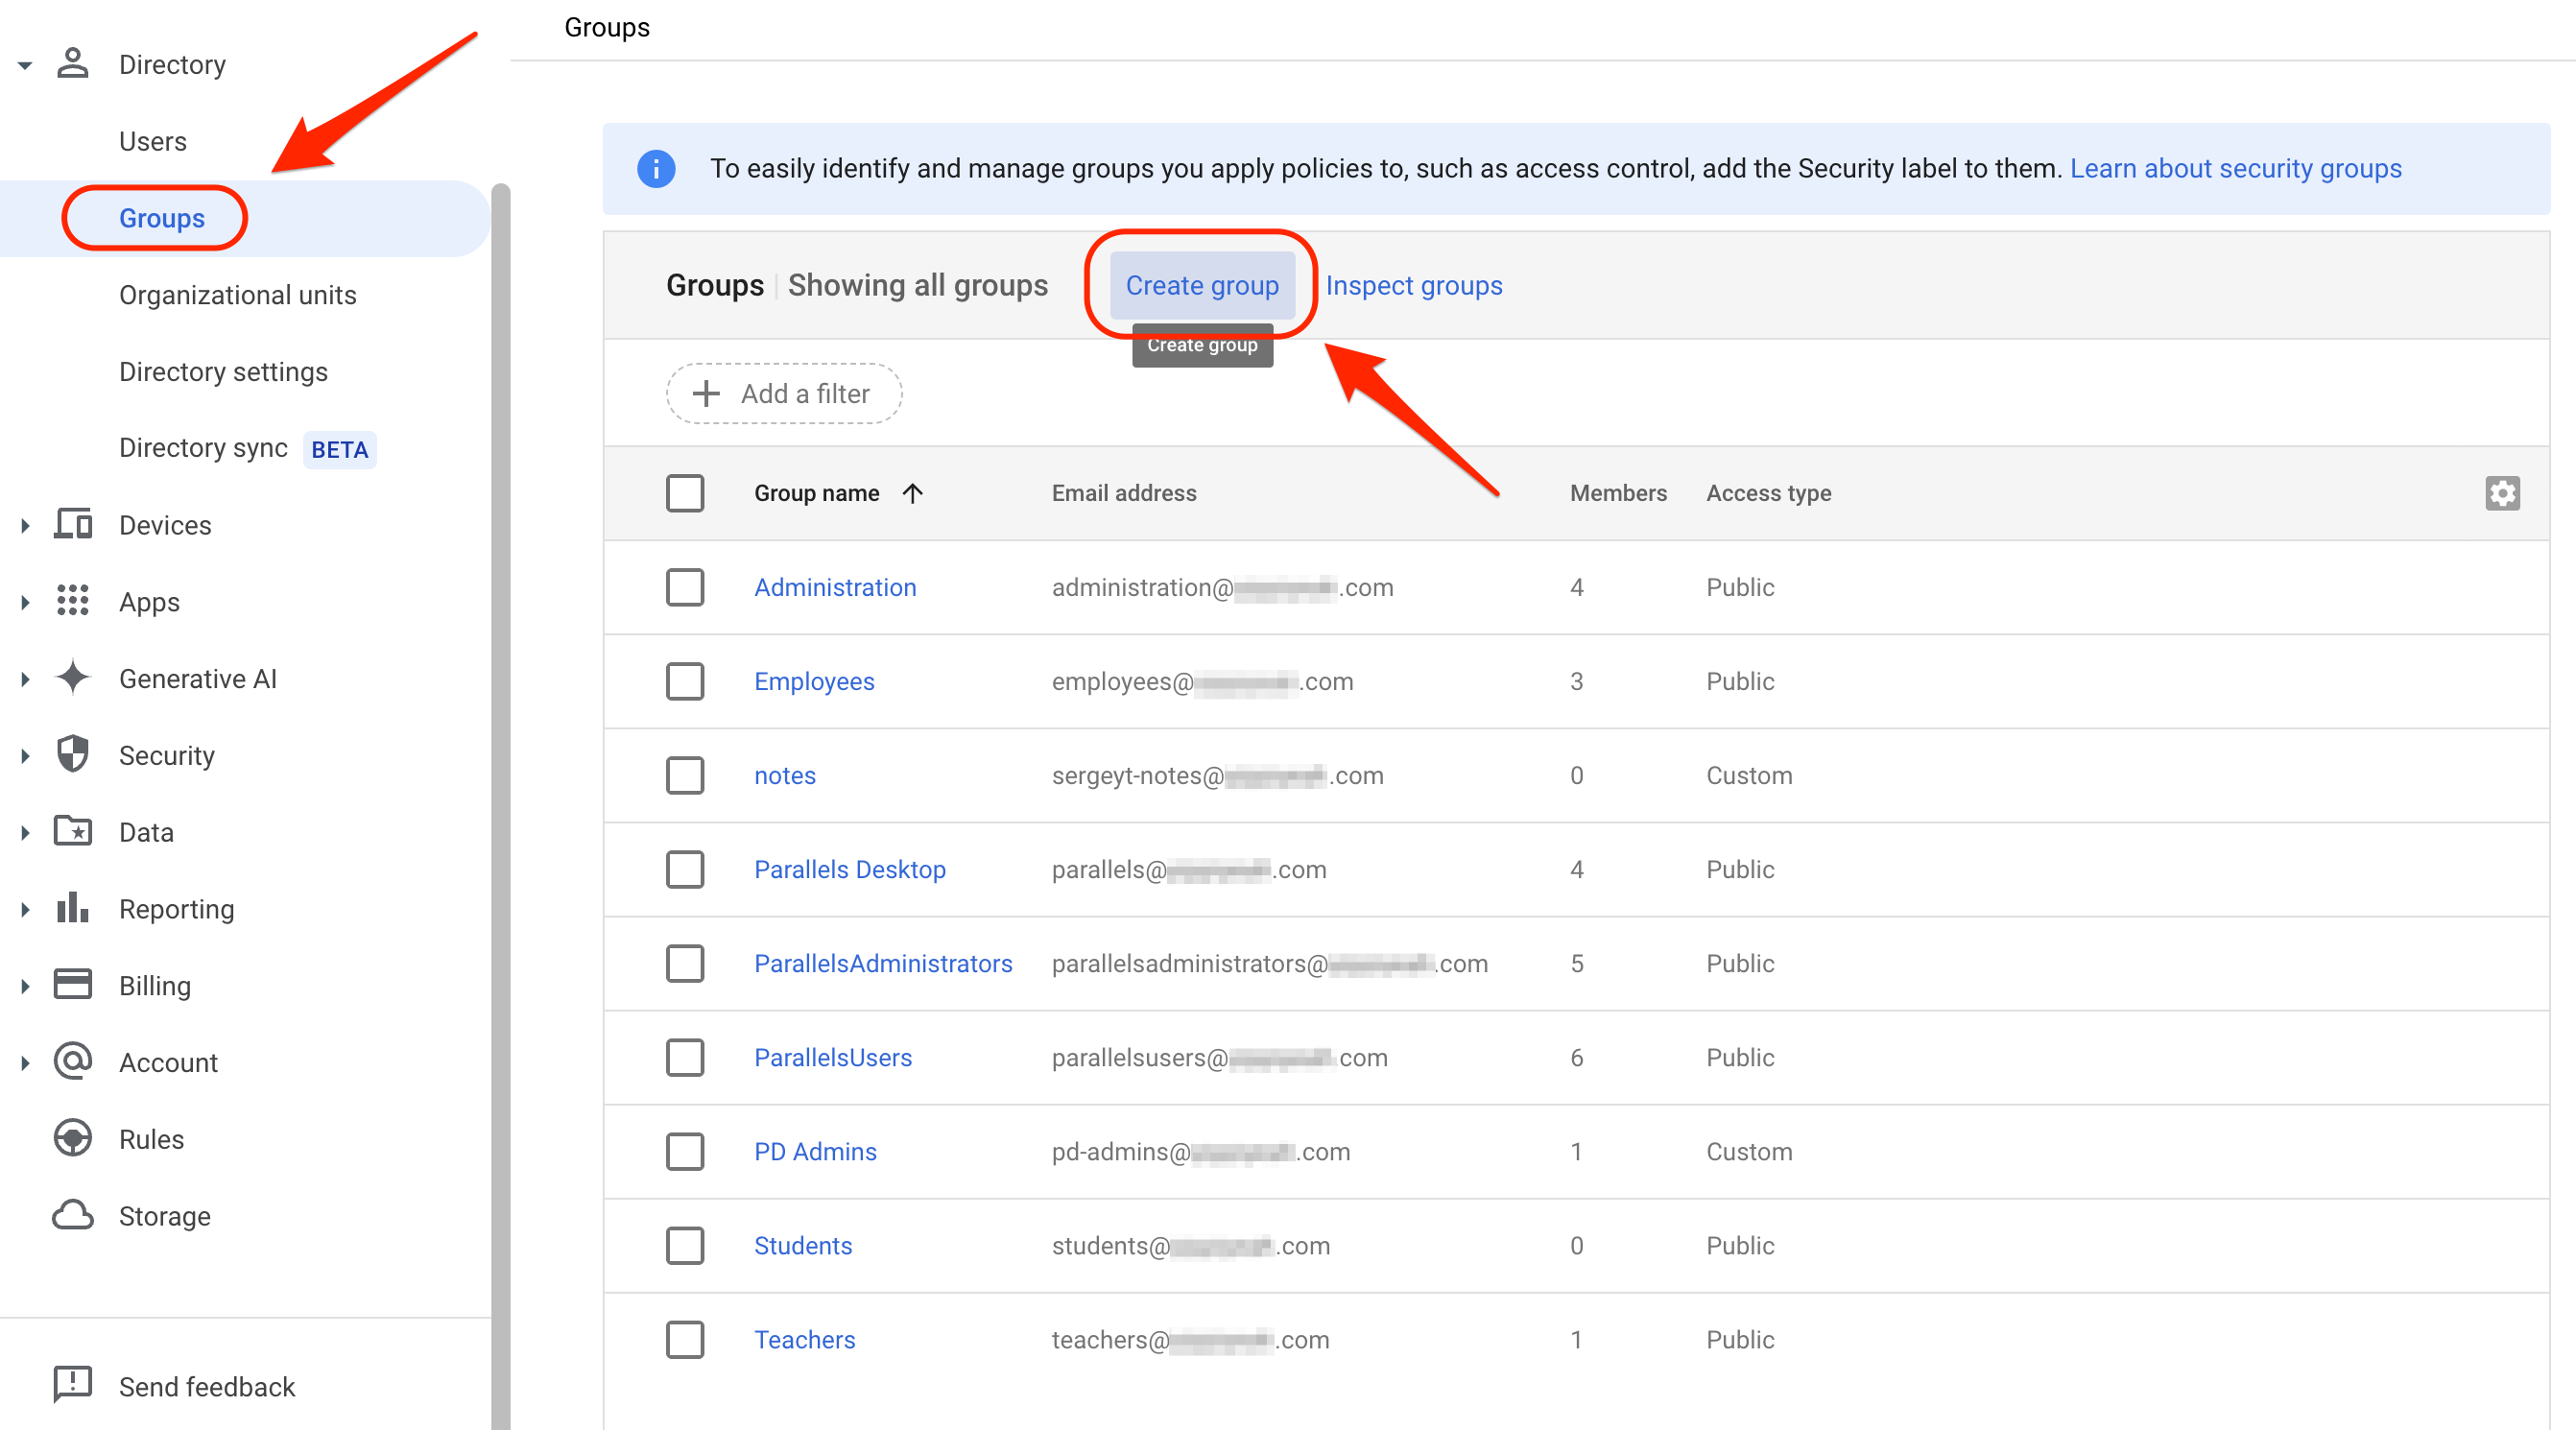
1. Launch your [Google Admin console](https://admin.google.com/) and use the left-hand side panel to expand the **Directory** section and choose **Groups**.
2. Click on **Create group** to launch the procedure of creating a group.
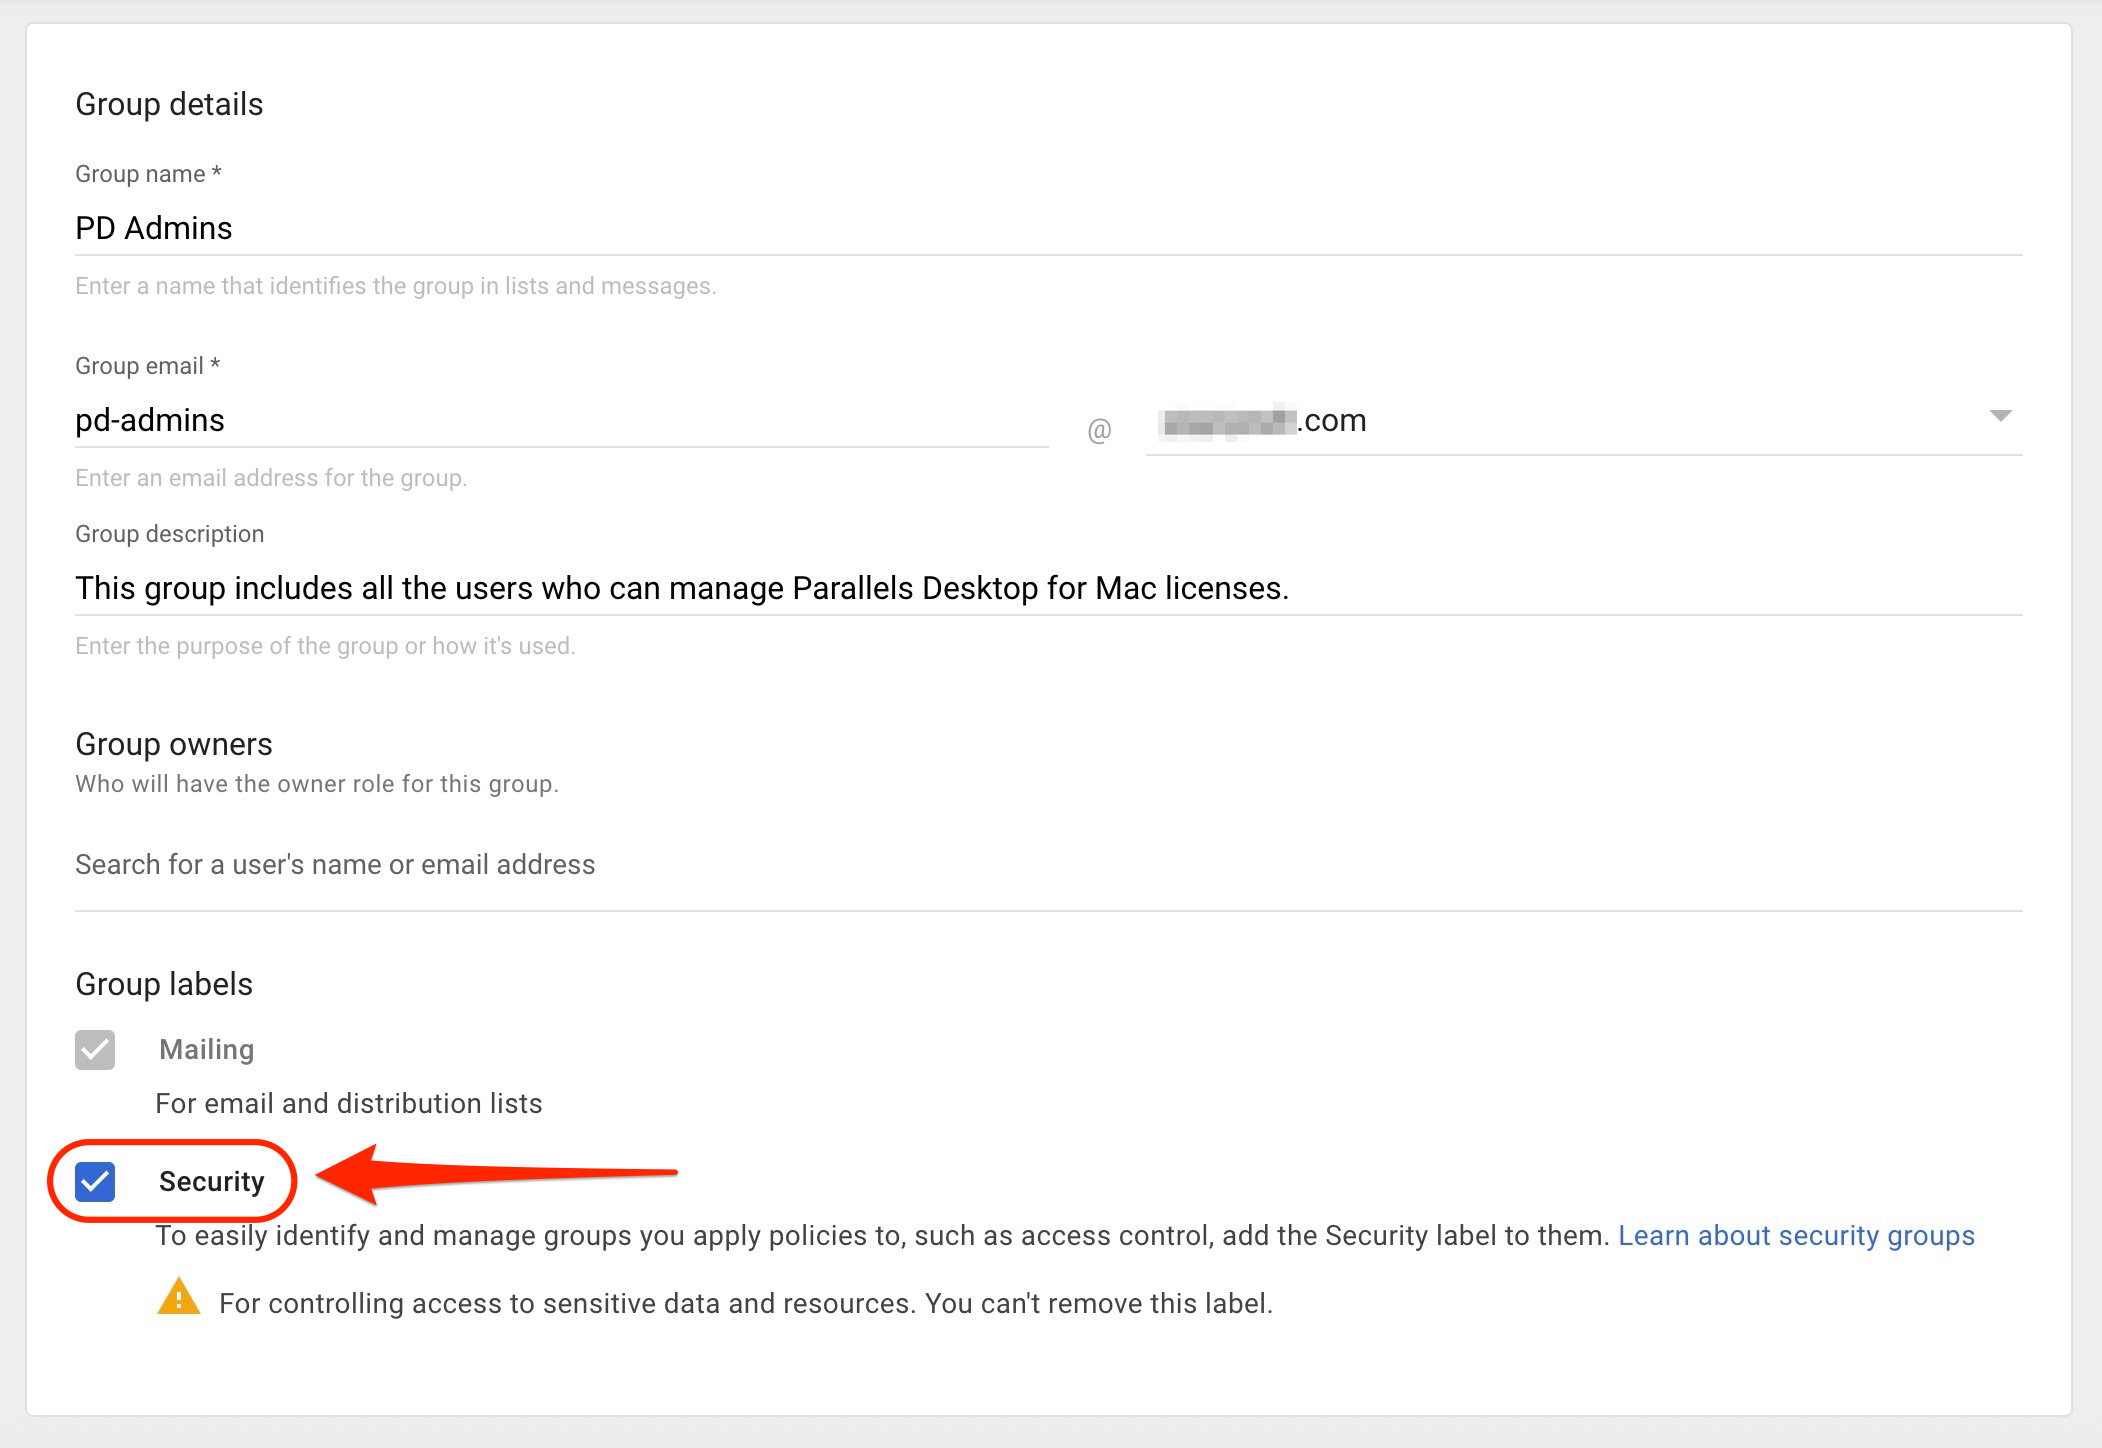
3. Fill out the required details, make sure to activate the **Security** label, and click **Next**.
4. On the next page, select the security settings as you see fit and click Create Group to finish the process.
5. Choose **Add members** at the next step and populate the group.\
\
**Note**: Remember that anyone who needs to activate Parallels Desktop for Mac with their Google Workspace login must be included in the main Parallels Desktop users group, even if they are already included in the group for business account administrators.
6. Remember to repeat the process to create at least two groups, one for users with business account privileges in Parallels My Account (enabling them to manage issuing license seat quotas, etc.) and at least one for the users who need to activate Parallels Desktop for Mac on their computers.
The below process describes setting up a new Enterprise Application for Google Workspace:
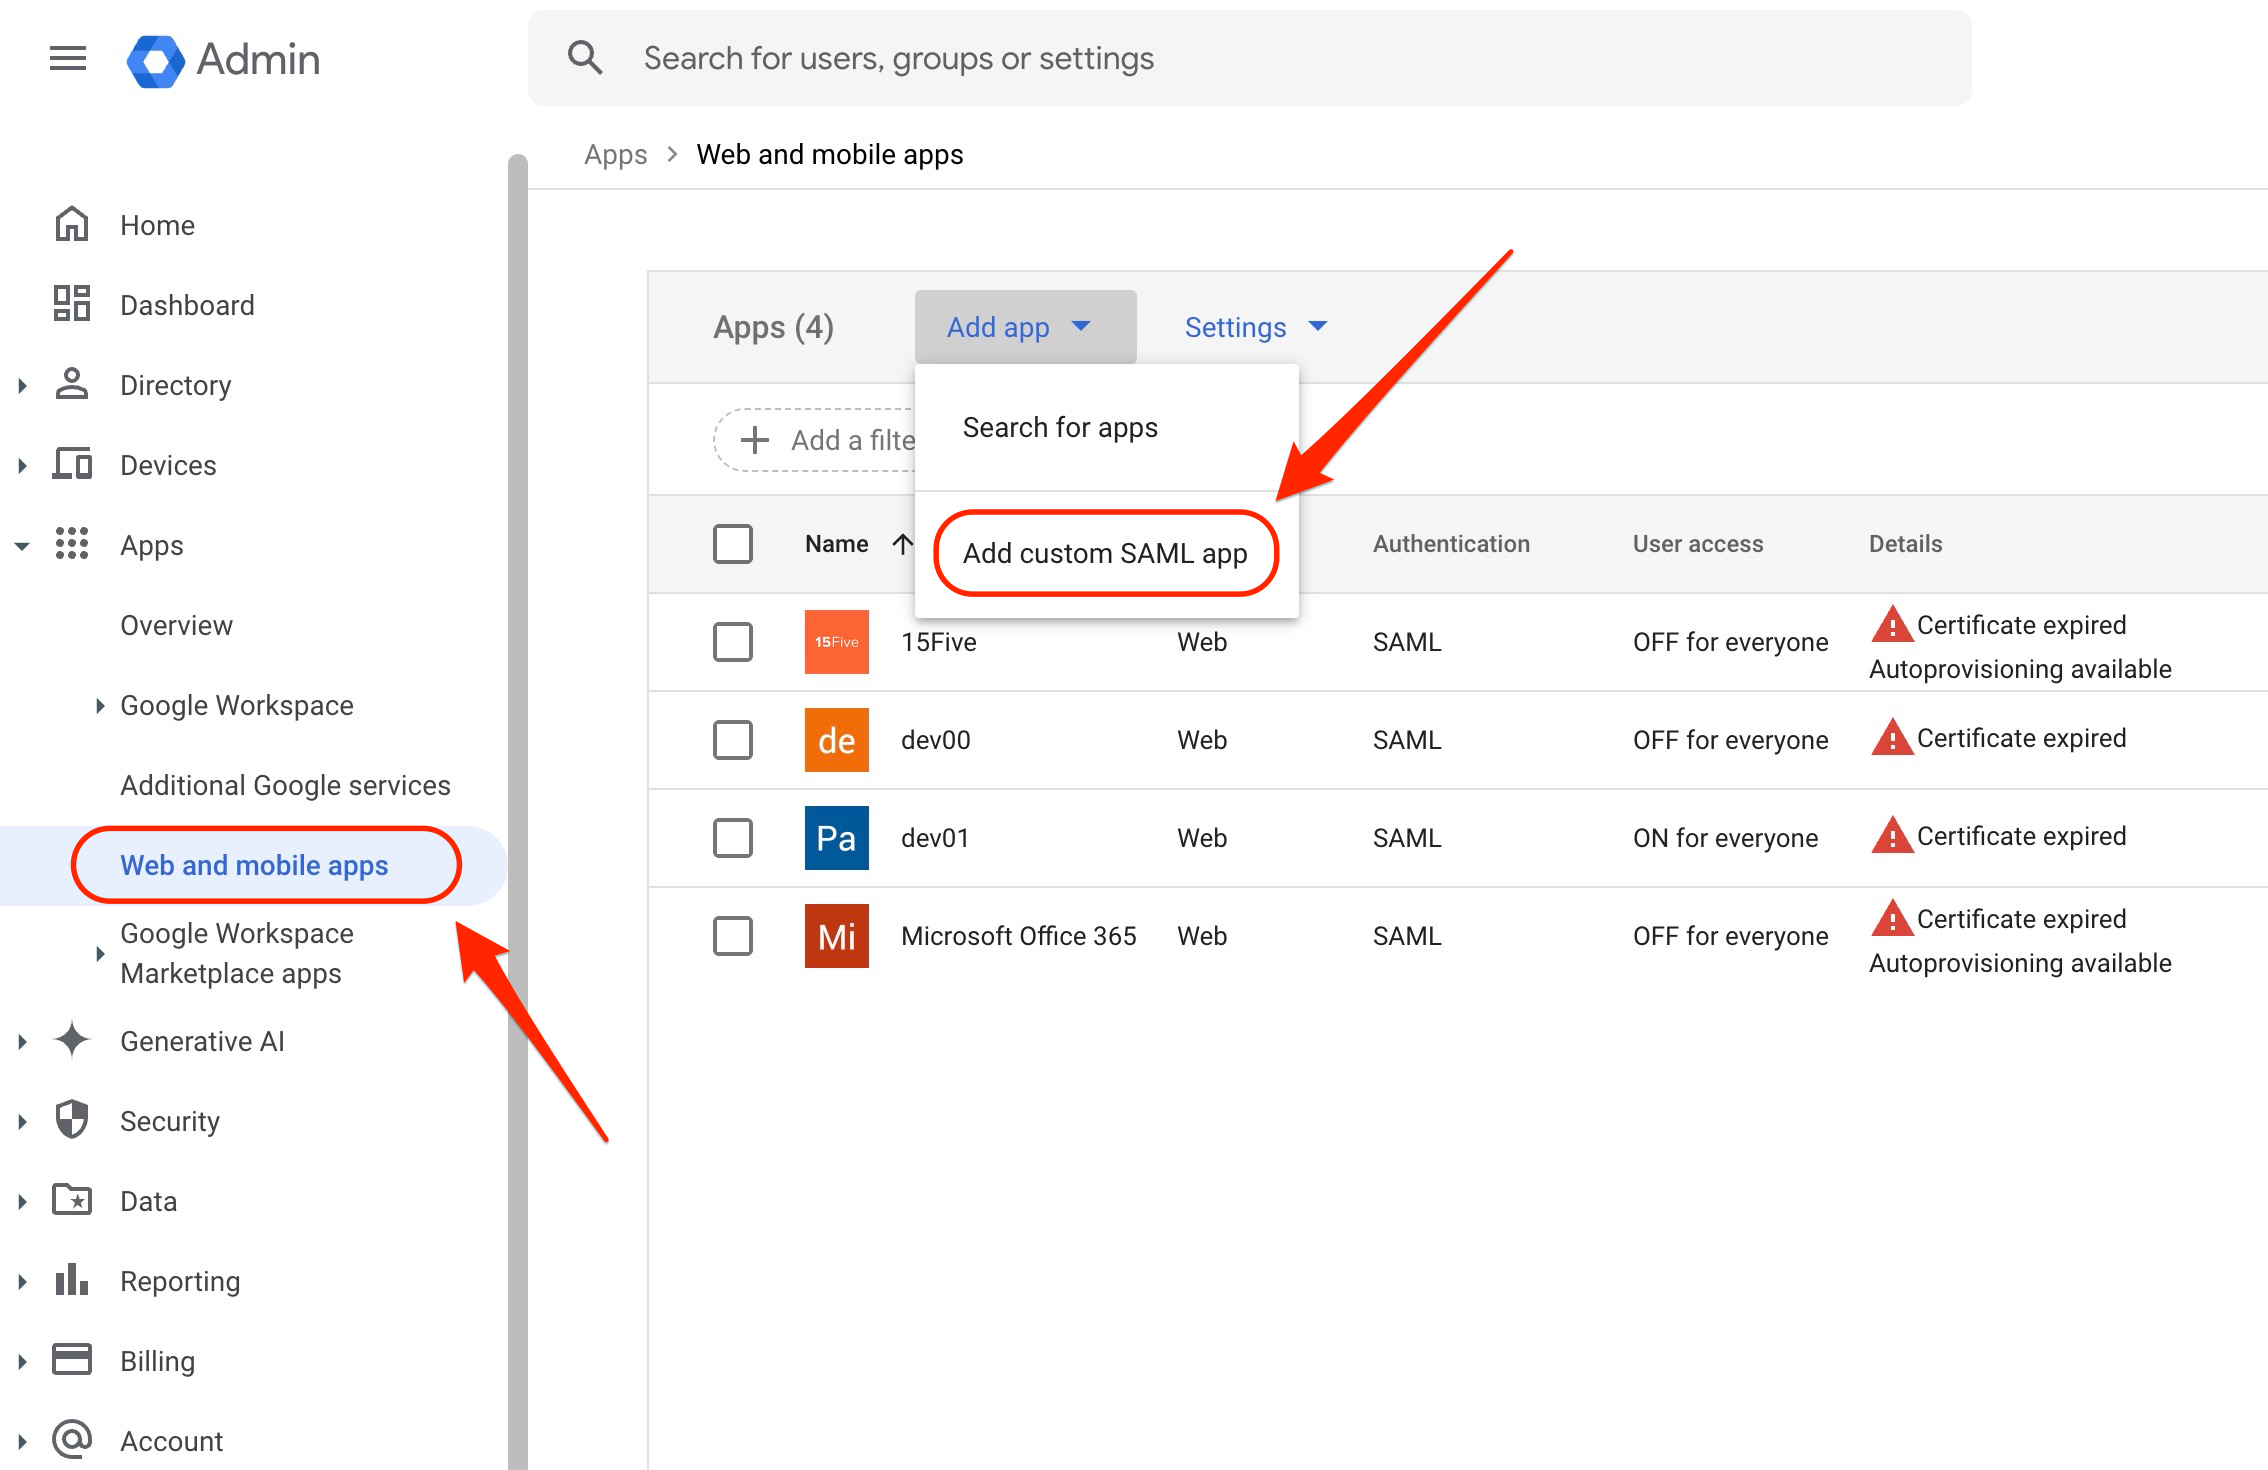
1. Launch your [Google Admin console](https://admin.google.com/) and use the left-hand side panel to expand the **Apps** section and choose **Web and mobile apps**.
2. Open the **Add app** drop-down menu and choose the **Add custom SAML app** option.
3. Fill out the name and description for the Parallels app.
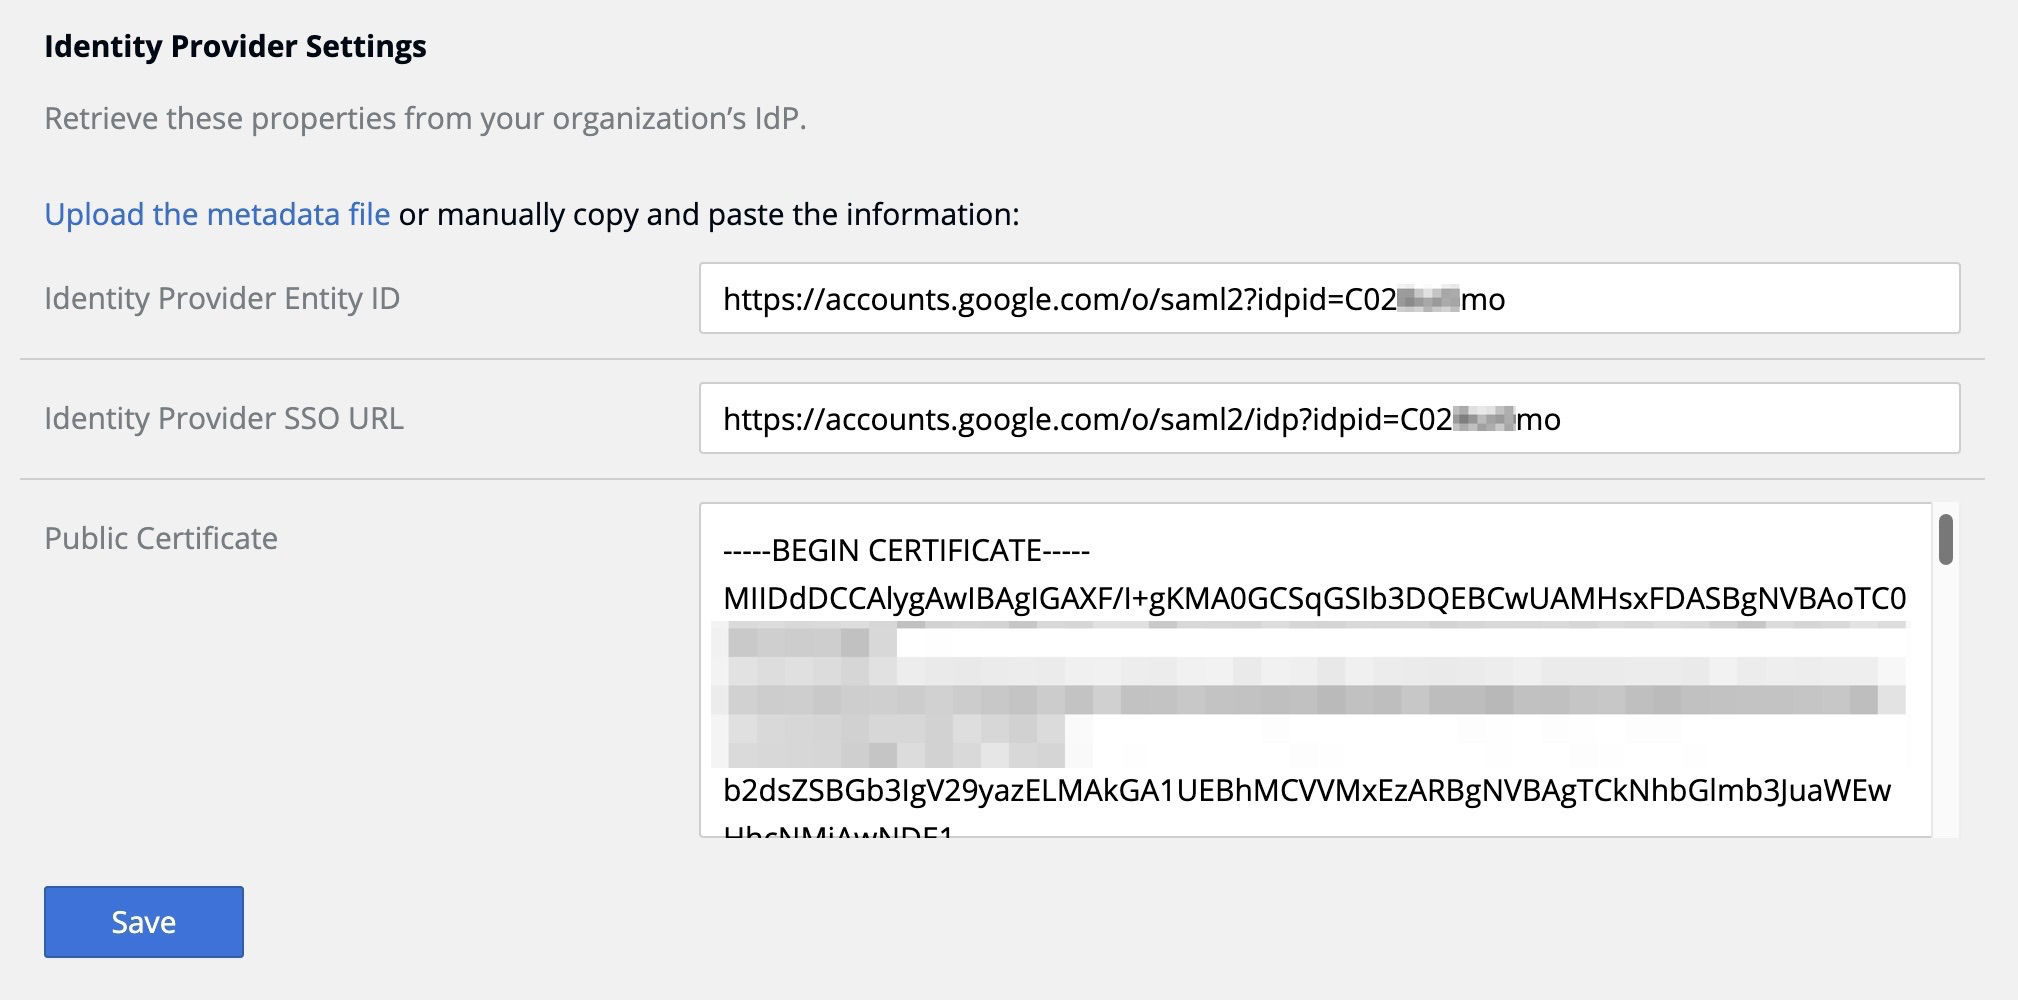
4. In the next step, copy the presented values from Google Workspace to **Step (4) Configure SAML Integration** section of the Parallels [My Account SSO setup](https://my.parallels.com/profile/business/idp_integration) page the following way:
* **SSO URL** (Google Workspace) -> **Identity Provider SSO URL** (Parallels My Account)
* **Entity ID** (Google Workspace) -> **Identity Provider Entity ID** (Parallels My Account)
* **Certificate** (Google Workspace) -> **Public Certificate** (Parallels My Account).
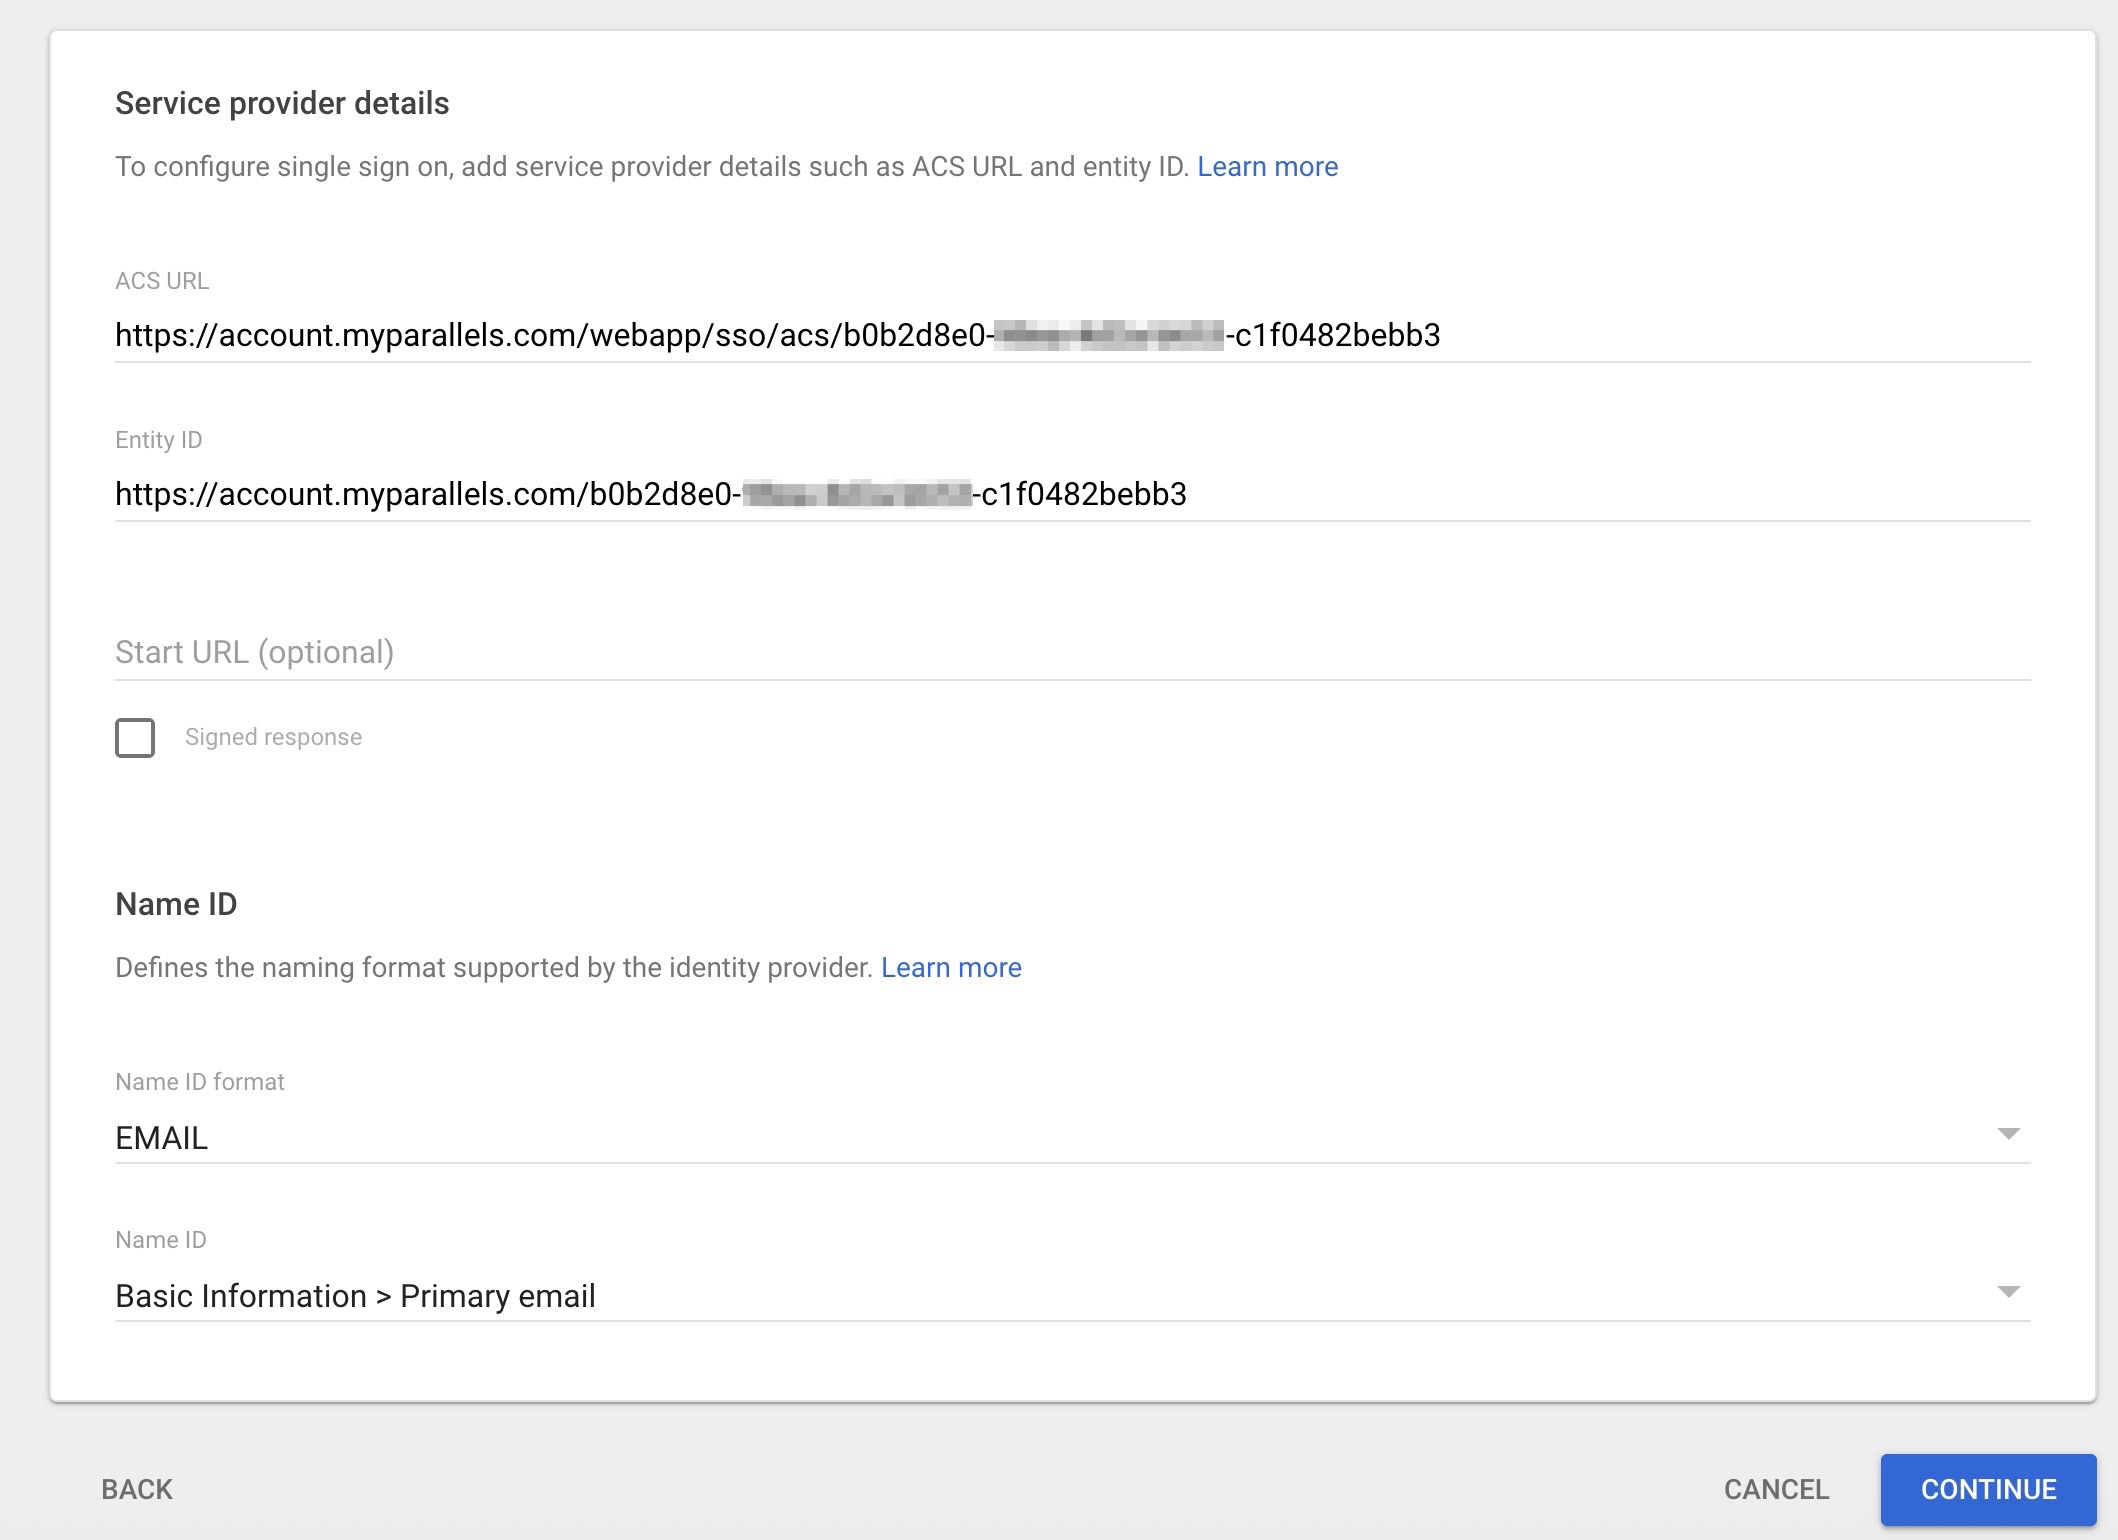
5. At the next step, **Service Provider Details**, use the values from the **Step (4) Configure SAML Integration** section of the Parallels [My Account SSO setup](https://my.parallels.com/profile/business/idp_integration) page to copy the following parameters:
* **Assertion Consumer Service URL** (Parallels My Account) -> **ACS URL** (Google Workspace)
* **Service Provider Entity ID** (Parallels My Account) -> **Entity ID** (Google Workspace)
Set the remaining parameters to the following values:
* Leave the **Start URL** field blank.
* Under the **Name ID** section, set the **Name ID format** to `EMAIL`, and **Name ID** to `Basic Information > Primary email`.
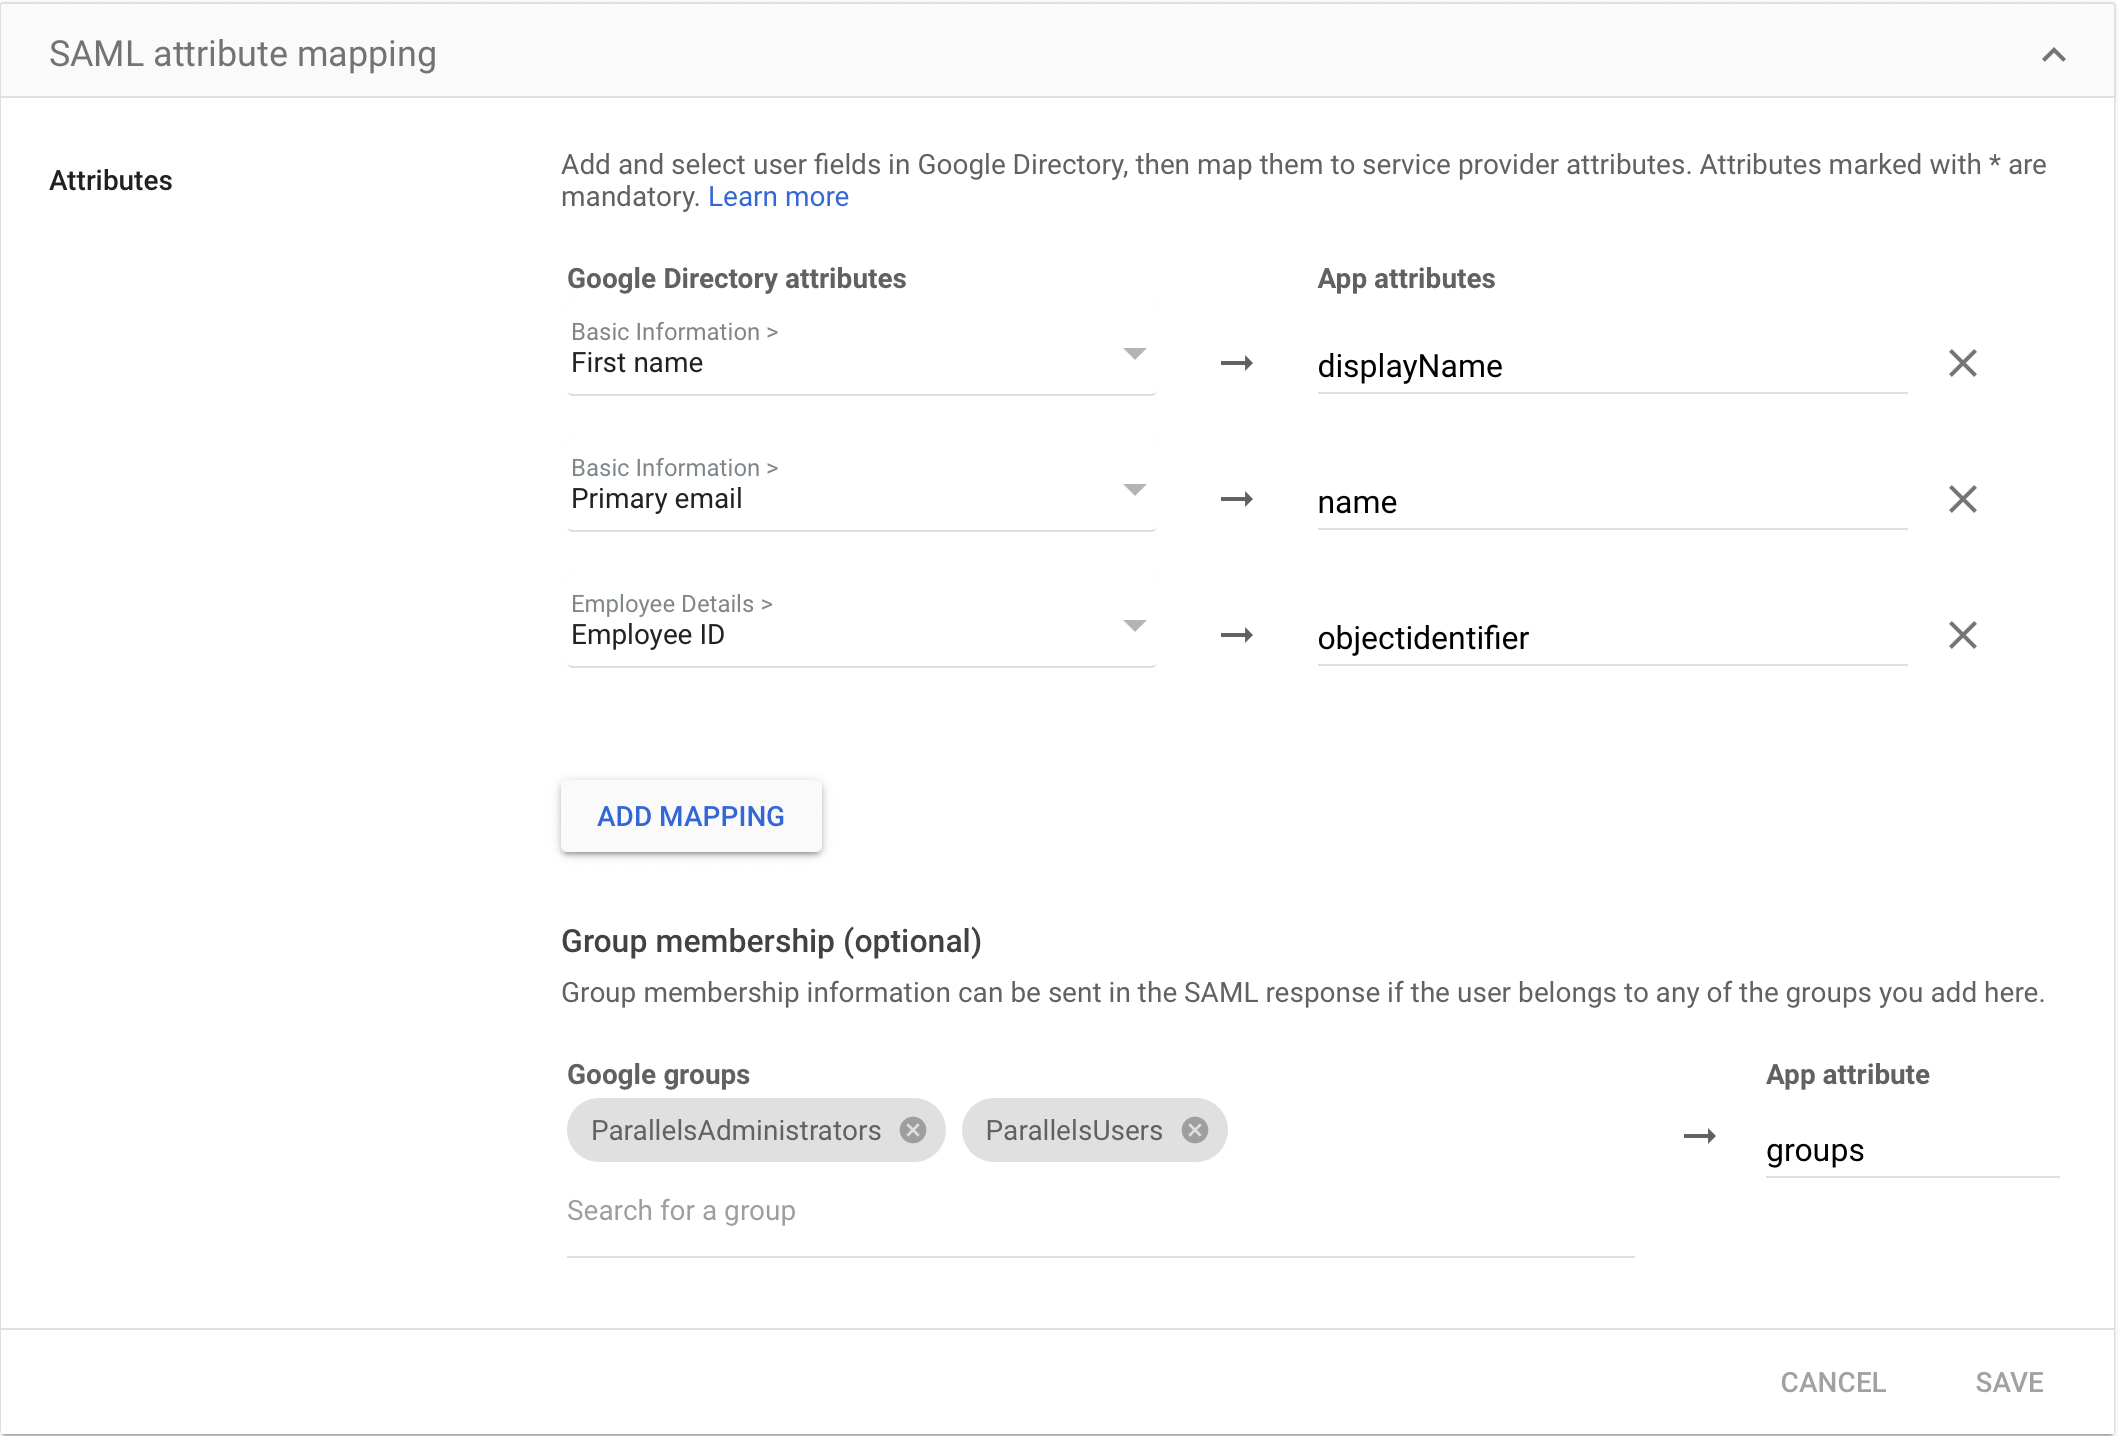
6. The next step, Attribute mapping, is very important, and you should pay close attention to setting all the parameters correctly, keeping the spelling and capitalization exactly as presented. Use the **Add Mapping** button to map the following value pairs:
* `Basic Information` > `First name` (Google Directory attribute) -> `displayName` (App attribute).
* `Basic Information` > `Primary email` (Google Directory attribute) -> `name` (App attribute).
* `Employee Details` > `Employee ID` (Google Directory attribute) -> `objectidentifier` (App attribute).
7. Under the **Group membership** section, choose the groups of Parallels My Account administrators and Parallels Desktop users created previously and map them to the app attribute `groups`.
8. Click **Finish** to complete the setup process.
9. Switch back to the SSO setup page in Parallels My Account and mark **Step (2) Register the Parallels Enterprise App** and **Step (4) Configure SAML Integration** as complete.
Proceed to the next step.
### (3) Configure User Groups Mapping
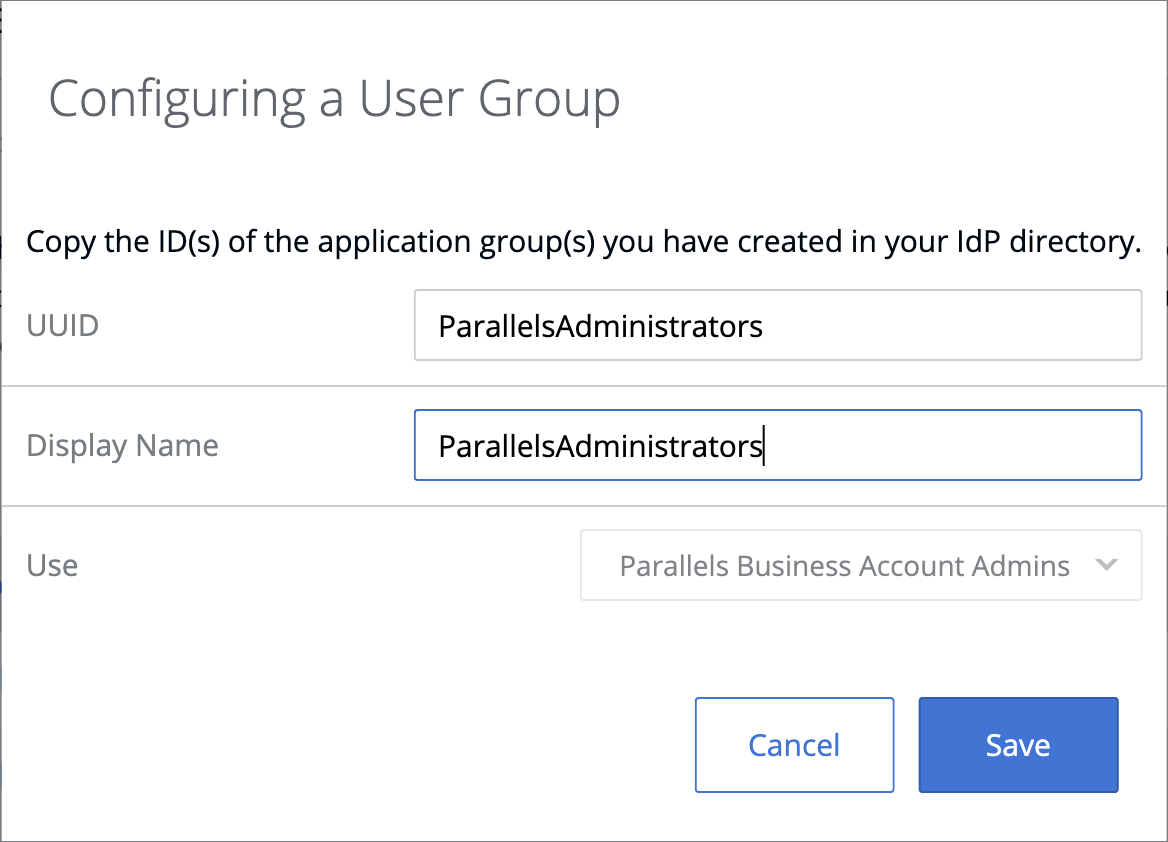
Having created the user groups in the previous step, you should add the groups' names and IDs to the respective fields **Step (3) Configure User Groups Mapping** of the [integration configurator page](https://my.parallels.com/profile/business/idp_integration) in Parallels My Account.
Take the following steps.
1. Launch your [Google Admin console](https://admin.google.com/) and use the left-hand side panel to expand the **Directory** section and choose **Groups**.
2. Copy the group's name to a notepad app for both the Administrators and the Users group.
3. Switch to the Parallels My Account [integration page](https://my.myparallels.com/profile/business/idp_integration), expand **Step (3) Configure User Groups Mapping**, and use the **click to edit** links to copy the respective group's name into BOTH FIELDS, **UUID** and **Display Name**, for administrators, and click **Save**.
Take care to use the correct values for each group.
4. Mark **Step (3) Configure User Groups Mapping** as complete.
Once the required groups have been created in the IdP Directory and associated with the Parallels app, move on to the next step.
### (4) Configure SAML Integration
The SAML 2.0 is supposed to be configured for the Parallels enterprise application registered with Google Workspace at the time of the Parallels enterprise application registration (refer to chapter [**(2) Register Parallels enterprise app and configure SAML settings**](#id-2-create-user-groups-and-register-parallels-enterprise-app-and-configure-saml-settings) earlier in this document for more details).
Make sure to check the **Step 4** section on the [integration configurator page](https://my.parallels.com/profile/business/idp_integration) at Parallels My Account. All fields must be filled in, and the **Configuration in the IdP Directory is done** option must be enabled.
If everything is set, proceed to the next step.
### (5) Configure SCIM Integration
SCIM 2.0 integration between Parallels My Account and your Organization’s IdP allows you to keep user identity information in Parallels My Account in constant sync with the updates made to user identities in the IdP Directory.
{% hint style="warning" %}
**Warning**: At this point, Parallels does not support SCIM integration for Google Workspace.
{% endhint %}
Due to the lack of SCIM integration, the administrator will have to manually add and remove users in Parallels My Account, as well as on the Google Workspace side.
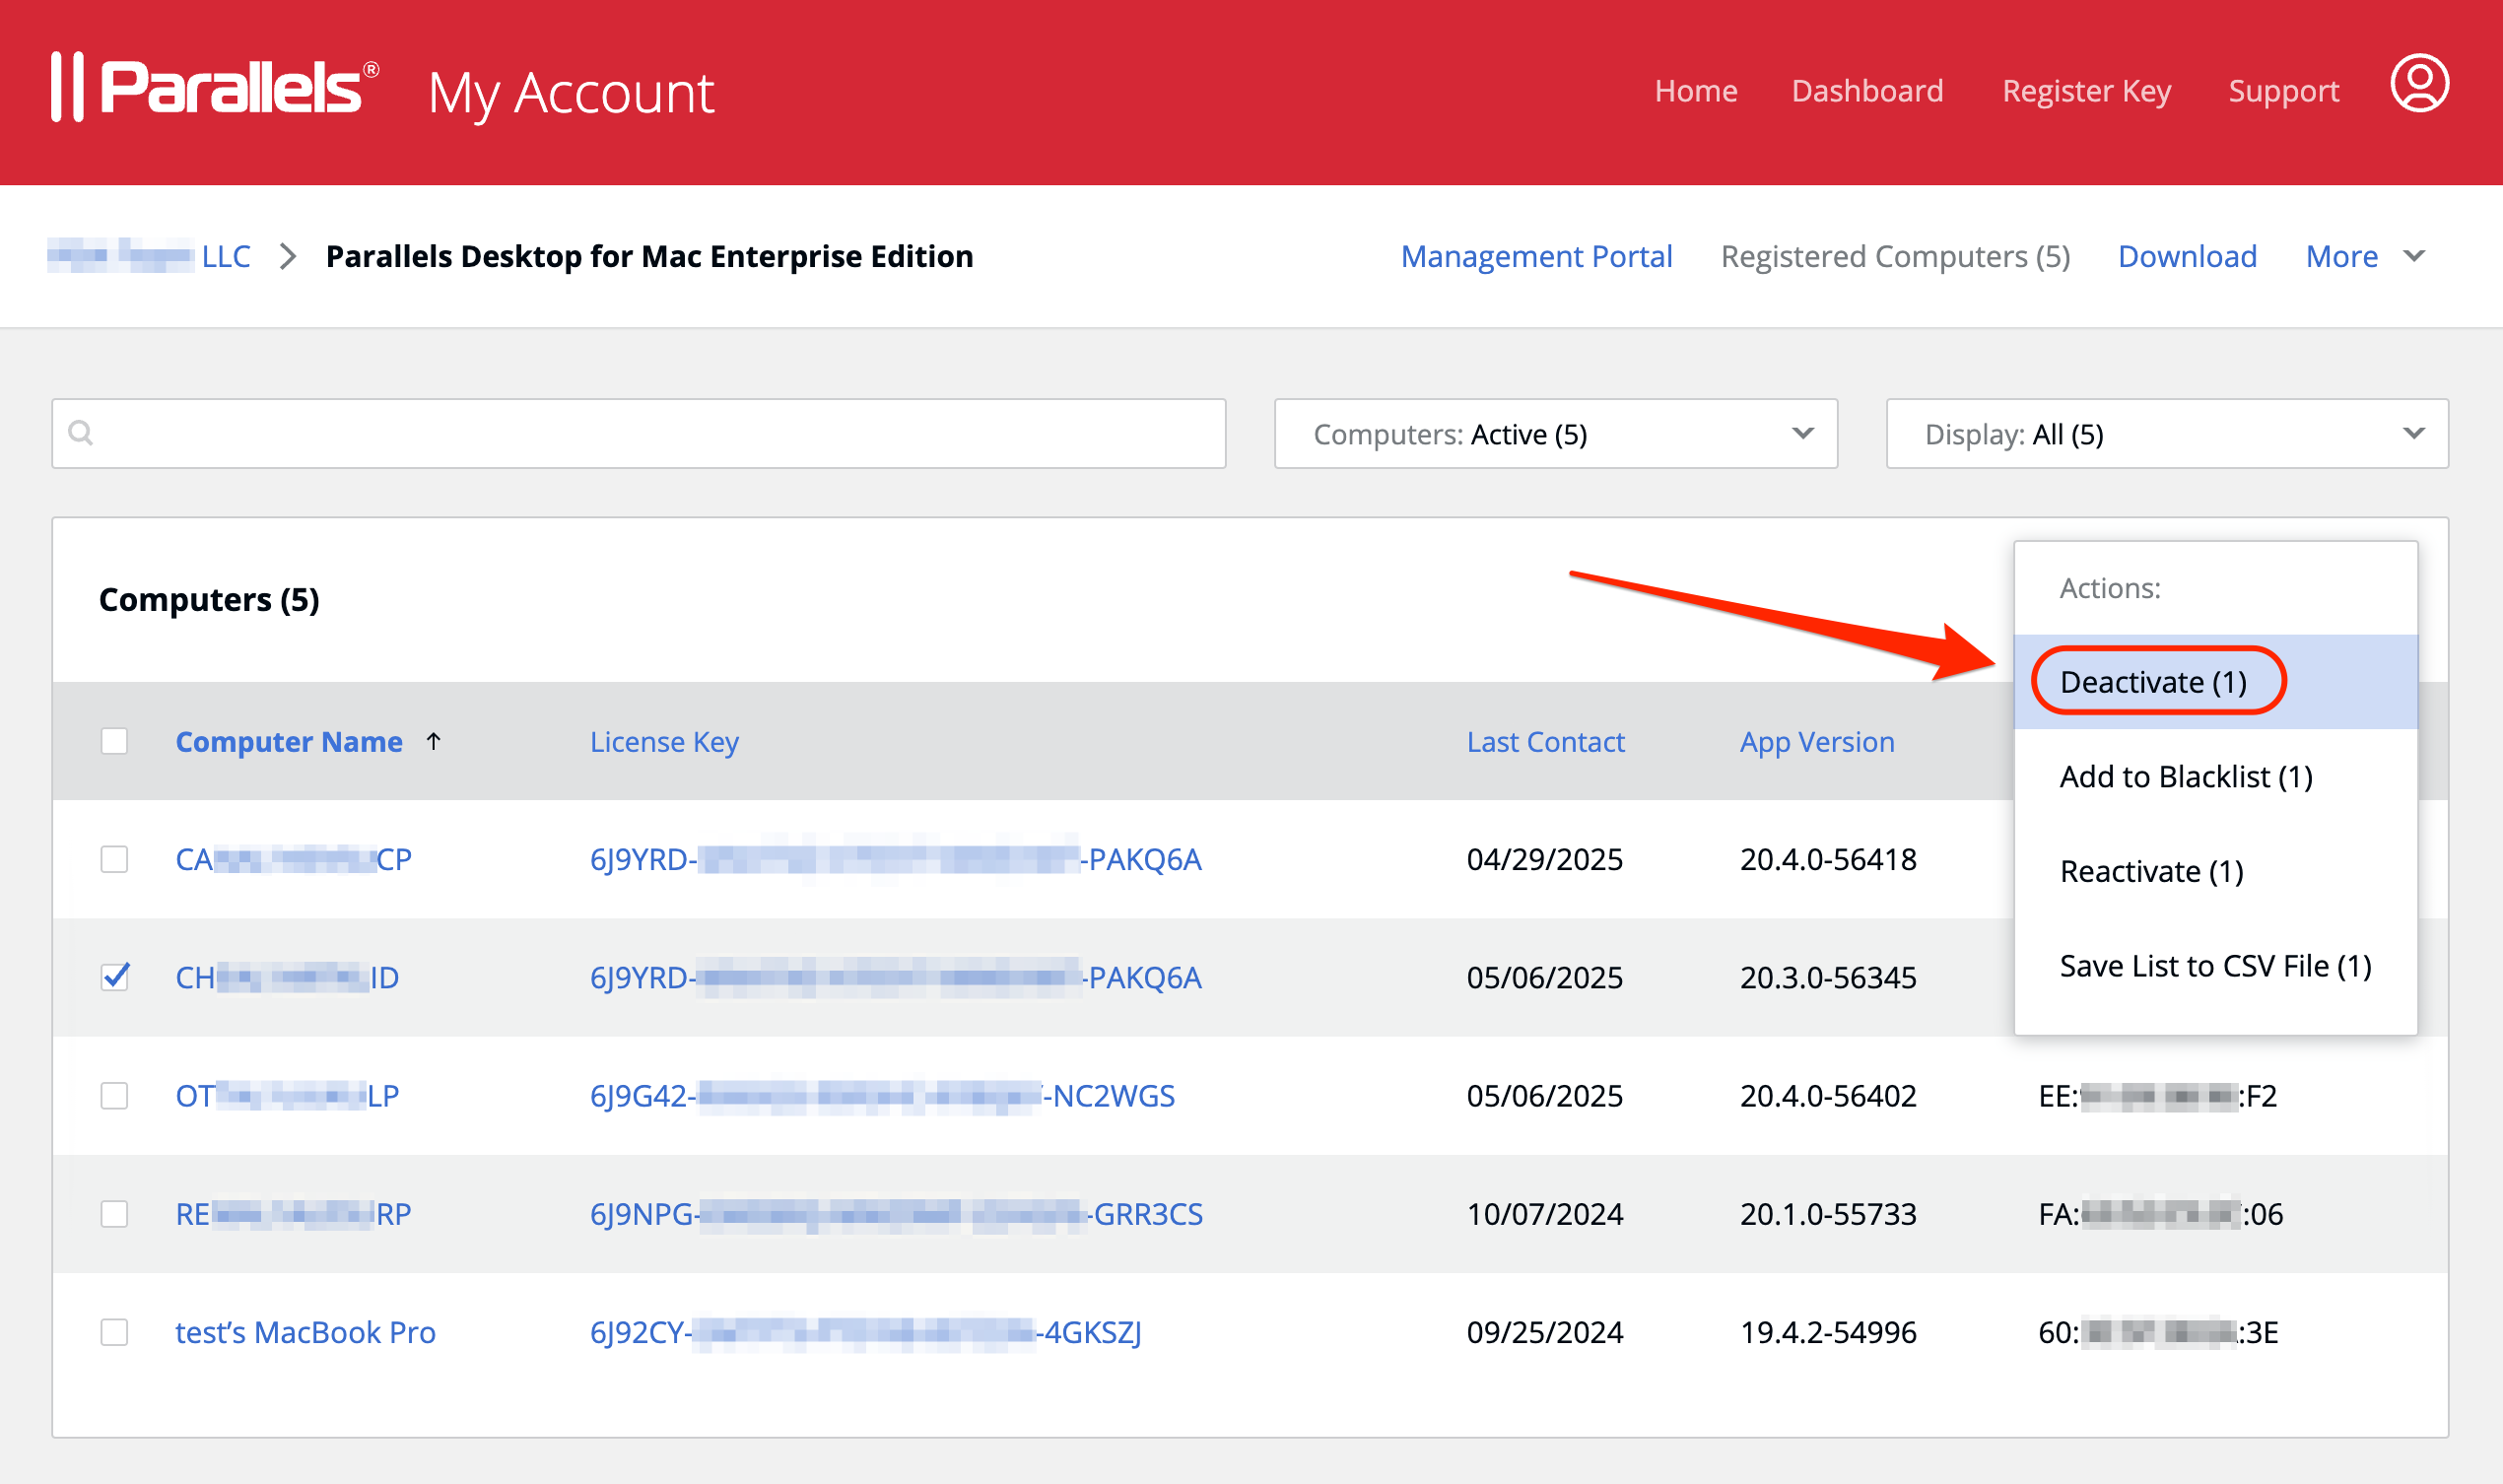
To revoke a license on the Parallels My Account side, follow these steps:
1. Open the [**Virtual Machines**](/landing/pd-ag/managing-and-monitoring-virtual-machines/virtual-machines.md) page of the [Parallels Management Portal](broken://pages/TGJTDEURG3xnSnT0id8o) and identify the machine using the following three parameters: `User name`, `Computer name`, and `Parallels Desktop state`. The latter will help you spot the machines activated using SSO.
2. Write down the computer name of the Mac where you need to revoke the license.
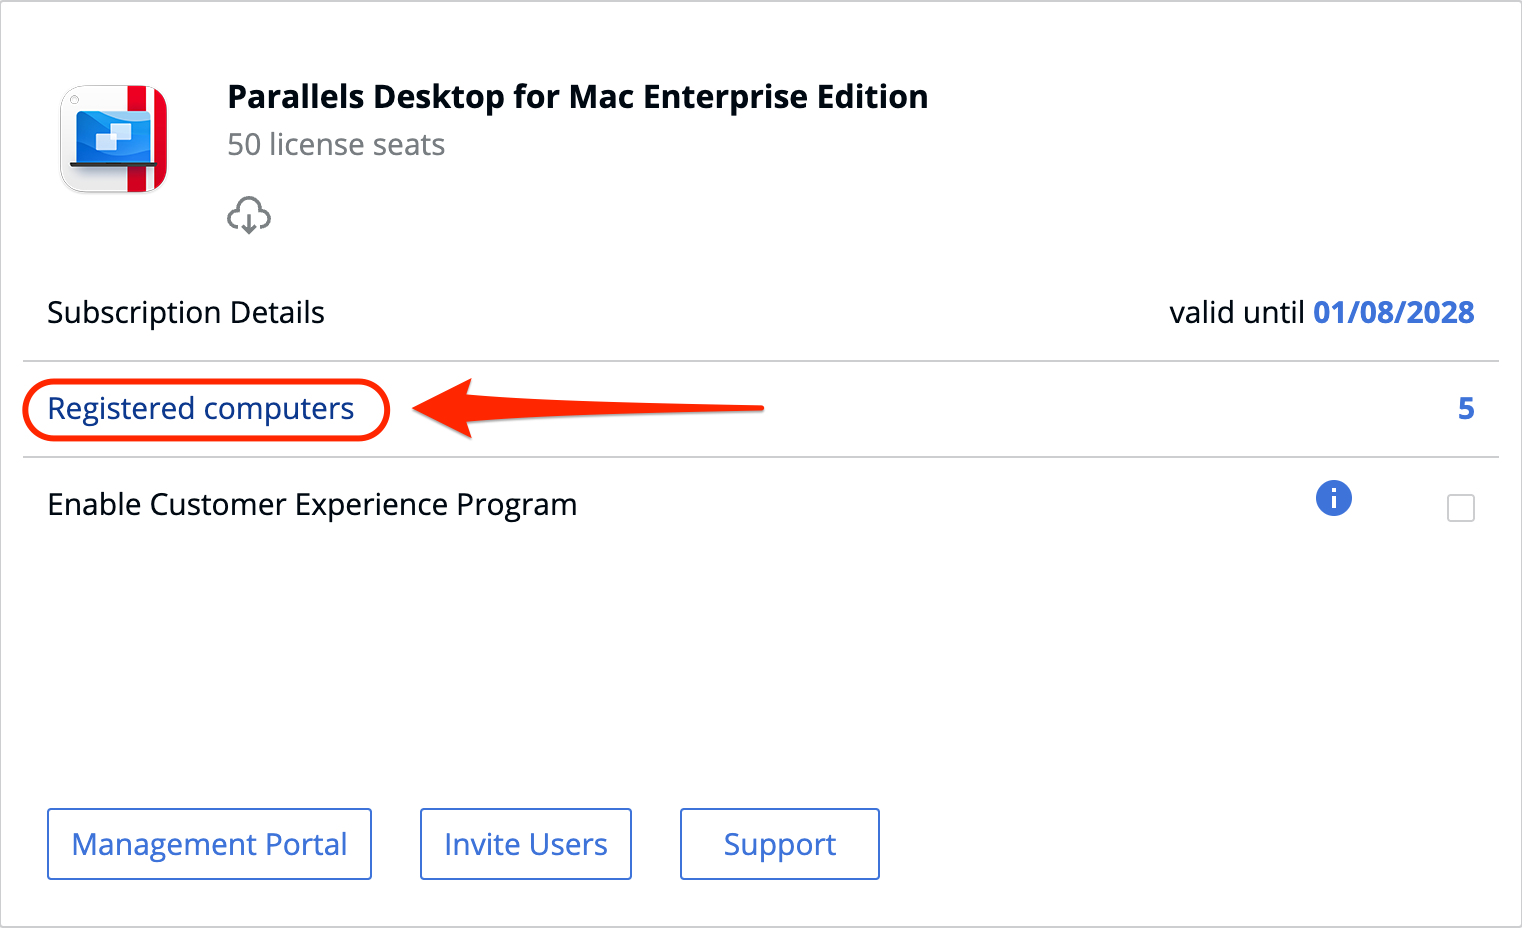
3. Open the Parallels [My Account main page](https://my.parallels.com/dashboard), select the Enterprise product card, and click on the **Registered Computers** link.
4. Select the target Mac using the checkbox on the left, and use the Actions menu in the top right corner to deactivate the license.
On the Parallels [My Account SSO setup](https://my.parallels.com/profile/business/idp_integration) page, expand **Step (5) Configure SCIM Integration** and make sure the **Enable SCIM Support** checkbox is unticked.
Continue to the next step.
### (6) Add users to the application groups
For users to be able to make use of the application to sign or activate with Parallels, they have to be created and added to the groups tied to the Enterprise Application.
If you need to add more users to the groups created in [step (2)](#id-2-create-user-groups-and-register-parallels-enterprise-app-and-configure-saml-settings), open your [Google Admin console](https://admin.google.com/) and use the left-hand side panel to expand the **Directory** section and choose **Groups**. Point your mouse at a specific group and use the **Add members** button to populate it with users as required.
Once it is done, or if you plan to add users later, switch back to the Parallels [My Account SSO setup](https://my.parallels.com/profile/business/idp_integration) page, expand **Step (6) Add Users to Application Groups**, and mark the **Configuration in the IdP Directory is complete** checkbox at the bottom of the section.
### (7) Configure backup login
The backup login can be used to access your organization’s business account registered with Parallels, bypassing Single Sign-On in the event of an SSO malfunction. By default, the backup login is set to the email address of the currently logged-in user. If you want to define a different backup login, add more users first on the Users page of the [Business Profile section](https://my.parallels.com/profile/business/users?role=All\&status=All) in Parallels My Account. The new user must log into the business account at least once before they can be designated as a backup login.
{% hint style="danger" %}
**Warning**: Once you have completed the integration process and activated the SSO functionality, only users from the Administrators group in your IdP signing in via SSO will retain access to managing the Parallels business account. All previous administrative privileges based on logins and passwords will become inactive.
Your designated backup login will continue to work.
{% endhint %}
---
# Agent Instructions
This documentation is published with GitBook. GitBook is the documentation platform designed so that both humans and AI agents can read, navigate, and reason over technical content effectively. Learn more at gitbook.com.
## Querying This Documentation
If you need additional information that is not directly available in this page, you can query the documentation dynamically by asking a question.
Perform an HTTP GET request on the current page URL with the `ask` query parameter, and the optional `goal` query parameter:
```
GET https://docs.parallels.com/landing/pd-ag/getting-started/configuring-the-single-sign-on-sso-integration-with-parallels-my-account/starting-the-integration-process-in-parallels-my-account/configuring-sso-integration-with-google-workspace.md?ask=&goal=
```
`ask` is the immediate question: it should be specific, self-contained, and written in natural language.
`goal` is optional and describes the broader end goal you are ultimately trying to accomplish on behalf of the user. GitBook uses it to tailor the answer towards what is most useful for that goal.
The response will contain a direct answer to the question and relevant excerpts and sources from the documentation.
Use this mechanism when the answer is not explicitly present in the current page, you need clarification or additional context, or you want to retrieve related documentation sections.