> For the complete documentation index, see [llms.txt](https://docs.parallels.com/landing/llms.txt). Markdown versions of documentation pages are available by appending `.md` to page URLs; this page is available as [Markdown](https://docs.parallels.com/landing/pd-ag/getting-started/configuring-the-single-sign-on-sso-integration-with-parallels-my-account/starting-the-integration-process-in-parallels-my-account/configuring-sso-integration-with-ping-identity/configuring-sso-integration-with-ping-identity.md).
# \[DEPRECATED] Configuring SSO Integration with Ping Identity
Follow the steps below one by one to integrate Parallels My Account with Ping Identity.
### (1) Configure Organization's Domains
A domain is a part of the email addresses (after the @ symbol) used by the end users in your organization. When end users try to log in to Parallels My Account using SSO, they are prompted to enter their work email address. Parallels My Account checks the domain part of the email address and recognizes that the user belongs to your organization. Click on the title of **Step 1** to expand it, and read the instructions carefully.
* Add one or more domains your organization uses.
* Each domain must be unique and can only be registered to **one** business account that your organization has registered with Parallels.
* Make sure to add only the domains your organization can control.
The Parallels My Account service verifies the domain ownership by checking a specific TXT record that must be added to the DNS host of the corresponding domain. Make sure that all domains added to the list are verified before proceeding with the next steps.
Depending on the software and/or provider, a TXT record may take up to 72 hours to propagate. You can check whether it's been configured using the following command:
```
$ dig TXT {yourdomain}.{com}
```
### (2) Register Parallels Enterprise App and Configure SAML Settings
Registering the Parallels enterprise application (required for integrating with the Parallels My Account service) in the IdP Directory allows you to configure the SSO-related parameters and correctly provision the integration between your IdP and the Parallels My Account service.
The description below illustrates the registration procedure for Ping Identity. It is assumed that you have the permissions required to register and configure enterprise applications with Ping Identity. To register a Parallels enterprise application with Ping Identity:
1. Log into Ping Identity [here](https://www.pingidentity.com/en/account/sign-on.html) using an account that has privileges for registering and configuring enterprise applications for your organization.
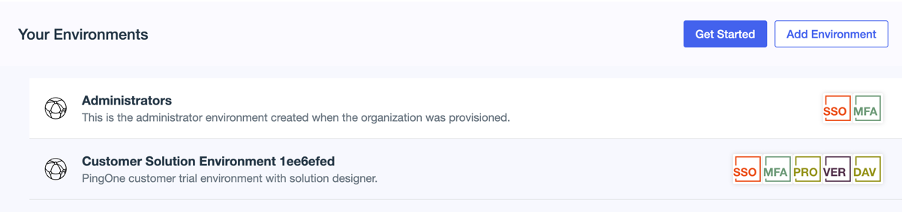
2. On the **Start** page, choose the **Administrators** environment to open the Ping Identity console page.
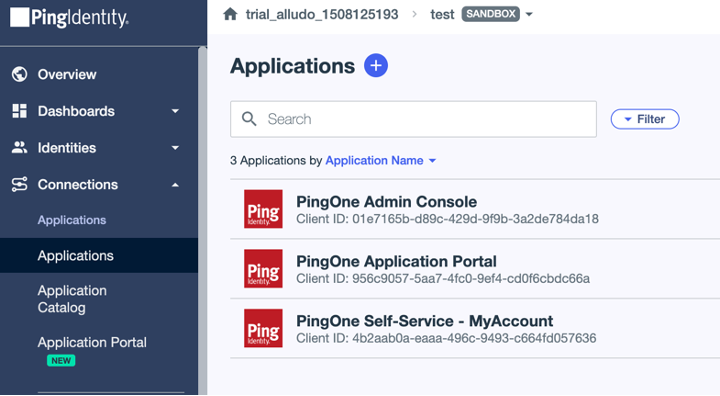
3. To register the Parallels enterprise application in Ping Identity, navigate to the **Connections** tab on the sidebar, click on the **Applications** link, and click on the **+** button.
4. Type the name of the application (the actual name remains at your discretion), add a short description, choose the **SAML Application** option, click **Configure**, and wait while the enterprise application is being created. You will end up on the **SAML Configuration** page.
5. Switch to your **IdP integration** page in My Account, scroll down to, and expand **Step 4** ("`Configure SAML integration`"). Under **Service Provider Settings**, click on **Download a metadata file** link to download a `metadata.xml` file.
6. Return to the **SAML Configuration** page, check **Import metadata**, and click **Select a file** to upload your downloaded `metadata.xml` file. Click **Save**.
Once the registration of the Parallels enterprise application in the IdP Directory is completed, switch back to the [integration configurator page](https://my.parallels.com/profile/business/idp_integration) at Parallels My Account, expand the section of **Step 2** and select the **Configuration in the IdP Directory is done** option at the bottom of the section. Then move on to the next step.
### (3) Configure User Groups Mapping
You must create user groups associated with the Parallels enterprise application in your IdP Directory. Later, you will add users to those groups to let Parallels My Account know which users should be able to activate their copies of Parallels Desktop for Mac Enterprise Edition via Single Sign-On (SSO) and which should have business account admin privileges in the Parallels ecosystem.
At least one user group is required for adding users with admin access to your organization’s business account registered with Parallels. Once the group is created, you should add the group's name and ID in **Step 3** of the integration configurator page in Parallels My Account.
Start with creating the group in the IdP Directory. To do so, switch to your IdP management portal and follow the standard procedure of creating a user group and associating it with the Parallels enterprise application, as provided by your Organization’s IdP. The description below illustrates the registration procedure for Ping Identity. It is assumed that you have appropriate permissions that allow you to manage user groups in Ping Identity. If your organization uses a different IdP service, follow the instructions provided in the admin guide specific to your IdP of choice.
To create a user group for the Parallels enterprise application in Ping Identity:
1. Log into the Ping Identity portal using the account which has privileges for managing user groups and configuring enterprise applications.
2. On the **Start** page choose **Administrator environment** (or any other environment what you could create before) to open the Ping Identity console page.
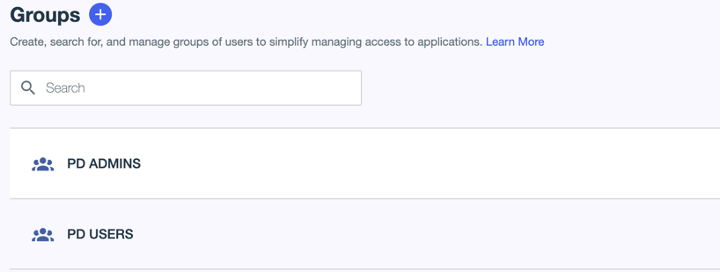
3. Navigate to **Identities** and switch to the **Groups** tab.
4. You need to create two groups, one for the users who are supposed to be granted the admin permissions to access your organization’s business account registered with Parallels, and another for the regular Parallels Desktop users who are expected to sign into their copies of Parallels products via SSO.
5. Click the **+** icon to launch the group creation wizard, and type in the group name and description.\
\
Click **Save** and wait while the group is being created.
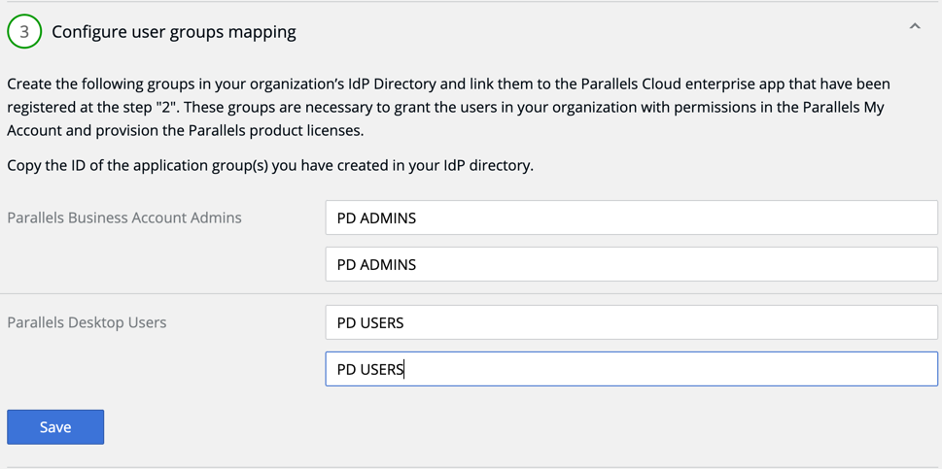
6. Copy the name of the group that you have specified to Parallels My Account. To do so, switch back to the [integration configuration page](https://my.parallels.com/profile/business/idp_integration) at Parallels My Account, expand the **Step 3** section, paste the name of the group in both corresponding input fields of the section **Parallels Business Account Admins**, and click **Save**.
{% hint style="info" %}
**Note**: Please make sure that the respective group names on the IdP side and the Parallels MyAccount side match precisely. This will help you avoid potential problems as some IdPs use group names in their identification and authorization processes.
{% endhint %}
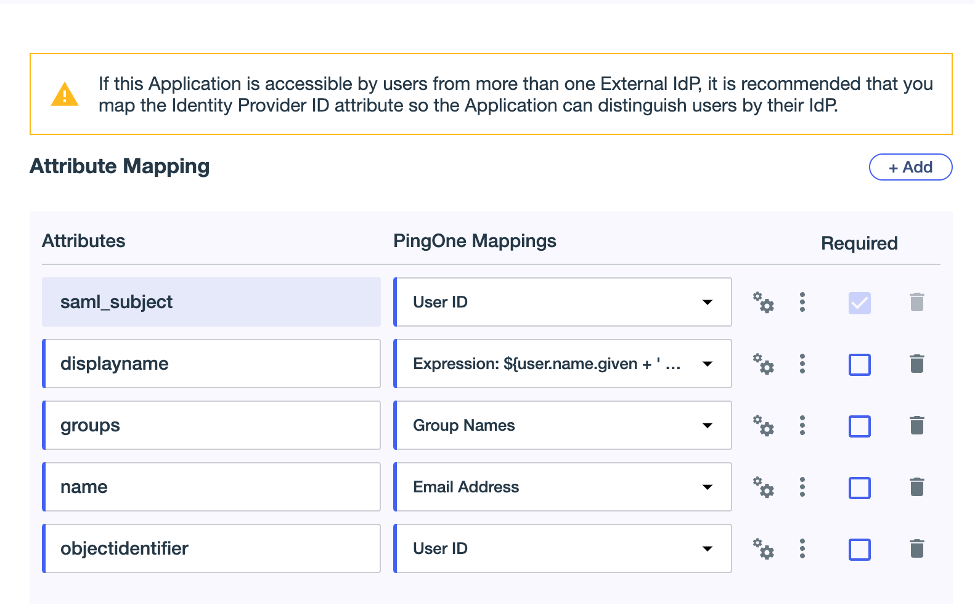
Once the group is created, it’s necessary to configure attribute mapping. To do so, navigate to the Application tab and click on the application that has been created in the previous step [**(2) Register Parallels enterprise app**](#id-2-register-parallels-enterprise-app-and-configure-saml-settings). Open the **Attribute Mappings** tab and add four more mapping attributes which will associate the PingOne user attributes to the SAML attributes in the application. Add the attributes as follows:
`displayname` -> `Expression: {user.name.given + ' ' + user.name.family}`
`groups` -> `Group Names`
`name` -> `Email Address`
`objectidentifier` -> `User ID`
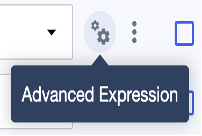
To add **displayname** value please click on the icon labelled **Advanced expression**.
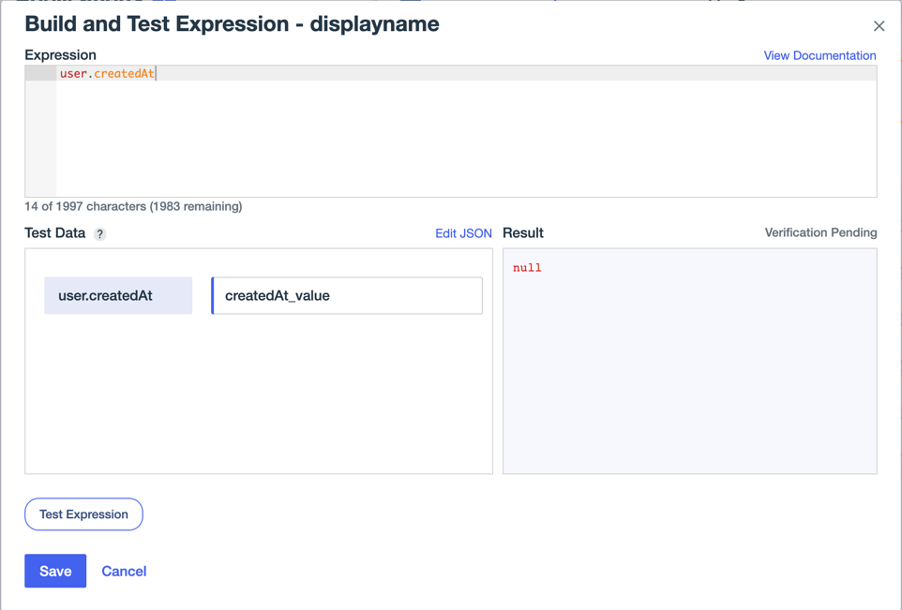
There, you’ll see the following window:
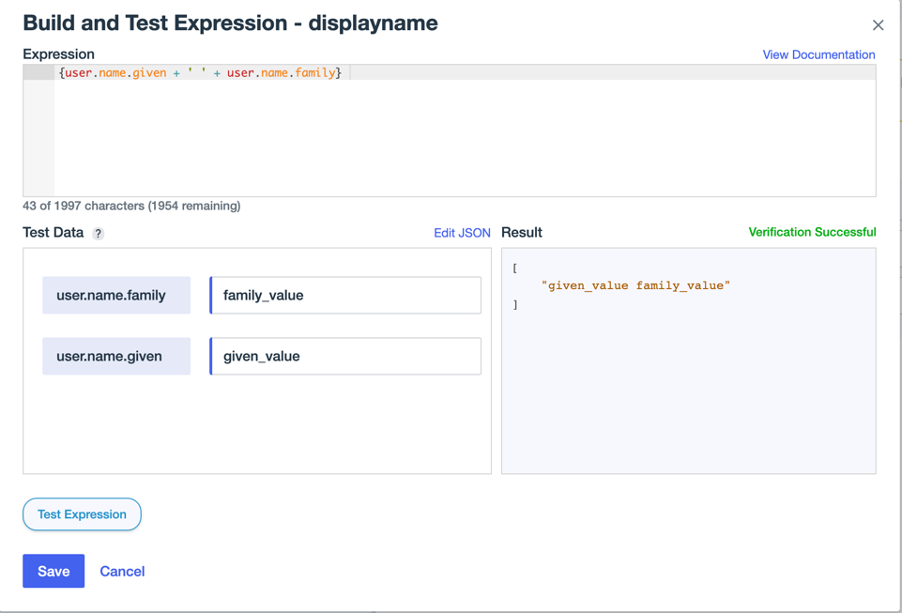
Under **Expression**, delete the current expression and add the following: `{user.name.given + ' ' + user.name.family}`
Click the **Test Expression** button. Expect the **Verification Successful** note, as depicted below in green. Click **Save**.
At this point, you should be able to see the following table:
Please note that the fields are case-sensitive.
Make sure you have configured both groups: for the Parallels Desktop users and for the Parallels business account admins. If everything is set, click **Save** at the bottom and proceed to the next step.
### (4) Configure SAML Integration
SAML 2.0 integration between Parallels My Account and your organization’s IdP allows your organization's users to activate their copies of Parallels Desktop for Mac Enterprise Edition using Single Sign-On (SSO) while your admins can use it to log into the business account registered with Parallels using their main corporate login credentials.
To complete this step, you must copy some parameters from your Parallels My Account to the settings section of the Parallels enterprise application registered in the IdP Directory and then copy certain data provided in the IdP Directory to the Parallels My Account admin panel.
The following description illustrates the procedure for Ping Identity. It is assumed that you have appropriate permissions that allow you to configure enterprise applications in Ping Identity. If your organization uses a different IdP service, follow the instructions provided in the chapter specific to your IdP of choice.
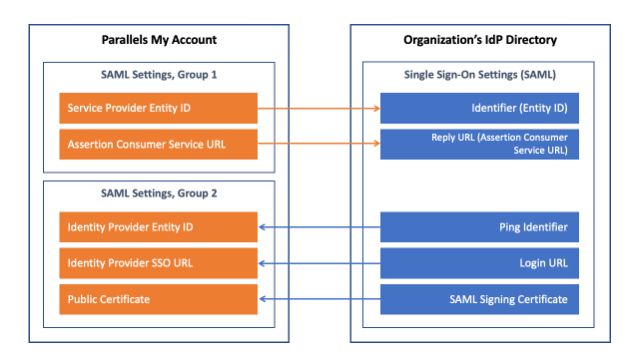
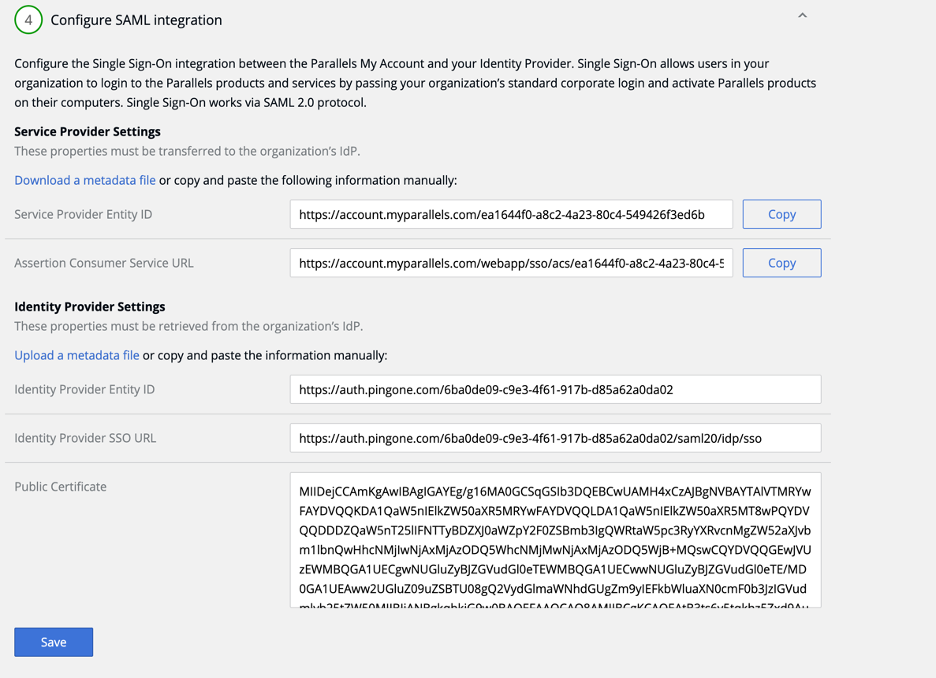
Expand the section of **Step 4** on the [integration configurator page](https://my.parallels.com/profile/business/idp_integration) in Parallels My Account. Note that there are two groups of parameters in the section. The first group has two values, **Service Provider Entity ID** and **Assertion Consumer Service URL** which must be copied from Parallels My Account to the IdP Directory. The second group includes three parameters – **Identity Provider Entity ID**, **Identity Provider SSO URL**, and **Public Certificate**. The values for these parameters must be copied from your IdP Directory to Parallels My Account.
Parameters can be copied between Parallels My Account and the IdP Directory either via metadata files (assuming your IdP software supports transferring those parameters via external files) or manually.
The first group of parameters, **Service Provider Entity ID** and **Assertion Consumer Service URL** (both values are pre-set automatically and cannot be changed), is already copied from Parallels My Account to the IdP Directory during the creation of Enterprise Application in **Step 2**.
To transfer the second set of parameters from Ping IdP to My Account:
1. Navigate to the **Application** tab and click on the application that has been created in the previous step [**(2) Register Parallels enterprise app**](#id-2-register-parallels-enterprise-app-and-configure-saml-settings). Proceed to the **Configuration** tab and click **Download Metadata** under Connection Details.
2. Switch to the **IdP integration** page in My Account, scroll down and expand **Step 4** ("`Configure SAML integration`"). Under **Identity Provider Settings**, click on the **Upload a metadata file** link and select the downloaded XML file.
3. Select the **Configuration in the IdP Directory** is done option at the bottom of the section and click **Save**.
4. Return to the **Application** tab in Ping IdP and close the **Configuration** tab, after which enable **User Access** to the application by flipping the switch.
Proceed to the next step.
### (5) Configure SCIM Integration
SCIM 2.0 integration between Parallels My Account and your Organization’s IdP allows you to keep user identity information in Parallels My Account in constant sync with the updates made to user identities in the IdP Directory.
It is assumed that your IdP software supports SCIM. For this reason, the **SCIM Support** option in the **Step 5** section on the [integration configurator page](https://my.parallels.com/profile/business/idp_integration) in the Parallels My Account is enabled by default. If your IdP does not support SCIM, disable the option and move on to the next step.
The following description is based on the assumption that SCIM is supported.
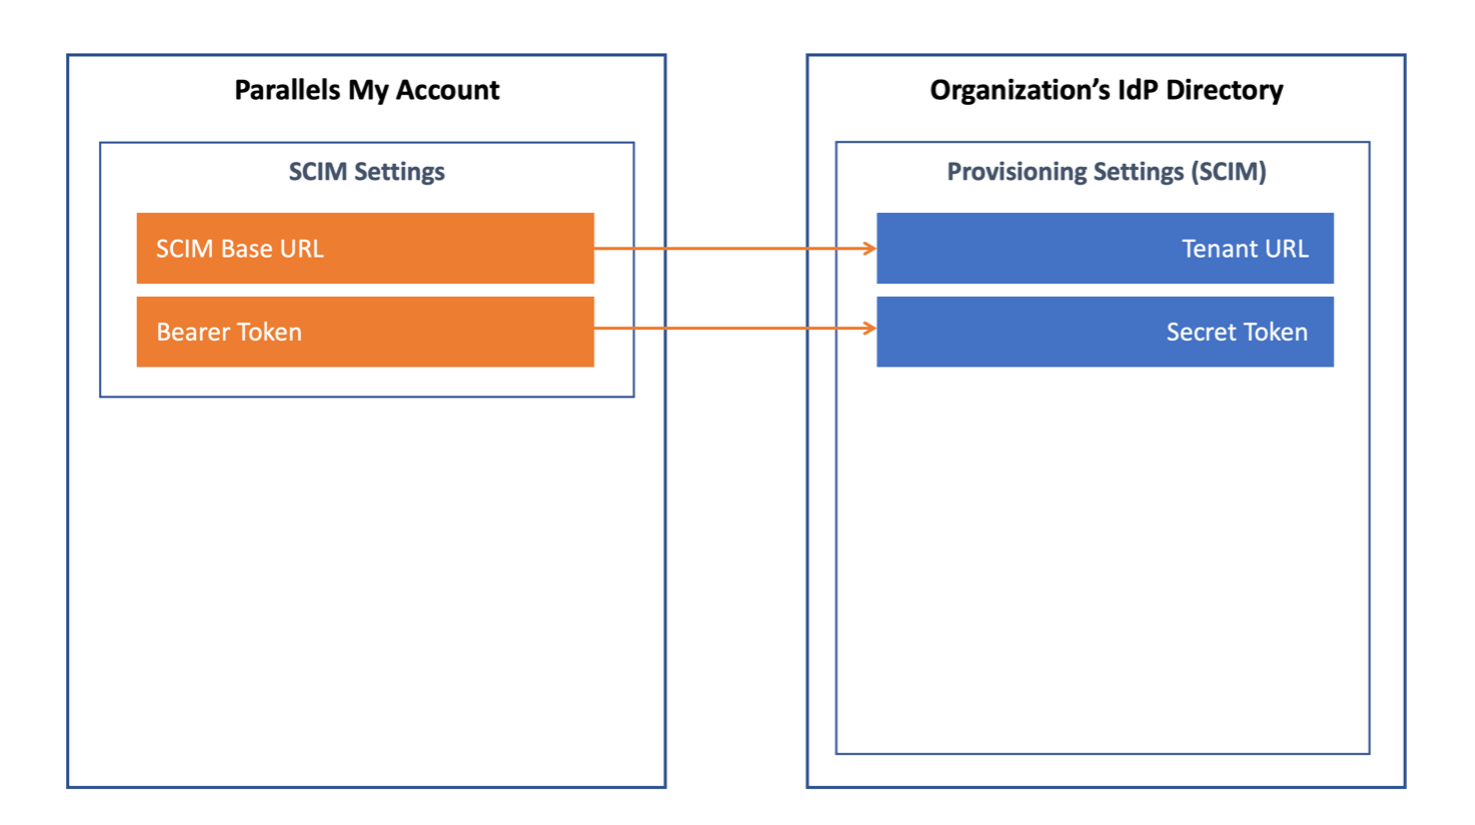
To configure provisioning via SCIM, you must copy two parameters: **SCIM Base URL** and **Bearer Token** (both values are pre-set automatically and cannot be changed) from the **Step 5** section of the [integration configurator](https://my.parallels.com/profile/business/idp_integration) in Parallels My Account to the IdP Directory.
The description below illustrates the procedure for Ping Identity. It is assumed that you have appropriate permissions that allow you to configure enterprise applications in Ping Identity. If your organization uses a different IdP service, follow the instructions provided in the admin guide specific to your IdP of choice.
To configure SCIM settings at the IdP management portal:
1. Go to **Connections** → **Provisioning**.
2. Click **+** and then click **New connection**.
3. Select **Identity Store**, and in the opened list select SCIM, scroll down and click **Next**.
4. Enter a name and description for this provisioning connection (the actual name and description remain at your discretion). The connection name will appear on the list once you have completed and saved the connection.
5. Click **Next**.
6. On the **Configure authentication** screen, enter the following:
* **SCIM Base URL**. The fully qualified URL to use for the SCIM resources is .
* Select the authentication method to use: **Bearer Token**.
* Copy the contents of the **Bearer Token** from Parallels My Account and paste it into the appropriate field.
7. Click **Test Connection** to save the changes and click **Continue**.
8. On the next page click **Finish**.
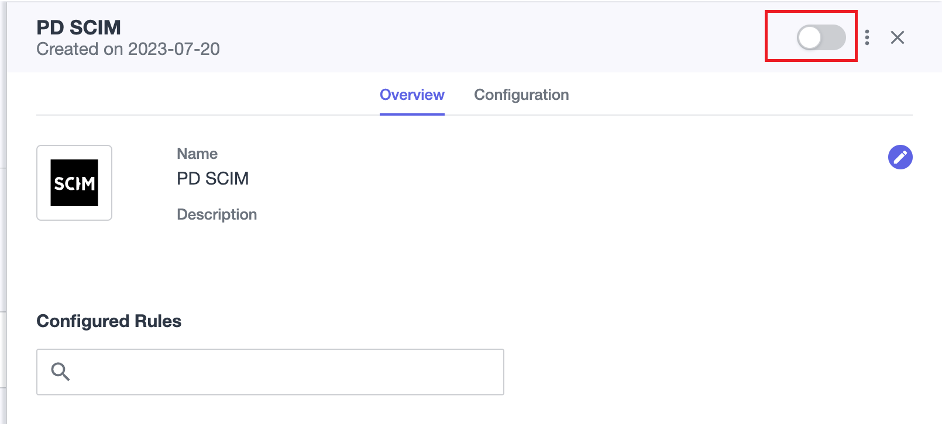
9. Turn on **SCIM** by toggling the switch.
Once the provisioning settings in the IdP Directory have been saved, switch back to Parallels My Account and select the **Configuration in the IdP Directory is done** option at the bottom of the section to confirm that you have finished the configuration procedure in the IdP Directory. Then continue to the next step.
### (6)Add Users to the Application Groups
Add users to the groups created in Step 3 (described earlier) to enable end users to activate their copies of Parallels Desktop for Mac Enterprise Edition using SSO and grant administrators permission to log into your organization’s business account registered with Parallels.
To do so, navigate to the Start page and choose Administrator environment (or any other environment that you might have created before) to open the Ping Identity console page. Navigate to **Identifies**, then **Users**, and create users by clicking the **Add User** button. Once it is done, or if you plan to add users later, select the **Configuration in the IdP Directory is done** option at the bottom of the section.
Once users have been created, you need to add them to the groups created above. To do so, navigate back to the **Identifies** tab and switch to the **Groups** tab. Click on the group name and add users to it.
### (7) Configure Backup Login
The backup login can be used to access your organization’s business account registered with Parallels, bypassing Single Sign-On in the event of an SSO malfunction. By default, the backup login is set to the email address of the currently logged-in user. If you want to define a different backup login, add more users first on the Users page of the [Business Profile section](https://my.parallels.com/profile/business/users?role=All\&status=All) in Parallels My Account. The new user must log into the business account at least once before they can be designated as a backup login.
{% hint style="danger" %}
**Warning**: Once you have completed the integration process and activated the SSO functionality, only users from the Administrators group in your IdP signing in via SSO will retain access to managing the Parallels business account. All previous administrative privileges based on logins and passwords will become inactive.
Your designated backup login will continue to work.
{% endhint %}
---
# Agent Instructions
This documentation is published with GitBook. GitBook is the documentation platform designed so that both humans and AI agents can read, navigate, and reason over technical content effectively. Learn more at gitbook.com.
## Querying This Documentation
If you need additional information that is not directly available in this page, you can query the documentation dynamically by asking a question.
Perform an HTTP GET request on the following URL with the `ask` and `goal` query parameters:
```
GET https://docs.parallels.com/landing/pd-ag/getting-started/configuring-the-single-sign-on-sso-integration-with-parallels-my-account/starting-the-integration-process-in-parallels-my-account/configuring-sso-integration-with-ping-identity/configuring-sso-integration-with-ping-identity.md?ask=&goal=
```
`ask` is the immediate question: it should be specific, self-contained, and written in natural language.
`goal` is what the user is ultimately trying to achieve, the reason they need the answer. Sharing it helps GitBook give you a better, more relevant answer. A goal is most helpful when it describes the outcome the user wants rather than restating the question. For example, with `ask=how do I create an API token`, a goal like `build a script that syncs our docs to a CMS` lets GitBook tailor the answer to that use case.
The response will contain a direct answer to the question and relevant excerpts and sources from the documentation.
Use this mechanism when the answer is not explicitly present in the current page, you need clarification or additional context, or you want to retrieve related documentation sections.