For the complete documentation index, see llms.txt. This page is also available as Markdown.

Manually Creating and Uploading Virtual Machine Images

The default recommended way to provision virtual machines is outlined in this chapter. If, however, you prefer to manually create an image, follow the steps outlined in this chapter.

Note: If your organization has both Apple silicon and Intel Macs, you need to create a separate virtual machine for each processor architecture. For the list of supported operating systems, please visit https://www.parallels.com/requirements/.

Parallels Desktop for Mac Enterprise Edition accepts virtual machine images in a packed .pvmp format. To create such an image:

  1. Using your own Parallels Desktop setup, do the following:

    1. Create a Parallels virtual machine and install an operating system in it.

    2. Make sure the Parallels Tools are installed as they are required for most integrations between the Mac and the virtual machine.

    3. Pre-install the software that your users may need, and otherwise configure the virtual machine according to your requirements.

      Note: Boot Camp-based virtual machines (an Intel Mac-only feature) and linked clones cannot be used for deployment.
  2. If your virtual machine is running Windows, you may need to use Sysprep to strip it of installation-specific information such as the SID (Security Identifier), GUID (Globally Unique Identifier), and other identifiers before deploying it. Follow the directions outlined in this KB article.

  3. Make sure the virtual machine is shut down.

  4. If your virtual machine has snapshots, it is recommended that you remove them. This will significantly reduce the virtual machine size. Moreover, these snapshots may be unusable on another computer because of hardware differences.

  5. When the virtual machine is ready, it needs to be packed as a .pvmp file before you make it available for download to your users. To pack it:

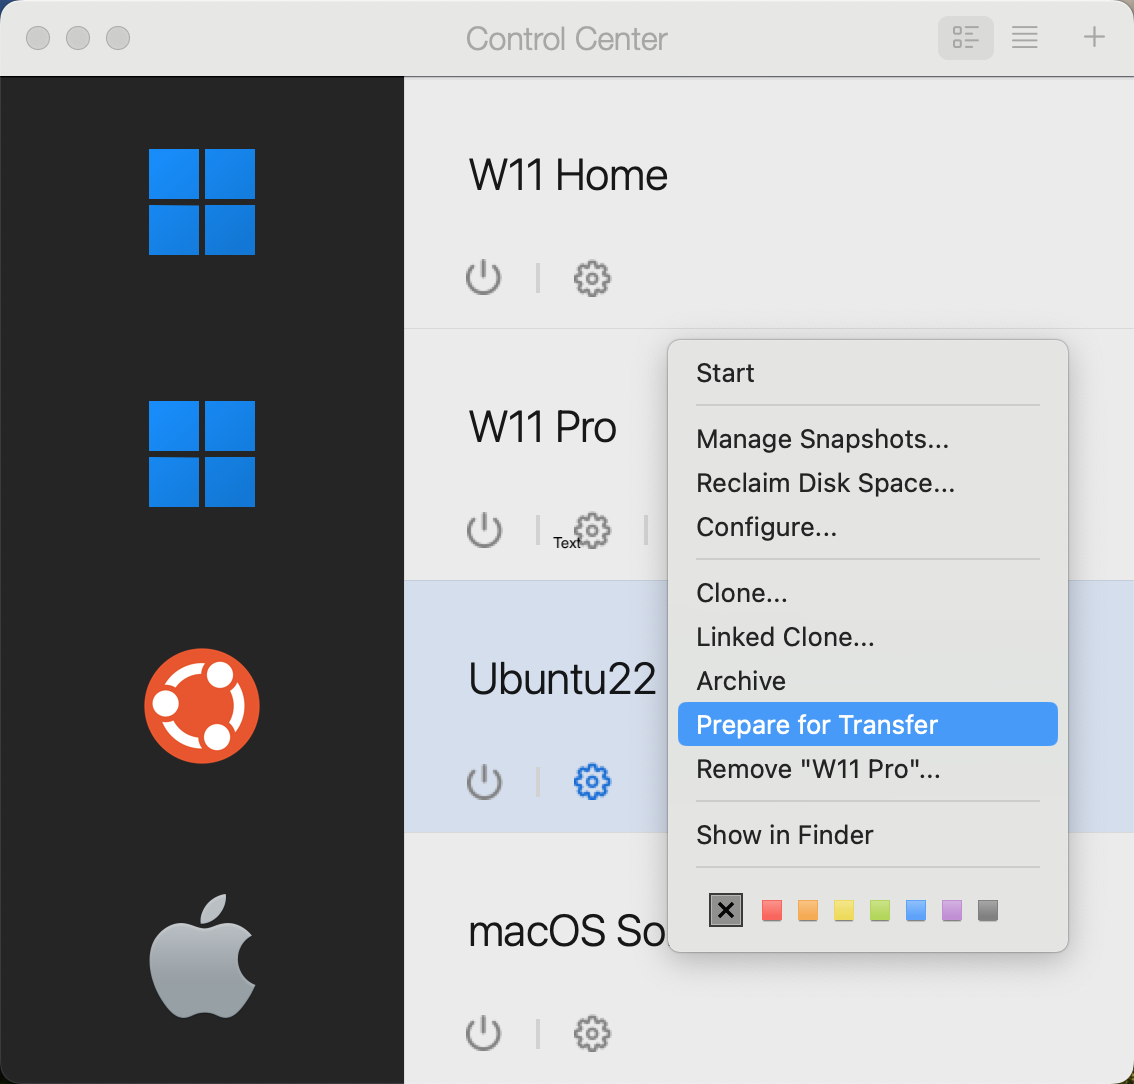
    1. Open the Parallels Desktop Control Center.

    2. Right-click on the virtual machine that you want to transfer and select Prepare for Transfer. Parallels Desktop will start packing the virtual machine. This process may take some time, depending on the virtual machine size.

    3. Once the .pvmp package is created, you can right-click it and choose to show where it is stored in the Finder.

    4. An SHA-256 checksum for the virtual machine package is calculated automatically and saved as a .txt file in the same folder. You will need it later during the deployment process. You can also calculate the checksum by executing the shasum command.

Note: If you have the .pvmp virtual machine file but not the .txt file with its checksum, you can quickly find it by following these steps:

  1. Right-click on the .pvmp file while holding down the Option key and choose Copy {file_name} as Pathname.

  2. Open Terminal.

  3. Type in shasum -a 256 {file_desination}, pasting the copied pathname from Step 1, and hit Enter.

The output will look similar to the following:

63a90c3c38cc8c358221da339068fc1292b10bf7c00ed8449787b0e6019d706b /Users/parallels/Parallels/Windows11Pro.pvmp

Uploading the Image

Once you have a virtual machine saved as a .pvmp archive, upload it to a server from which Parallels Desktop users can download it to their Mac computers via HTTPS. The requirements are:

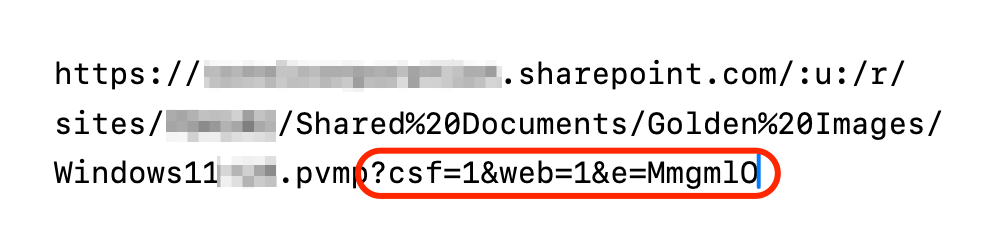
  • The link has to be direct, explicitly leading to the image file and not a file download page. E.g., if you are using Microsoft Sharepoint, take these steps:

    1. Create and copy a shareable link to a file following the normal "Copy link" procedure.

    2. Before using the link for deployment, paste it into a text editor, and replace the text after the ? with download=1.

  • You have to ensure that no authentication is required to download the image file.

Optionally, you may use a URL shortener.

You may use an internal file sharing resource accessible with VPN enabled.

Once your link is ready, we suggest you test the download using the curl command from the macOS Terminal, e.g.:

A file available via a direct link will begin downloading; otherwise, the command will result in a script or API response (JSON/HTML).

Note: The quickest way to receive an accurate path to any given folder on your Mac is to hold down the Option key and right-click on that folder. You will see the menu option titled "Copy "<folder_name>" as Pathname".

Troubleshooting Error: 405 (Method Not Allowed)

If Parallels Desktop fails to download your Golden Image and shows error 405: Method Not Allowed, it means that your link points to a handler script instead of the final location of the file, and that script does not respond to the HEAD method, which Parallels Desktop requires.

You can quickly test your link using the curl command:

If your link is direct and final as required by Parallels Desktop, you will get a HTTP 200 response (along with the content-length value which reflects the file size), or similar. Otherwise, you will get a 405 Method Not Allowed response, and such link will not work for the purposes of this guide.

Last updated