> For the complete documentation index, see [llms.txt](https://docs.parallels.com/landing/llms.txt). Markdown versions of documentation pages are available by appending `.md` to page URLs; this page is available as [Markdown](https://docs.parallels.com/landing/pd-ag/provisioning-and-activation-of-parallels-desktop/alternative-deployment-methods/alternative-mass-deployment-via-deployment-package/deploying-the-package-to-macs/example-jamf-pro.md).
# Example: Jamf Pro
Jamf Pro includes the Software Distribution functionality that you can use to deploy the Parallels Desktop package to Mac computers in your organization. To deploy the package, you need:
* Jamf Pro server installed or deployed in Jamf Cloud and configured.
* Target Mac computers enrolled in Jamf Pro.
* A distribution point (cloud or file share) configured and be accessible from the target Mac computers.
{% hint style="info" %}
**Note:** The instructions below refer exclusively to the how the process is done in the web-based version of Jamf Admin as the Mac app had been deprecated in April 2024.
{% endhint %}
### \[OPTIONAL] Adding a Distribution Point
A distribution point is a server that hosts files and packages for distribution to computers. By default, the cloud distribution server is JCDS, where the recommended size limit for any single file/package is 20GB. If your Parallels Desktop deployment package includes a virtual machine and exceeds 20GB, you could consider switching your cloud distribution to Amazon S3, which allows 30GB files. You can change your cloud distribution point in **Settings** -> **Server** -> **Cloud distribution point**.
{% hint style="info" %}
**Note**: You can only have one cloud distribution point selected for any one Jamf Pro deployment. To learn more about Jamf's cloud distribution settings, refer to the [respective page](https://learn.jamf.com/en-US/bundle/jamf-pro-documentation-current/page/Cloud_Distribution_Point.html) of Jamf's documentation.
{% endhint %}
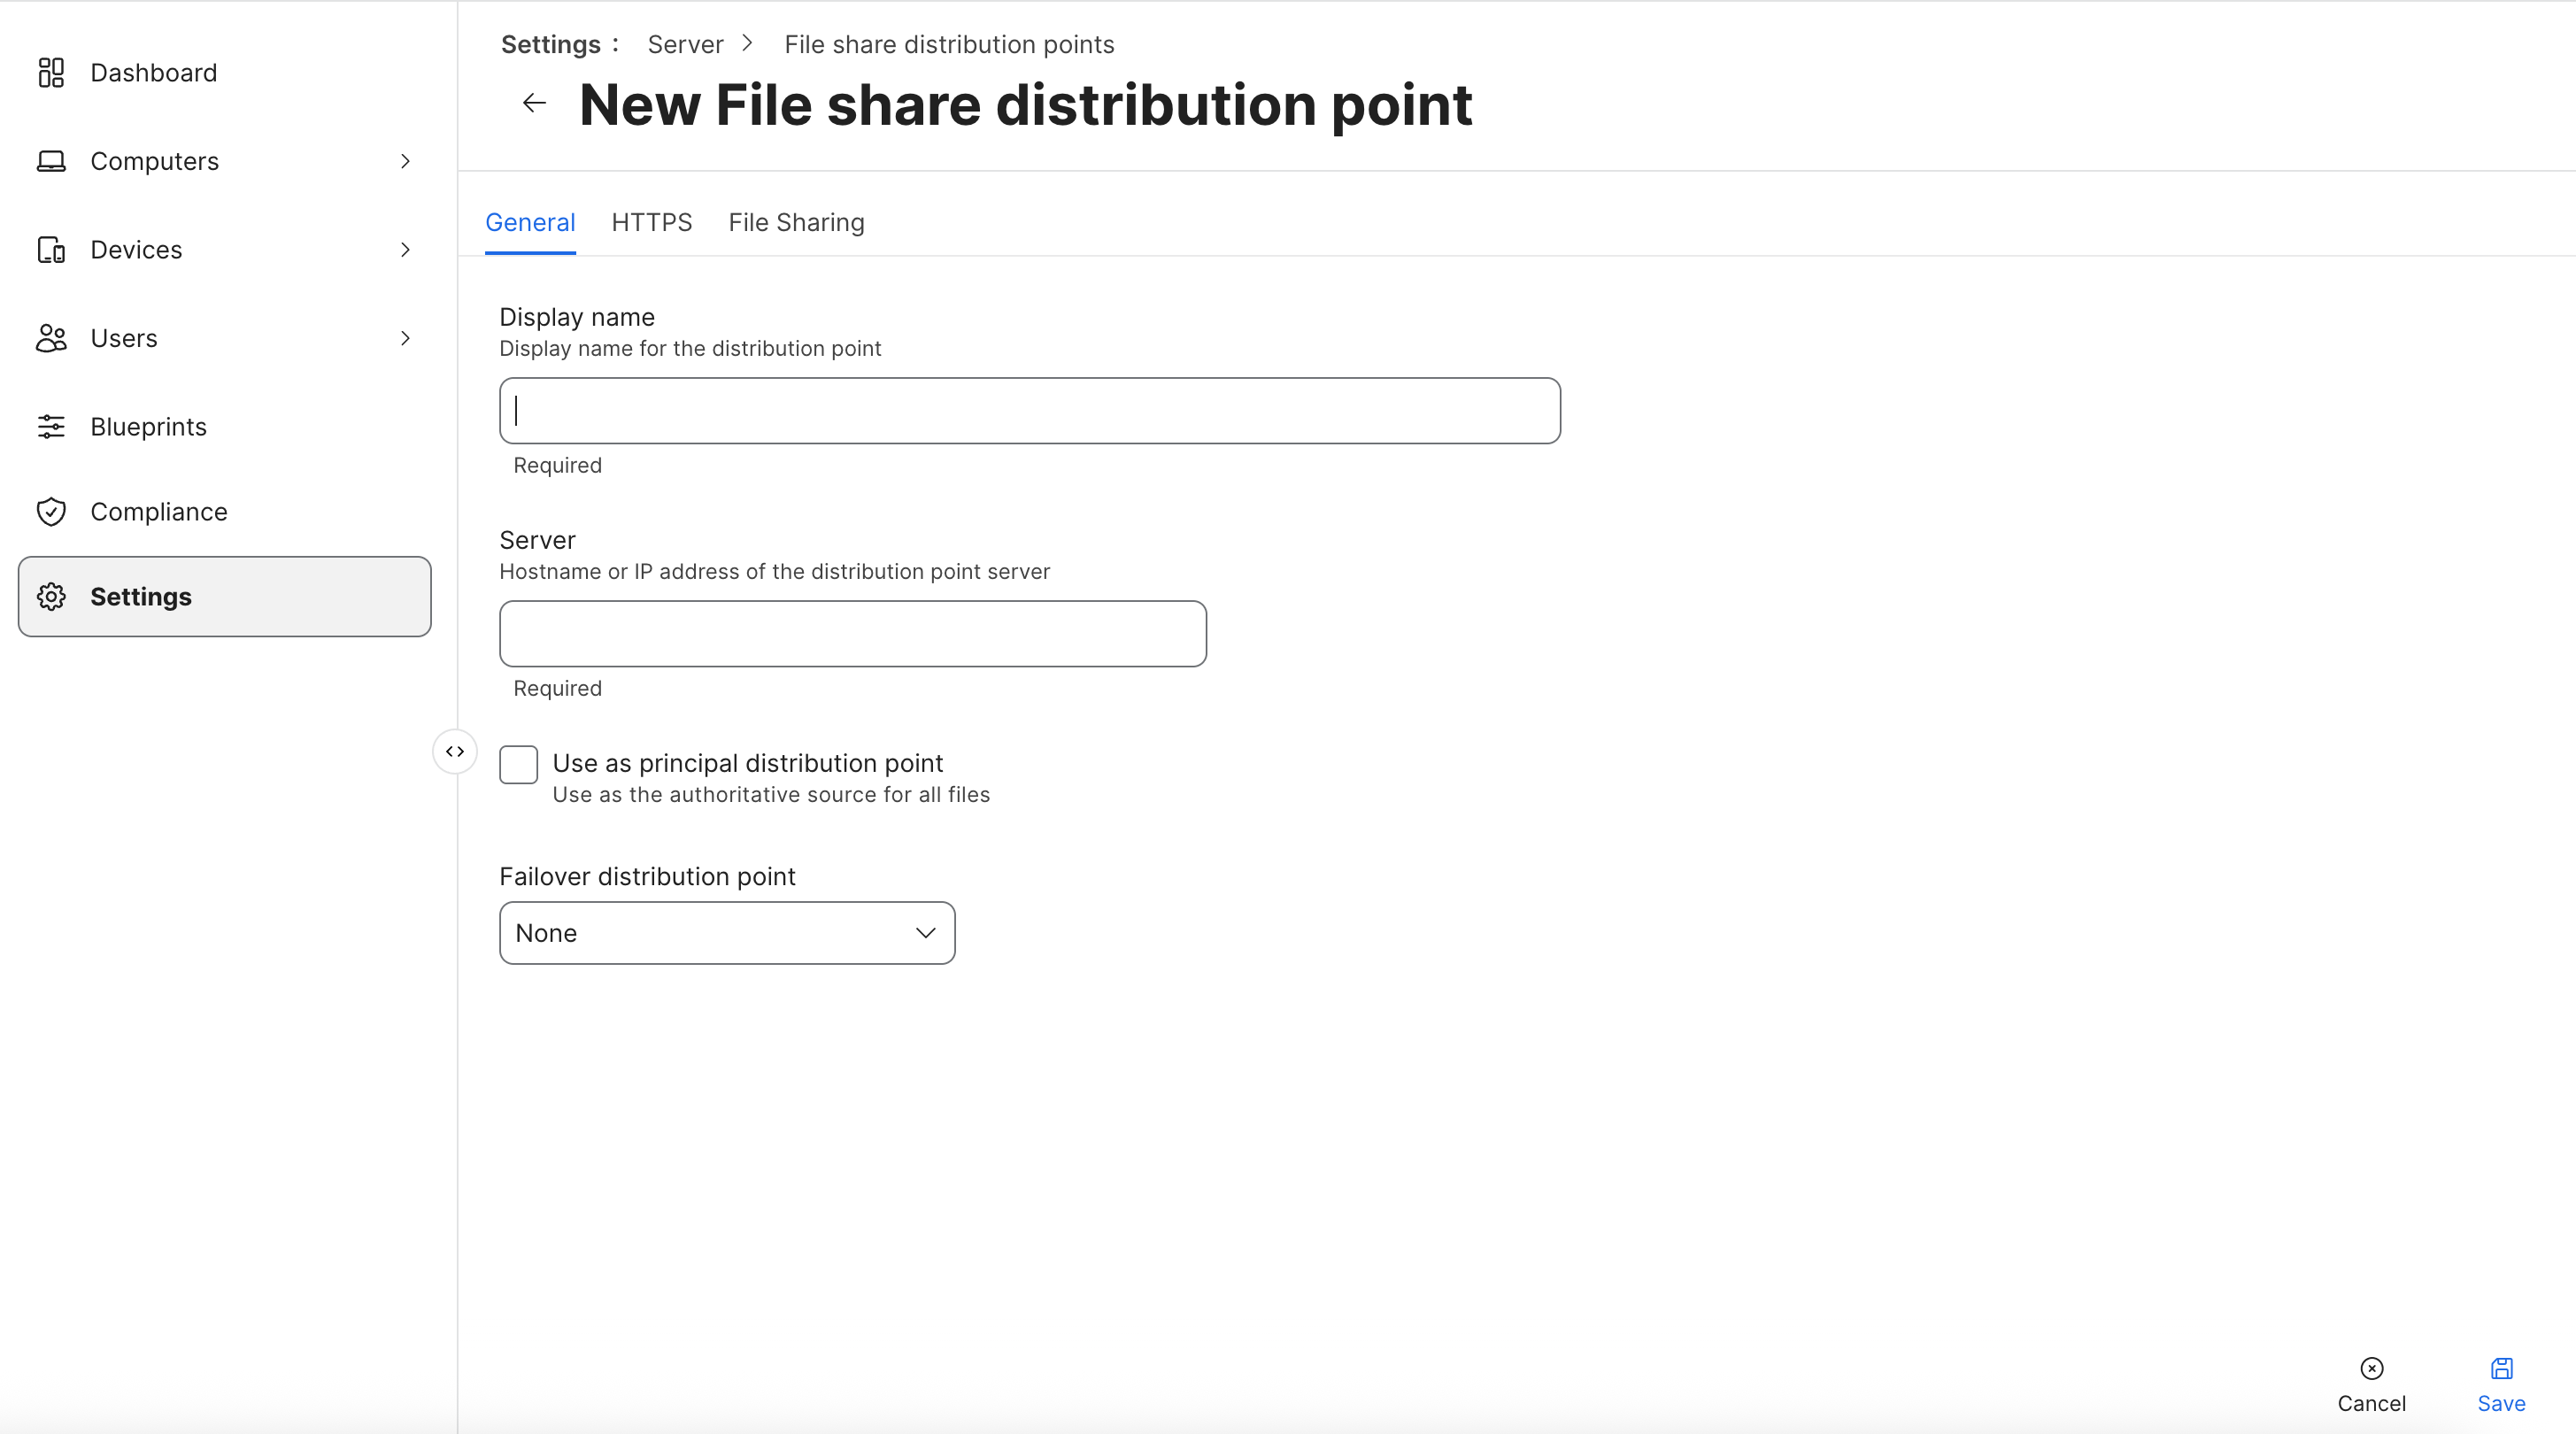
However, if your existing Jamf cloud distribution setup is already used for deploying other files and packages, and you would like to distribute a large Parallels Desktop deployment package which includes a pre-configured virtual machine, you could use a dedicated file share distribution point. To do so:
1. Go to **Settings** -> **Server** -> **File share distribution points** and user **Ctrl+N** to create a new one.
2. On the **General** tab page:
1. Type a name for the distribution point.
2. Specify the IP address or the host name of the distribution point server.
3. Leave the **Use as principal distribution point** option unchecked.
4. Leave the **Failover distribution point** as `None`.
3. Click the **File Sharing** tab and specify the following:
1. **Protocol:** Select AFP or SMB depending on which protocol is used on your server for file sharing.
2. **Share name:** Specify the share name. For example, if your server name is MYSERVER and your full share name is \\\MYSERVER\JAMF-SHARE, specify JAMF-SHARE in this field.
3. **Port:** In most cases the default value is what a given protocol normally uses. If you know that your server uses a different port number, specify it here.
4. **Read/Write Account:** Specify credentials of an account that has read/write access to the share.
5. **Read-Only Account:** Specify credentials of an account that has read-only access to the share.
4. Click **Save** to save the settings and add the distribution point to your Jamf Pro setup.
### Adding the Package to the Cloud Distribution Point
If the size of your Parallels Desktop deployment package is within the limits of your preferred cloud distribution point, you can upload it for distribution:
1. Go to **Settings** -> **Computer management** -> **Packages** and use **Ctrl+N** to add a new package.
2. Fill out the **Display name**, **Info**, and **Notes** fields.
3. Use the **Filename** section to choose the Parallels Desktop deployment package file for uploading.
4. Click **Save** and wait for the package to upload. Monitor the **Packages** page for any error messages.
### Creating and Deploying a PPPC Configuration Profile
For a streamlined user experience, make sure to configure and deploy to the same target computers a configuration profile that will pre-determine the PPPC (Privacy Preferences Policy Control) access permissions for the Parallels Desktop app. This way, your users won't see any notifications about access to `Desktop`, `Documents`, or `Downloads` folders, etc.
1. From your Jamf dashboard, go to **Computers** -> **Content Management** -> **Configuration Profiles** and use **Ctrl + N** to create a new profile.
2. Fill out the mandatory fields in the **General** tab, such as **Name**, **Description**, and **Distribution Method**, as you see fit. Make sure to set the **Level** parameter to `Computer Level`.
3. Scroll down the left-side bar to reach the **Privacy Preferences Policy Control** tab and click on it.
4. Under **App Access**, set the **Identifier** to `com.parallels.desktop.console`, **Identifier Type** to `Bundle ID`, and leave the **Validate the Static Code Requirement** box unchecked. In the **Code Requirement** field, paste the following value, making sure to copy it carefully:\
\
`identifier "com.parallels.desktop.console" and anchor apple generic and certificate 1[field.1.2.840.113635.100.6.2.6] /* exists */ and certificate leaf[field.1.2.840.113635.100.6.1.13] /* exists */ and certificate leaf[subject.OU] = "4C6364ACXT"`\
\
If you want to verify the value of this parameter [independently](https://learn.jamf.com/en-US/bundle/jamf-school-documentation/page/Privacy_Preferences_Policy_Control.html#ariaid-title2), launch macOS Terminal on a Mac with a copy of Parallels Desktop installed and execute the following command:\
\
`codesign -display -r - /Applications/Parallels\ Desktop.app`
5. Under **App or Service**, use the **+ Add** button to, at the very minimum, allow the app to access the Desktop (`SystemPolicyDesktopFolder`), Documents (`SystemPolicyDocumentsFolder`), and Downloads (`SystemPolicyDownloadsFolder`) folders. You may also want to enable `Accessibility` and `ScreenCapture` for other Parallels Desktop functionality, such as error reporting.
6. At the very top of the Configuration Profiles page, switch to the Scope tab and select the target computers or user groups.
7. In the bottom-right corner, click **Save**.
We suggest ensuring this profile is successfully deployed to all target computers before deploying the installation package.
### Adding and Deploying the Autodeploy Package
Follow these steps:
1. From your Jamf dashboard, go to **Settings** -> **Computer management** -> **Packages** and use **Ctrl + N** to add the previously created deployment package to the system.
2. To deploy the added package, go to **Computers** -> **Content Management** -> **Policies** and use **Ctrl + N** to create a new package deployment policy. In the General tab, make sure to set **Execution Frequency** to `One per computer`, and in the Packages section, choose the recently added deployment package. Choose the target computers in the **Scope** tab.
### Testing the Package
Once the policy is retrieved by a Mac, it will install and activate Parallels Desktop on that Mac. Once completed, the user can begin working with Parallels Desktop.
If you are testing your policy, you can wait for it to trigger, or you can run it manually using the **Self Service** app. The app is installed when a Mac is enrolled in Jamf Pro and can be opened from the Applications folder in macOS. If there are errors executing the policy, you can review them in the app. Please also note that when testing a policy, don't try to run it on the same Mac that you use as a distribution point because an attempt to mount a share on the same Mac that hosts it will fail.
---
# Agent Instructions
This documentation is published with GitBook. GitBook is the documentation platform designed so that both humans and AI agents can read, navigate, and reason over technical content effectively. Learn more at gitbook.com.
## Querying This Documentation
If you need additional information that is not directly available in this page, you can query the documentation dynamically by asking a question.
Perform an HTTP GET request on the current page URL with the `ask` query parameter, and the optional `goal` query parameter:
```
GET https://docs.parallels.com/landing/pd-ag/provisioning-and-activation-of-parallels-desktop/alternative-deployment-methods/alternative-mass-deployment-via-deployment-package/deploying-the-package-to-macs/example-jamf-pro.md?ask=&goal=
```
`ask` is the immediate question: it should be specific, self-contained, and written in natural language.
`goal` is optional and describes the broader end goal you are ultimately trying to accomplish on behalf of the user. GitBook uses it to tailor the answer towards what is most useful for that goal.
The response will contain a direct answer to the question and relevant excerpts and sources from the documentation.
Use this mechanism when the answer is not explicitly present in the current page, you need clarification or additional context, or you want to retrieve related documentation sections.