> For the complete documentation index, see [llms.txt](https://docs.parallels.com/landing/llms.txt). Markdown versions of documentation pages are available by appending `.md` to page URLs; this page is available as [Markdown](https://docs.parallels.com/landing/pdfm-ug/v20-it-it/guida-utente-di-parallels-desktop-per-mac-20/usa-windows-sul-mac/definisci-come-windows-funziona-con-macos/condividi-elementi-tra-macos-e-windows/aggiunta-dei-dischi-windows-al-finder.md).
# Aggiunta dei dischi Windows al Finder
Se lavori spesso con Windows, puoi aggiungere dischi Windows al Finder per tenere sempre a portata di mano i file Windows.
Prosegui come segue:
1. Innanzitutto assicurati che i dischi Windows siano condivisi con macOS. Esegui una di queste azioni:
* Fai clic sull'icona Parallels Desktop nella barra dei menu e scegli **Configura.**
* Se la barra dei menu è visibile nella parte superiore dello schermo, scegli **Azioni** > **Configura**.
Quindi, fai clic su **Opzioni** e scegli **Condivisione** > **Condividi Windows**. Verifica che **Accedi alle cartelle Windows dal Mac** sia selezionato. Se desideri condividere anche Windows OneDrive, seleziona **Condividi OneDrive con Mac**.
2. Nel passaggio successivo, devi consentire ai dischi Windows di essere montati sul desktop macOS. Apri il Finder, scegli **Finder** > **Preferenze** e seleziona **Server connessi**.
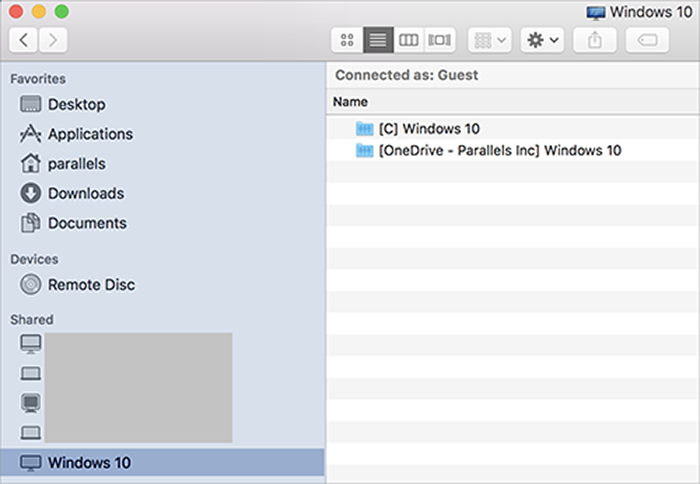
3. Ora devi montare i dischi Windows sul desktop macOS. Nel Finder, fai clic sulla macchina virtuale (dovrebbe essere disponibile nella sezione **Condiviso**). La macchina virtuale deve essere in esecuzione.\
\
**Nota:** in macOS 10.14 Mojave o versioni successive, puoi trovare la macchina virtuale nella sezione **Rete**.\
\
Quindi fai doppio clic su un qualsiasi disco Windows. Il disco viene montato e visualizzato sul desktop.
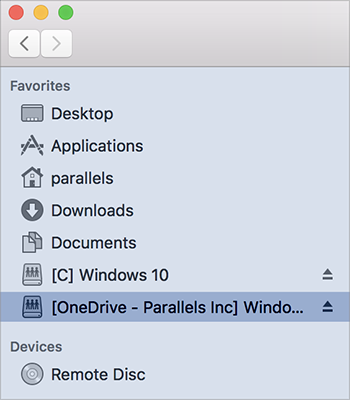
4. Trascina il disco dal desktop nella sezione **Preferiti** nel Finder.
Ora puoi accedere ai file Windows dal Finder macOS.
{% hint style="info" %}
**Nota:** il disco è disponibile solo in macOS mentre è in esecuzione la macchina Windows.
{% endhint %}
---
# Agent Instructions
This documentation is published with GitBook. GitBook is the documentation platform designed so that both humans and AI agents can read, navigate, and reason over technical content effectively. Learn more at gitbook.com.
## Querying This Documentation
If you need additional information that is not directly available in this page, you can query the documentation by asking a question.
Perform an HTTP GET request on the following URL with the `ask` and `goal` query parameters:
```
GET https://docs.parallels.com/landing/pdfm-ug/v20-it-it/guida-utente-di-parallels-desktop-per-mac-20/usa-windows-sul-mac/definisci-come-windows-funziona-con-macos/condividi-elementi-tra-macos-e-windows/aggiunta-dei-dischi-windows-al-finder.md?ask=&goal=
```
`ask` is the immediate question: it should be specific, self-contained, and written in natural language.
`goal` is what the user is ultimately trying to achieve, the reason they need the answer. Sharing it helps GitBook give you a better, more relevant answer. A goal is most helpful when it describes the outcome the user wants rather than restating the question. For example, with `ask=how do I create an API token`, a goal like `automate deployments from our CI pipeline` lets GitBook tailor the answer to that use case.
The response will contain a direct answer to the question and relevant excerpts and sources from the documentation.
Use this mechanism when the answer is not explicitly present in the current page, you need clarification or additional context, or you want to retrieve related documentation sections.