> For the complete documentation index, see [llms.txt](https://docs.parallels.com/landing/llms.txt). Markdown versions of documentation pages are available by appending `.md` to page URLs; this page is available as [Markdown](https://docs.parallels.com/landing/pdfm-ug/v20-zh-tw/parallels-desktop-for-mac-20-shi-yong-zhi-nan/parallels-desktop-pian-hao-she-ding-he-xu-ni-ji-qi-she-ding/xu-ni-ji-qi-she-ding/xuan-xiang/gong-yong-she-ding.md).

# 共用設定

在「**共用**」窗格中，您可以檢視和設定虛擬機器的共用設定。

若要開啟這些設定，請選擇「**動作**」>「**設定**」>「**選項**」，然後按一下「**共用**」。

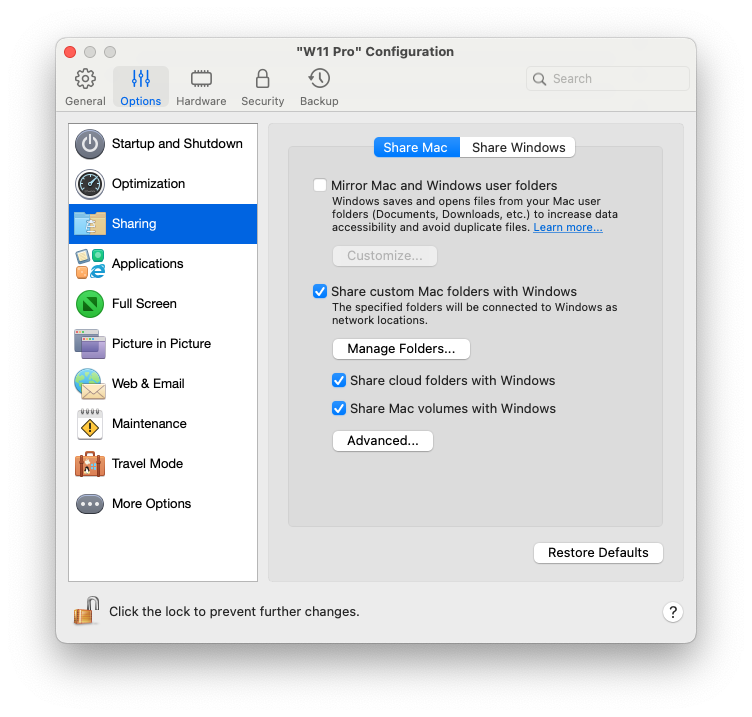
<figure><img src="https://content.gitbook.com/content/NPLQPyrTCZG7rj2GnqwJ/blobs/vVYzYgQgjngfT0c5v3OB/Screenshot%202024-01-19%20at%2016.37.45.png" alt="" width="563"><figcaption></figcaption></figure>

### **共用 Mac**

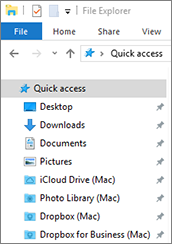
<table><thead><tr><th width="236">選項</th><th>描述</th></tr></thead><tbody><tr><td><strong>與 Windows 共用自訂的 Mac 檔案夾</strong></td><td><p>啟用了資料夾共用後，您可以從 Windows 應用程式存取任何已共用的 macOS 資料夾。當您開啟檔案 (例如，在許多應用程式中選擇「<strong>檔案</strong>」>「<strong>開啟</strong>」)，已共用的 macOS 資料夾將以標籤為「\\Mac」的網路共用目錄形式出現。<br></p><p>若要啟用 macOS 資料夾與 Windows 應用程式共用的功能，請進行下列動作：<br></p><ul><li>若只要共用 Home 資料夾中的資料夾，請啟用「<strong>與 Windows 共用 Mac 資料夾</strong>」> 用右鍵按一下「<strong>管理資料夾...</strong>」。> 選取 Home 資料夾然後按一下「<strong>確定</strong>」。若要分享您的所有 macOS 資料夾，請選取具有您 Mac 名稱的資料夾，然後按一下「<strong>確定</strong>」。</li><li><p>若要共用您想要的資料夾，請按一下「<strong>管理資料夾</strong>」並按一下新增 (+) 按鈕，然後選擇您想要共用的資料夾。您可以通過再次按一下新增 (+) 按鈕以新增更多資料夾。當您與 Windows 共用了 macOS 資料夾後，您可以：<br></p><ul><li>通過取消選取「<strong>啟用</strong>」來停用此資料夾共用。</li><li>通過按兩下「<strong>名稱</strong>」列中的資料夾名稱修改在 Windows 中顯示的資料夾名稱並輸入新的名稱。</li><li>藉由在「<strong>權限</strong>」資料夾按一下「<strong>讀取和寫入</strong>」並選擇「<strong>唯讀</strong>」，可限制寫入至此資料夾。您將無法新增項目到此資料夾。</li></ul></li></ul></td></tr><tr><td><strong>鏡像 Mac 和 Windows 使用者資料夾</strong></td><td><p>您可以為 macOS 與 Windows 設定使用相同的資料夾，例如音樂、文件、圖片以及桌面與已刪除的檔。舉例來說，如果您將檔儲存到檔案資料夾，無論您是使用 macOS 應用程式或 Windows 應用程式，它都會在檔案資料夾當中。<br></p><p>若要啟用此功能，請選取「<strong>鏡像 Mac 和 Windows 使用者資料夾</strong>」。<br></p><p>您 macOS 的<code>「桌面」</code>、<code>「文件」</code>、<code>「圖片」</code>、<code>「音樂」</code>、<code>「影片」</code>和<code>「下載」</code>資料夾都會與相對應的 Windows 資料夾合併。<br></p><p>如果您只想對應部分資料夾，請按一下「<strong>自訂</strong>」並選取這些資料夾。</p></td></tr><tr><td><p><strong>與 Windows 共用雲端資料夾</strong></p><p>(在 macOS 虛擬機器中，此選項稱為「<strong>與虛擬機器共用雲端資料夾</strong>」)</p></td><td><p>如果您正在 macOS 中使用 iCloud、Dropbox 或 Google Drive 雲存儲，您看可以輕鬆地 Windows 共用 macOS 資料夾。啟用共用後，您就可以上傳、下載、同步來自 Windows 內的任何服務的檔，無需拷貝硬碟的任何檔。<br></p><p>要與 Windows 共用 macOS iCloud、Dropbox 或 Google Drive 資料夾，請進行以下操作：<br></p><p><strong>附註：</strong>在 Parallels Desktop for Mac Pro Edition 中，您也可以和 Windows 共用您的 Dropbox for Business 和 Box 資料夾。<br></p><ol><li>如果您還未在 macOS 中設定 iCloud、Dropbox 或 Google Drive。</li><li>選擇「<strong>與 Windows 共用雲端資料夾</strong>」。</li><li>登入到 Windows 並開啟<strong>電腦</strong>。用於 iCloud、Dropbox 或 Google Drive 的資料夾在「<strong>快速存取</strong>」(或「<strong>我的最愛</strong>」) 區段中可供使用。您可以上傳檔到雲存儲也可以從雲存儲下載檔案。</li></ol><p><img src="https://download.parallels.com/desktop/v19/docs/en_US/Parallels%20Desktop%20User&#x27;s%20Guide/sharecloudstorage.png" alt="Share cloud storage" data-size="original"></p></td></tr><tr><td><p><strong>將 Mac 磁碟區對應到 Windows</strong></p><p>(在 macOS 虛擬機器中，此選項稱為「<strong>將 Mac 磁碟區對應到虛擬機器</strong>」)</p></td><td><p>當您連線一個外部存放裝置時，例如 USB 驅動程式您的 Mac，您可存取來自 macOS 應用程式的內容。<br></p><p>您可設定 Parallels Desktop 自動裝載存放裝置與磁碟區到 Windows。這樣，您就可存取來自 macOS 與 Windows 的內容。<br></p><p>可將下列項目安裝到 Windows：</p><ul><li><strong>可移動驅動程式</strong>：外部存放裝置，例如 USB 硬碟與 USB flash 驅動程式。</li><li><strong>CD/DVD 驅動程式</strong>：CD 和 DVD 磁碟機或裝載的 CD/DVD 映像。</li><li><strong>網路資料夾</strong>：透過網路共用的資料夾。</li></ul><p>若要讓這些項目自動裝載到 Windows，請選取「<strong>將 Mac 磁碟區對應到 Windows</strong>」。<br></p><p>當您連線一個外部裝置或磁碟區時，會以網路磁碟裝載。例如，插入您 Mac 的一個 USB flash 驅動程式可以從 macOS 中的 <code>/Volumes</code> 資料夾與 Windows 中的「<code>我的電腦</code>」進行存取。</p></td></tr><tr><td><strong>高級</strong> > <strong>將磁碟機代號指派給共用資料夾</strong> (此功能僅可用於 Parallels Desktop for Mac Pro 及 Business/Enterprise Edition)</td><td>選取此選項，可指派磁碟機代號給與 Windows 共用的所有 Mac 資料夾。當 Mac 共用資料夾有代號時，您可以在 Windows 中輕鬆存取它 - 這些資料夾顯示在「<strong>檔案總管</strong>」的「<strong>此電腦</strong>」區段中。</td></tr><tr><td><strong>高級</strong> > <strong>允許建立可執行檔</strong> (此功能僅可用於 Parallels Desktop for Mac Pro 及 Business/Enterprise Edition)</td><td>選取此選項，可在與 Windows 共用的 Mac 資料夾中建立可執行檔。選取此選項時，所有新建立的檔案都會變成可執行檔。</td></tr><tr><td><strong>高級</strong> > <strong>啟用 DOS 8.3 檔案名稱</strong> (此功能僅可用於 Parallels Desktop for Mac Pro 及 Business/Enterprise Edition)</td><td>在 macOS 中建立的檔案沒有 DOS 8.3 名稱，某些 Windows 應用程式可能無法正常使用這些檔案。選取此選項，可為位於與 Windows 共用之 Mac 資料夾中的檔案，建立額外的 DOS 8.3 名稱。</td></tr></tbody></table>

### **共用** Windows

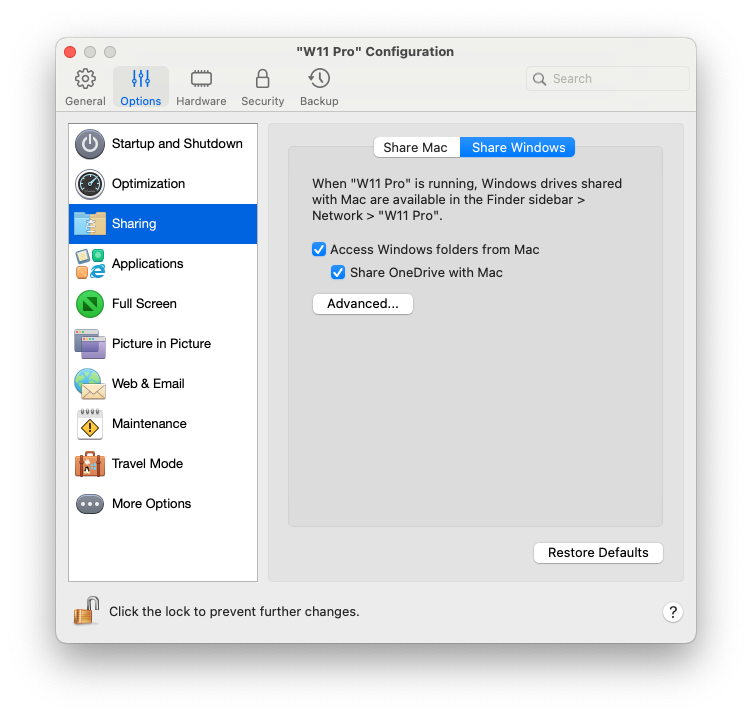
<figure><img src="https://content.gitbook.com/content/NPLQPyrTCZG7rj2GnqwJ/blobs/c751aSRXliUhiQRFo73F/Screenshot%202024-01-19%20at%2016.58.11.png" alt="" width="563"><figcaption></figcaption></figure>

<table><thead><tr><th width="339">選項</th><th>描述</th></tr></thead><tbody><tr><td><strong>從 Mac 存取 Windows 資料夾</strong></td><td>選取此選項，可允許從 Mac 存取 Windows 資料夾。</td></tr><tr><td><strong>與 Mac 共用 OneDrive</strong></td><td><p>如果您正使用 Microsoft OneDrive 存儲檔，您可以輕鬆地與 macOS 共用您的 OneDrive 資料夾。那麼無需拷貝硬碟中的任何檔即可上傳或下載 macOS 中的 OneDrive 檔。<br></p><p><strong>附註：</strong>若要與 macOS 共用 OneDrive 資料夾，必須在 Windows 中安裝 OneDrive 桌面應用程式。如果您使用的是預先安裝的 OneDrive 應用程式，將不會共用 OneDrive 資料夾，因為該應用程式不會建立任何本機資料夾，而是直接使用雲端儲存空間。<br></p><p>要與 macOS 共用 Windows OneDrive 資料夾，可進行以下操作：<br></p><ol><li>如果還未在 Windows 中設定 OneDrive，那麼請設定。</li><li>選擇「<strong>從 Mac存取 Windows 資料夾</strong>」以及「<strong>與 Mac 共用 OneDrive</strong>」。</li><li>在 macOS Finder 中，選擇「<strong>Finder</strong>」>「<strong>偏好設定</strong>」並選取「<strong>連線的伺服器</strong>」。</li></ol><p>選定後，Microsoft OneDrive 資料夾將會以硬碟形式出現在 macOS 桌面。您可以上傳檔到 OneDrive 也可以從 OneDrive 下載檔案。<br></p><p><strong>附註：</strong>這些共用資料夾都會在 macOS 桌面顯示，只有當 Windows 正在執行時您才能使用它們從 macOS 上傳檔。</p></td></tr><tr><td><strong>高級</strong> > <strong>和 Mac 共用 Windows 網路磁碟</strong> (此功能僅可用於 Parallels Desktop for Mac Pro 及 Business/Enterprise Edition)</td><td><p>選取後，當您連線到 Windows 中的網路磁碟機時，這些磁碟機也可在 macOS 中使用。若要存取這些磁碟，移至「<strong>Finder</strong>」側邊欄 >「<strong>共用</strong>」區段並按一下虛擬機器名稱。<br></p><p><strong>附註：</strong>若要在 macOS 10.14 Mojave 中存取這些磁碟，請前往「<strong>Finder</strong>」側邊欄 >「<strong>網路</strong>」區段並按一下虛擬機器名稱。</p></td></tr><tr><td><strong>高級</strong> > <strong>和 Mac 共用 Windows 連結的硬碟</strong></td><td><p>選取後，當您連線到 Windows 的外部磁碟機時，這些磁碟機也可在 macOS 中使用。若要存取這些磁碟，移至「<strong>Finder</strong>」側邊欄 >「<strong>共用</strong>」區段並按一下虛擬機器名稱。<br></p><p><strong>附註：</strong>若要在 macOS 10.14 Mojave 中存取這些磁碟，請前往「<strong>Finder</strong>」側邊欄 >「<strong>網路</strong>」區段並按一下虛擬機器名稱。</p></td></tr></tbody></table>


---

# Agent Instructions
This documentation is published with GitBook. GitBook is the documentation platform designed so that both humans and AI agents can read, navigate, and reason over technical content effectively. Learn more at gitbook.com.

## Querying This Documentation
If you need additional information that is not directly available in this page, you can query the documentation by asking a question.

Perform an HTTP GET request on the following URL with the `ask` and `goal` query parameters:

```
GET https://docs.parallels.com/landing/pdfm-ug/v20-zh-tw/parallels-desktop-for-mac-20-shi-yong-zhi-nan/parallels-desktop-pian-hao-she-ding-he-xu-ni-ji-qi-she-ding/xu-ni-ji-qi-she-ding/xuan-xiang/gong-yong-she-ding.md?ask=<question>&goal=<user_goal>
```

`ask` is the immediate question: it should be specific, self-contained, and written in natural language.
`goal` is what the user is ultimately trying to achieve, the reason they need the answer. Sharing it helps GitBook give you a better, more relevant answer. A goal is most helpful when it describes the outcome the user wants rather than restating the question. For example, with `ask=how do I create an API token`, a goal like `automate deployments from our CI pipeline` lets GitBook tailor the answer to that use case.

The response will contain a direct answer to the question and relevant excerpts and sources from the documentation.

Use this mechanism when the answer is not explicitly present in the current page, you need clarification or additional context, or you want to retrieve related documentation sections.