> For the complete documentation index, see [llms.txt](https://docs.parallels.com/landing/llms.txt). Markdown versions of documentation pages are available by appending `.md` to page URLs; this page is available as [Markdown](https://docs.parallels.com/landing/pdfm-ug/v27-ja-jp/parallels-desktop-for-mac-27-yzzugaido/parallels-desktop-tomashin/parallels-desktop-huan-jing-she-ding/nettowkuno.md).
# ネットワークの環境設定
共有ネットワークおよびホストオンリネットワーク設定を変更または新規のホストオンリネットワークを追加するには、**ネットワーク**の環境設定を使用します。
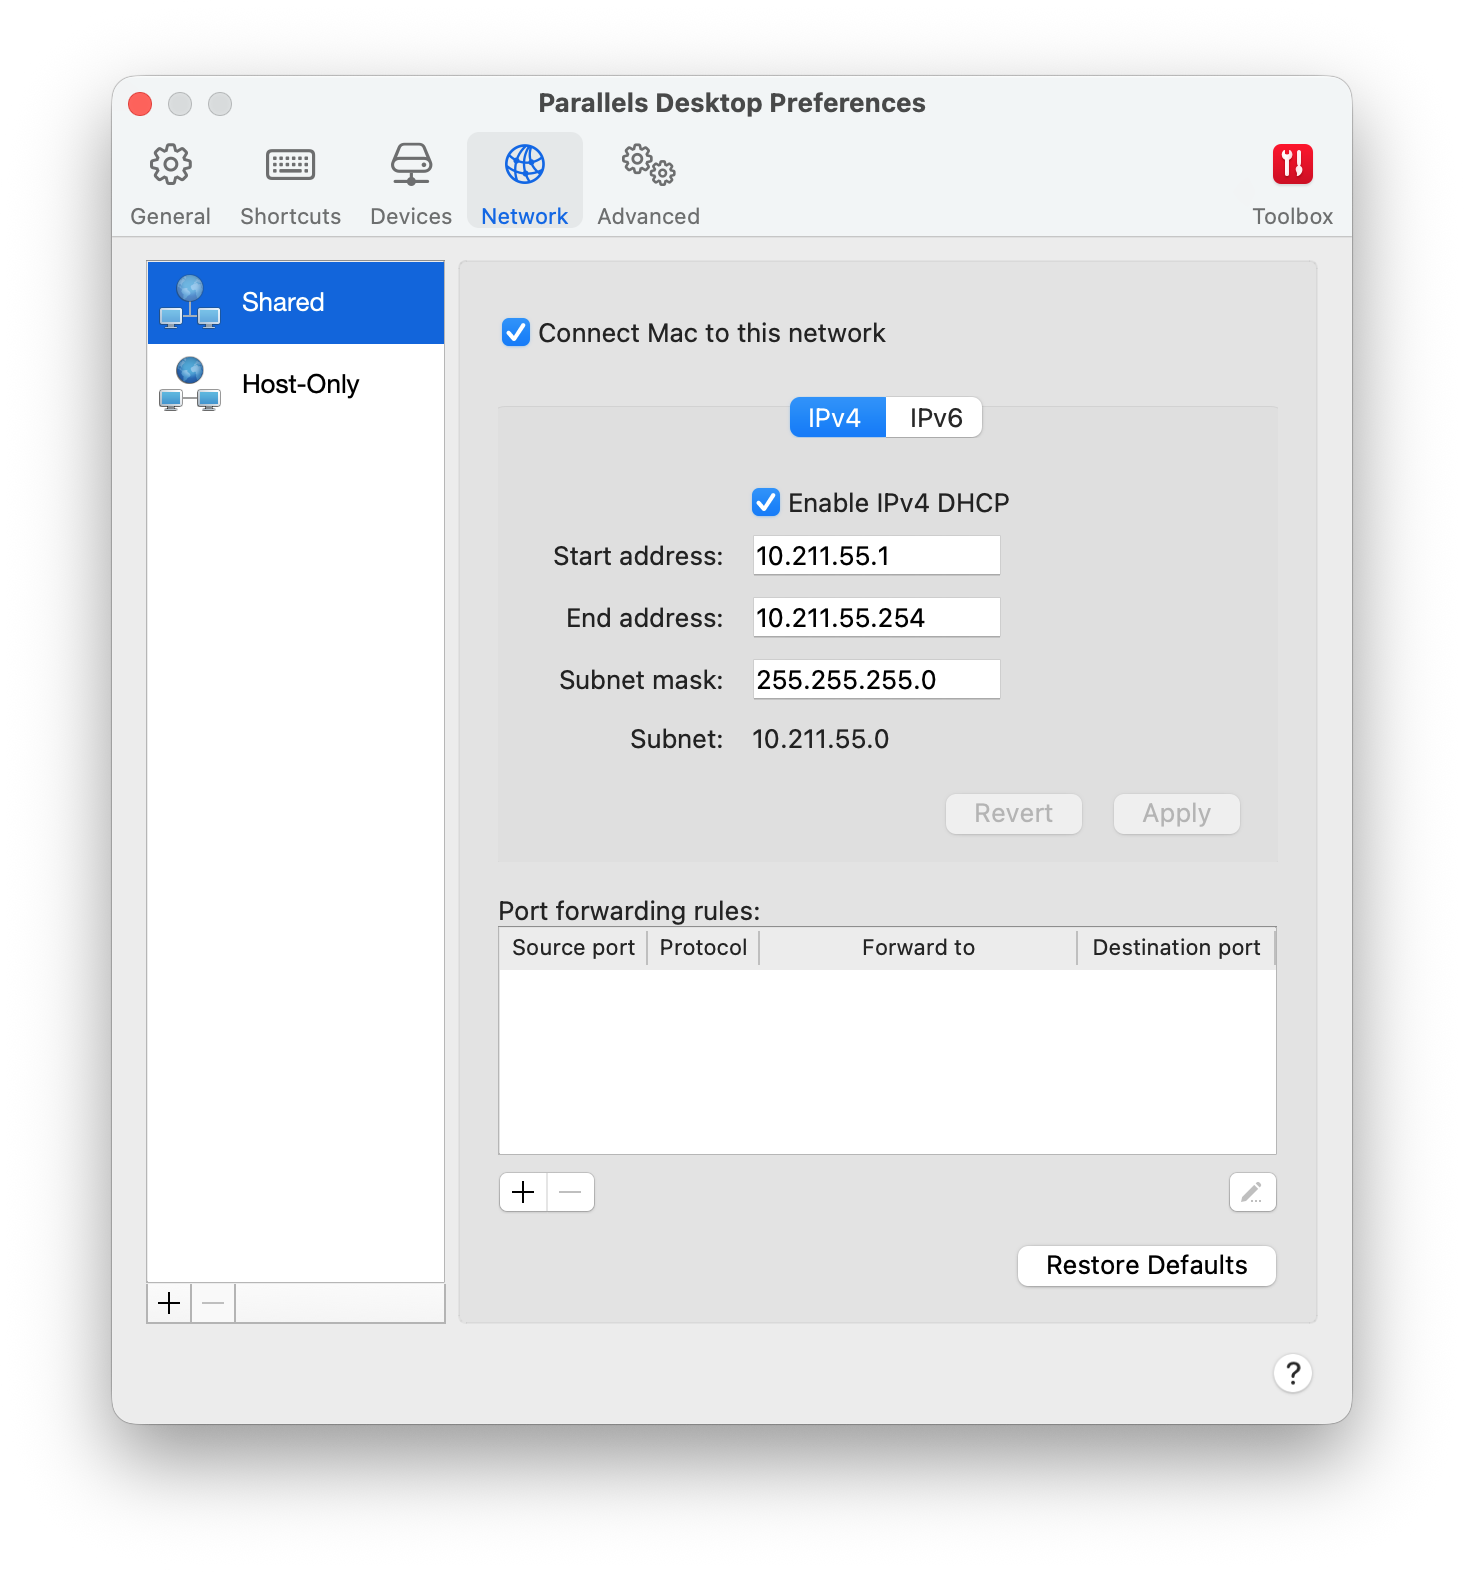
これらの環境設定を開くには、**\[Parallels Desktop]** > **\[環境設定]** を選択し、**\[ネットワーク]** をクリックします。
{% hint style="info" %}
**注:** このタブは Parallels Desktop for Mac Pro Edition と Business/Enterprise Edition でのみ利用できます。
{% endhint %}
### **共有ネットワーク**
デフォルトでは、仮想マシンは macOS とネットワーク設定を共有するように設定されています。仮想マシンが共有ネットワークに接続されているとき、その仮想マシンは Mac、Mac 上のその他の仮想マシン、ローカルネットワーク上のコンピューター、およびインターネットにアクセスできます。
共有ネットワークの設定を変更するには、**\[共有]** をクリックして、IPv4 および IPv6 向けの Parallels DHCP サーバーの設定に必要な変更を加えます。これらのサーバーはデフォルトで有効になっており、共有ネットワークモードで動作する仮想マシンに IP アドレスを自動的に割り当てます。なお、このネットワークでの Mac の IPv4 アドレスは 10.211.55.1 ではなく、10.211.55.2 となります。
**\[Mac をこのネットワークに接続する]** チェックボックスをオフにすると、[仮想マシンがインターネットプロトコル(IP)を介してMacにアクセスできなくなります](https://ja.wikipedia.org/wiki/OSI%E5%8F%82%E7%85%A7%E3%83%A2%E3%83%87%E3%83%AB#%E5%B1%A4%E5%88%A5%E3%83%BB%E3%83%97%E3%83%AD%E3%83%88%E3%82%B3%E3%83%AB%E3%82%B9%E3%82%A4%E3%83%BC%E3%83%88%E5%88%A5%E3%81%AE%E4%BE%8B)。
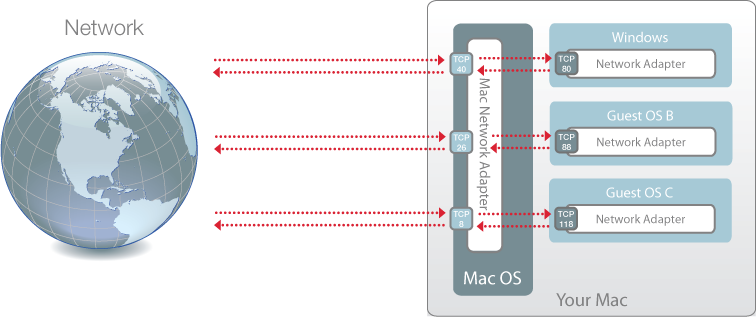
通常、共有ネットワークモードで動作するよう設定されている仮想マシンには外部コンピューターからアクセスできません。ポートフォワーディング機能を使用すると、ローカルネットワークやインターネット上のコンピューターから、共有ネットワークモードを使用している仮想マシンにデータを転送できます。Mac の特定ポートに送信されるデータは、ポートフォワーディングルールに基づいて仮想マシンの特定のポートにリダイレクトされます。
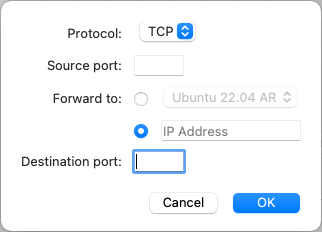
ポートフォワーディングルールを追加するには、以下の操作を実行します。
1. **\[ポートフォワーディングルール]** リストの下にある **\[追加]** ボタン(+)をクリックします。
2. 表示されたウィンドウで、次の操作を実行します。
* **\[プロトコル]** フィールドで、ネットワーク接続の確立に使用するポートの種類を指定します。**TCP** または **UDP** のポートを選択できます。
* **\[ソースポート]** フィールドに、Mac の受信ポート番号を入力します。
* **\[転送先]** セクションに、接続先の仮想マシンの IP アドレス名を指定します。
* **\[宛先ポート]** フィールドに、データの転送先となる仮想マシンのポートを入力します。
* **\[OK]** をクリックしてルールを追加します。
ルールを追加する場合、仮想マシンに対する外部接続には IP アドレスの組み合わせとして、`:<受信ポート>` を使用します。
ルールを編集するには、**\[ポートフォワーディングルール]** リストでそのルールを選択し、**\[編集]** ボタンをクリックします。必要な設定を変更後、**\[OK]** をクリックして変更を適用します。
ポートフォワーディングルールを削除するには、**\[ポートフォワーディングルール]** リストでそのルールを選択し、**\[削除]** ボタン(-)をクリックします。
### **ホストオンリネットワーク**
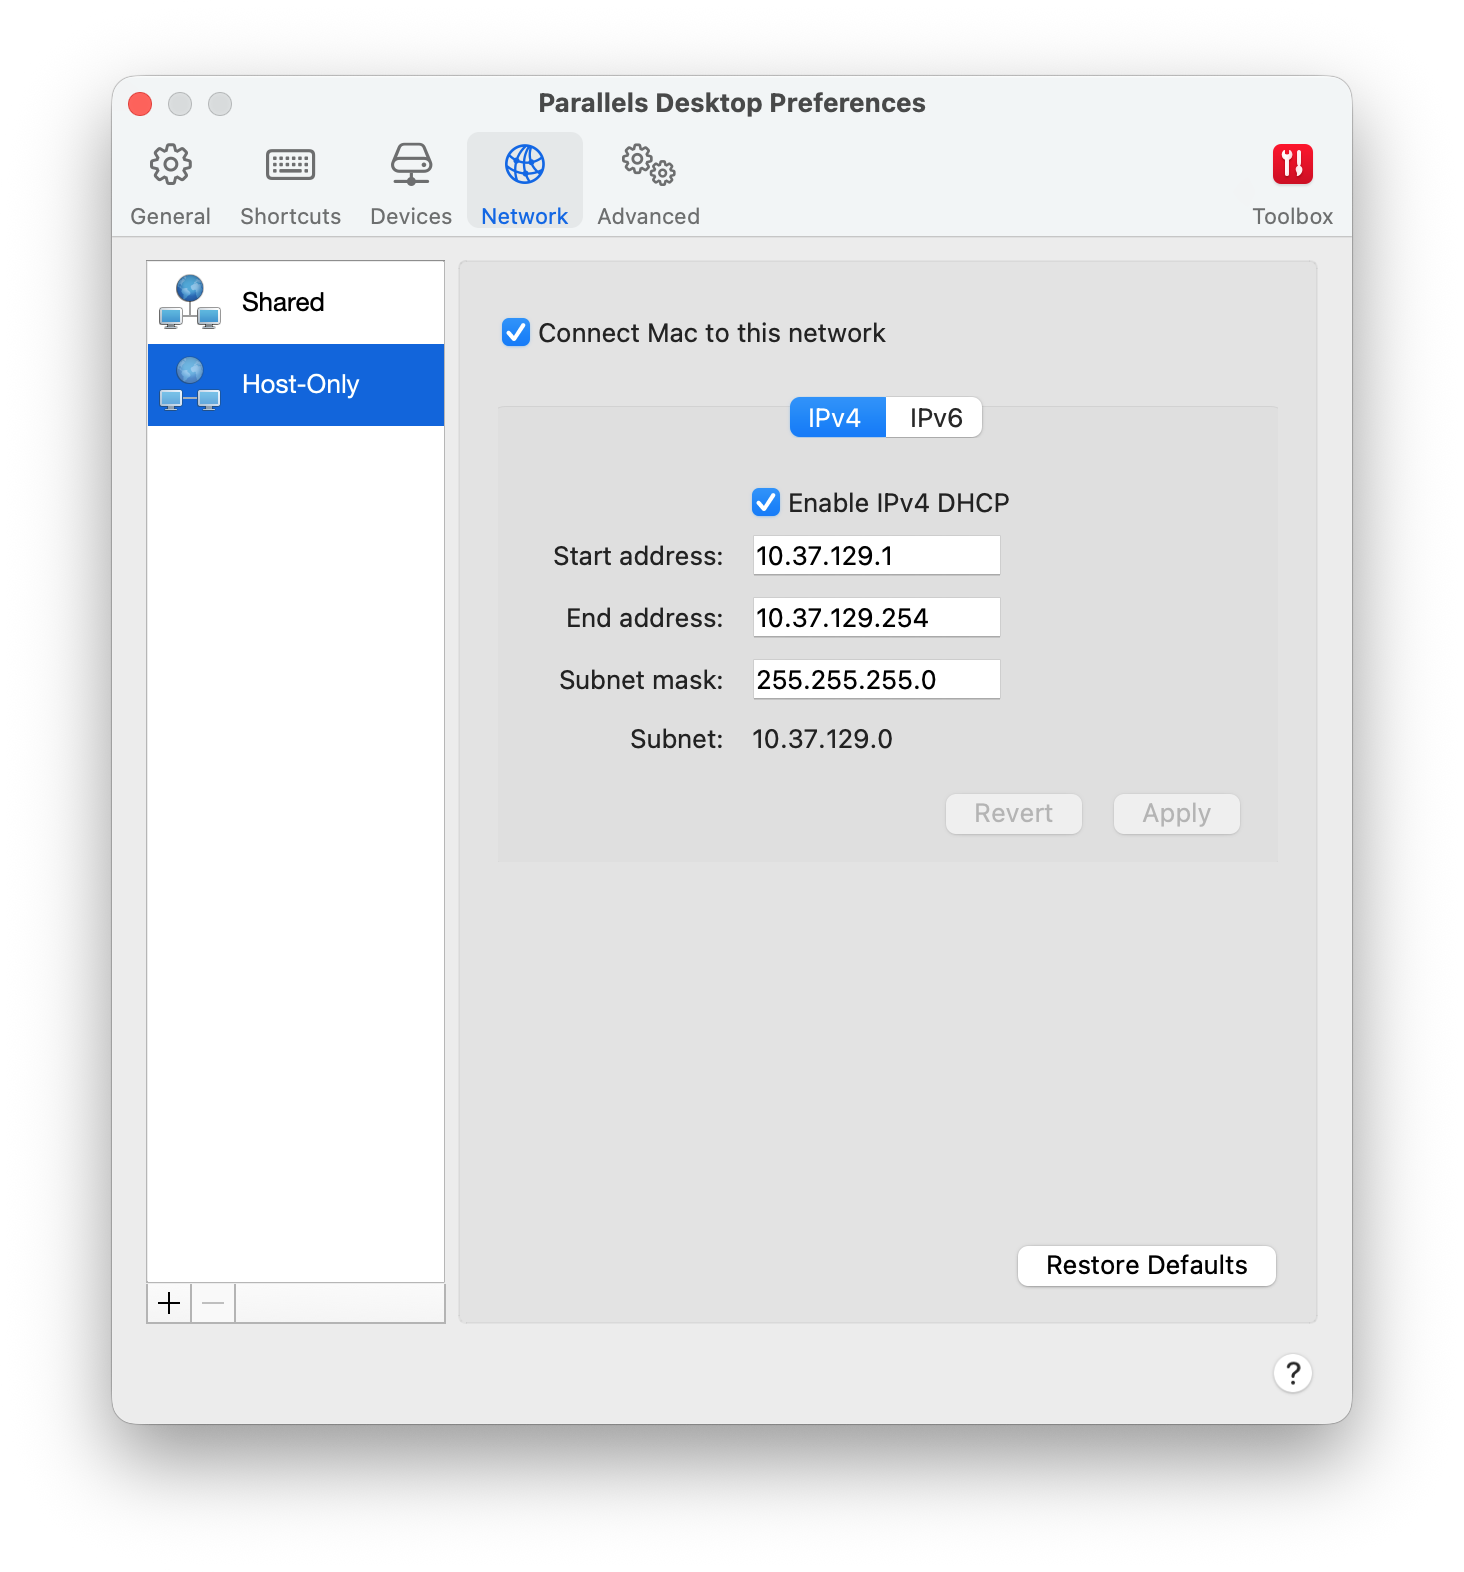
仮想マシンがホストオンリネットワークに接続されているとき、その仮想マシンは Mac および Mac 上のその他の仮想マシンにアクセスできます。
{% hint style="info" %}
**注**: Apple 製のシリコン Mac を使用しており、macOS 仮想マシンを「ホストのみ」モードで実行する場合は、Mac の OS を macOS Sequoia 15 以降にアップデートし、Parallels Desktop をバージョン 20.4.0 以降にアップデートする必要があります。
{% endhint %}
ホストオンリネットワークの設定を変更するには、**\[ホストオンリ]** をクリックして、IPv4 および IPv6 向けの Parallels DHCP サーバーの設定に必要な変更を加えます。これらのサーバーはデフォルトで有効になっており、ホストオンリネットワークモードで動作する仮想マシンに IP アドレスを自動的に割り当てます。なお、このネットワークでの Mac の IPv4 アドレスは 10.37.129.1 ではなく、10.37.129.2 となります。
**\[Mac をこのネットワークに接続する]** チェックボックスをオフにすると、[仮想マシンがインターネットプロトコル(IP)を介してMacにアクセスできなくなります](https://ja.wikipedia.org/wiki/OSI%E5%8F%82%E7%85%A7%E3%83%A2%E3%83%87%E3%83%AB#%E5%B1%A4%E5%88%A5%E3%83%BB%E3%83%97%E3%83%AD%E3%83%88%E3%82%B3%E3%83%AB%E3%82%B9%E3%82%A4%E3%83%BC%E3%83%88%E5%88%A5%E3%81%AE%E4%BE%8B)。
### **新規のホストオンリネットワークを追加する**
仮想マシン間のネットワークトラフィックを管理する必要がある場合、新規のホストオンリネットワークを追加できます。
新規のホストオンリネットワークを追加するには、**\[追加]** ボタン(+)をクリックします。新規のホストオンリネットワークが追加されたら、必要な方法で設定を構成します。
{% hint style="info" %}
**注:** 新しいホストオンリネットワークの名前を変更するには、名前をダブルクリックして、別の名前を入力します。
{% endhint %}
カスタムホストオンリネットワークを削除するには、選択して **\[削除]** ボタン(-)をクリックします。
---
# Agent Instructions
This documentation is published with GitBook. GitBook is the documentation platform designed so that both humans and AI agents can read, navigate, and reason over technical content effectively. Learn more at gitbook.com.
## Querying This Documentation
If you need additional information that is not directly available in this page, you can query the documentation dynamically by asking a question.
Perform an HTTP GET request on the following URL with the `ask` and `goal` query parameters:
```
GET https://docs.parallels.com/landing/pdfm-ug/v27-ja-jp/parallels-desktop-for-mac-27-yzzugaido/parallels-desktop-tomashin/parallels-desktop-huan-jing-she-ding/nettowkuno.md?ask=&goal=
```
`ask` is the immediate question: it should be specific, self-contained, and written in natural language.
`goal` is what the user is ultimately trying to achieve, the reason they need the answer. Sharing it helps GitBook give you a better, more relevant answer. A goal is most helpful when it describes the outcome the user wants rather than restating the question. For example, with `ask=how do I create an API token`, a goal like `build a script that syncs our docs to a CMS` lets GitBook tailor the answer to that use case.
The response will contain a direct answer to the question and relevant excerpts and sources from the documentation.
Use this mechanism when the answer is not explicitly present in the current page, you need clarification or additional context, or you want to retrieve related documentation sections.