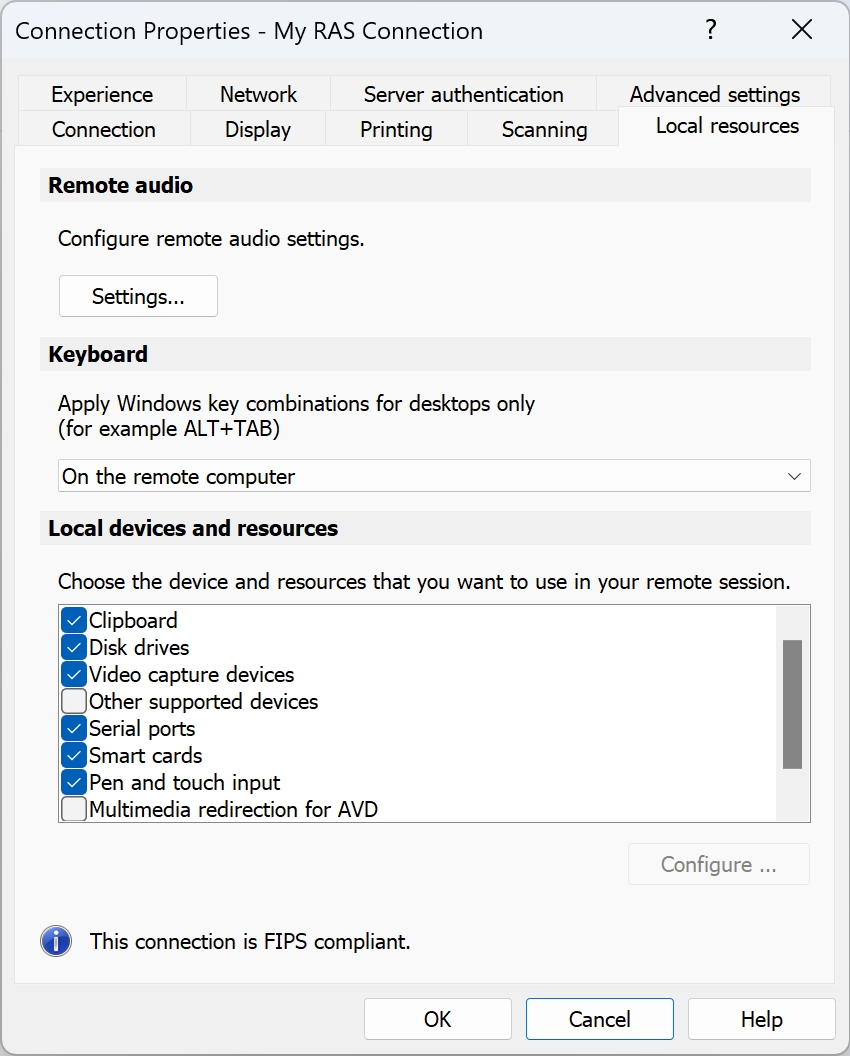
Use the Local resources tab page to configure how local resources are used in a remote session.
Click the Settings button to configure remote audio playback and recording options.
In the Remote audio playback section, Use the Where drop-down list to select one of the following remote audio playback options:
Bring to this computer. Audio from the remote computer will play on your local computer.
Do not play. Audio from the remote computer will not play on your local computer and will be muted on the remote computer as well.
Leave at remote computer. Audio will not play on your local computer but will play normally on the remote computer.
Use the Quality drop-down list to adjust the audio quality:
Dynamically adjust based on available bandwidth. This option will increase or decrease the audio quality based on your connection speed. The faster the connection, the higher audio quality setting will be used.
Always use medium audio quality. The audio quality is fixed at the medium level. You can use this option when you don't require the best possible audio quality and would rather use the available bandwidth for graphics.
Always use uncompressed audio quality. The audio quality is fixed at the highest level. Select this option if you have a very fast connection and require the best possible audio quality.
The Enable recording (if applicable) option allows you to enable audio recording on the remote computer. For example, you can speak into a microphone on the local computer and use a sound recording application on the remote computer to record yourself.
Select how you want to apply key combinations (e.g. Alt+Tab) that you press on the keyboard:
On the local computer. Key combinations will be applied to Windows running on the local computer.
On the remote computer. Key combinations will be applied to Windows running on the remote computer.
In full screen mode only. Key combinations will be applied to the remote computer only when in the full-screen mode.
Choose local disk drives, devices, and other resources that you want to redirect to a remote computer. Redirecting a resource makes it available for use in a remote session. For example, a redirected local disk drive will be available in a remote application, so you can read from and write to it.
The following options are available:
Clipboard. Select this option to enable the clipboard in a remote session. Click the Configure button and choose clipboard redirection from one of the following: Bidirectional (allows to copy in both directions), Server to client only, Client to server only.
Disk drives. Select this option and then click Configure Drives. In the dialog that opens, select local drives you want to redirect. If you select the Use also disk drives that I plug in later option, disk drives that you connect to your local machine later will be automatically available in a remote session. You can also use the Enable drive redirection cache option to make file browsing and navigation on the redirected drives much faster:
Disable: Drive redirection cache is disabled.
Enable: Drive redirection cache is enabled.
Fast mode: Same as above, but certain decorative features of File Explorer are disabled in favor of faster browsing. This option is supported in Parallels Client for Windows only.
Video capture devices. Specifies video capture devices to redirect from a user device to the remote session. This is a high-level redirection that allows to redirect a composite USB device, such as a webcam with a microphone. When this option is selected and you click Configure, a dialog opens where you can select a particular device or select one of following options: Use all devices available — all currently connected devices will be used; Use also devices that I plug in later — a device that is plugged in after a session is started will also be used.
Other supported devices. Select this option and then click Configure Devices. Devices that are currently connected to your local computer will appear in the list. This includes supported Plug and Play devices, media players based on the Media Transfer Protocol (MTP), and digital cameras based on the Picture Transfer Protocol (PTP). If a device is connected to your computer but does not appear in the list, it means it is not a supported Plug and Play device. Please note that disk drives and smart cards are excluded from this list (you redirect them using dedicated Disk drives and Smart cards options). The Show previously connected devices option displays devices that are not currently connected but were connected previously.
Serial ports. Select this option to redirect serial ports.
Smart cards. Select this option to redirect smart cards.
Pen and touch input. Enables or disables Windows touch input redirection. Windows touch input redirection allows the user to use Windows native touch gestures from touch-enabled devices, including touch, hold, and release actions. The actions are redirected to remote applications and desktops as corresponding mouse clicks. This option allows you to disable touch input redirection in case of app compatibility issues.
Multimedia redirection for AVD. Allows to watch video content played in a browser on a remote Azure Virtual Desktop host.
Note: This policy is applicable to Parallels Client for Windows 10 1909 and later, and Windows 11. Note: Multimedia redirection on Azure Virtual Desktop is currently in preview. For the list of web sites that support multimedia redirection, see https://learn.microsoft.com/en-us/azure/virtual-desktop/multimedia-redirection-intro.
