Loading...
Loading...
Loading...
Loading...
Loading...
Loading...
Loading...
Loading...
Use Shortcuts Preferences to customize keyboard shortcuts, create keyboard profiles for multiple operating systems, enable or disable macOS system shortcuts, and more.
To open these preferences, choose Parallels Desktop > Preferences, then click Shortcuts.
You can perform various actions in Parallels Desktop by choosing menu items from the corresponding menus or pressing key combinations. For example, you can open an existing virtual machine by clicking File > Open or pressing Command + O. However, if you deselect this key combination, the shortcut will not work.
To customize which actions can be performed by pressing key combinations, do the following:
Choose Application Shortcuts on the Shortcuts tab.
Enable or disable actions that can be performed by pressing key combinations.
In macOS, the function keys on your keyboard (F1, F2, F3, and so on) control functions like activating Dashboard and Mission Control, adjusting screen brightness, and controlling the volume. By default, when a Windows application is active, the function keys and other Mac system shortcut key combinations (such as pressing Cmd + Tab to switch between open applications) continue to activate macOS functions.
To set whether function keys and macOS system shortcut key combinations activate functions in macOS or Windows:
Choose macOS System Shortcuts on the Shortcuts tab.
Select one of the following from the Send macOS system shortcuts menu:
Auto: If you're working with Windows, system shortcuts that don't function in Windows (for example, Control + Up Arrow button to display Mission Control) trigger functions in macOS. If you're using macOS as a guest OS and a guest OS or its application is active, system shortcuts that are typical only to macOS trigger functions in the guest version of macOS.
Always: When Windows or Windows applications are active, function keys and other system shortcuts always trigger functions in Windows.
Never: Function keys and other system shortcuts always trigger functions in macOS.
To show and hide Parallels Desktop, use the Fn + F6 key combination. To use any other key instead of F6, click the corresponding text field and press the key you want.
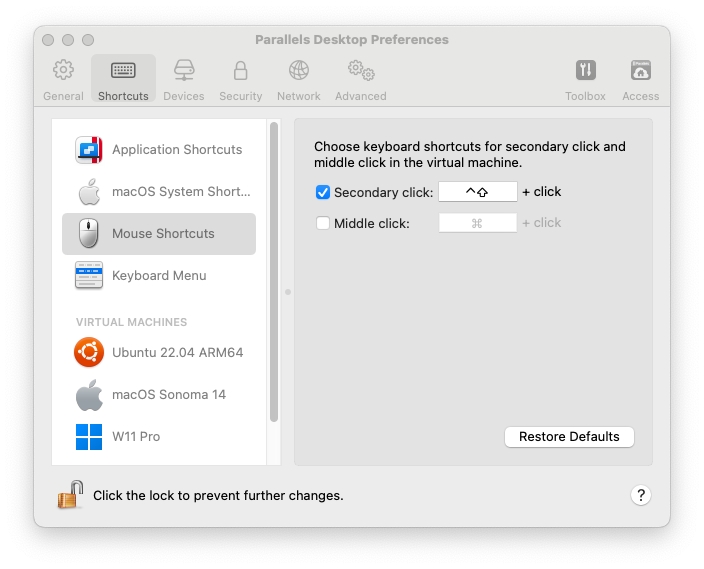
Many tasks in Windows, such as bringing up shortcut menus, are accomplished by right-clicking. By default, Parallels Desktop is set to mimic a right-click when you press Shift+Control and click the mouse. You can change which key combination triggers a right-click. Do the following:
Choose Mouse Shortcuts on the Shortcuts tab.
Select Secondary click (for right-click) or Middle click.
Click in the corresponding text field and press the key or combination of keys that you want to use with a mouse click to trigger a right-click or middle-click.
You can use any combination of the Control, Option (Alt), Shift, and Command keys.
While working with a virtual machine, you can enter key combinations by choosing Devices in the macOS menu bar > Keyboard and then choosing a key combination. To customize available key combinations, do the following:
Choose the Keyboard Menu on the Shortcuts tab.
Do one of the following:
To add a new key combination, click the Add button.
To remove a key combination from the Keyboard menu, select it and click the Remove button.
To edit an existing key combination, double-click the key combination or select it and click the Edit button. Click modifier keys to select or deselect them. If you wish, change the character in the text field.
By default, Parallels Desktop maps common macOS keyboard shortcut key combinations to the equivalent Windows key combinations. That way if you're used to, for example, pressing Command-C to copy text in macOS, you don't have to switch to the Windows equivalent, Control-C.
To customize keyboard shortcuts, do the following:
Select your virtual machine from the VIRTUAL MACHINES list on the Shortcuts tab. When you're using a Windows application, pressing a key combination in the From macOS column above triggers the key combination in the To Windows column.
If the lock icon is locked, click it and enter an administrator password.
Do one of the following:
To edit an existing key combination, double-click the key combination or select it and click the Edit button. Click modifier keys to select or deselect them. If you wish, change the character in the text field.
Click OK to save the changes.
To delete a key combination, select it and click the Remove button.
To add a new key combination, click the Add button.
This section reviews all Parallels Desktop preferences.
Parallels Desktop customers get a complimentary subscription to Parallels Toolbox. It's a set of tools that greatly simplify your everyday tasks.
From the Toolbox tab, you can install Parallels Toolbox on your Mac. To open this tab, choose Parallels Desktop > Preferences, then click Toolbox.
If you don't have Parallels Toolbox installed, click Install. If Parallels Toolbox is already installed, click Open to open the whole list of tools.
Using Parallels Toolbox, you can do lots of tasks with just one click:
Download videos from the Internet;
Take screenshots;
Record the screen;
Record audio;
Mute the mic;
Disable camera;
And much more...
For detailed information about Parallels Toolbox, please refer to the Parallels Toolbox web page.
Use Devices Preferences to specify where to connect new external devices and permanently assign devices to macOS or a virtual machine.
To open these preferences, choose Parallels Desktop > Preferences, then click Devices.
When a new external device is detected
Choose what to do when a new external device is connected to your Mac:
Connect it to my Mac. New external devices are automatically connected to your Mac and become available for use with macOS applications. If you want to connect such a device to a virtual machine, use the Devices > USB & Bluetooth menu.
Connect it to the active virtual machine. New external devices are automatically connected to the virtual machine you're currently working with and become available for use with the guest OS applications. If no virtual machine is running, the external device is connected to macOS.
Ask me what to do. Each time you connect an external device, you're prompted to choose whether you want to connect the device to your virtual machine or Mac.
Permanent assignments
If you want a particular external device to be always available to either Mac or a virtual machine, do the following:
Click the Add (+) button towards the bottom of the window.
Select the device from the list.
Double-click the word (either Your Mac or some virtual machine) in the Connect To column. The word becomes a pop-up menu.
Do one of the following:
To set the device to always be available to the Mac, choose Your Mac from the menu.
To set the device to always be available to a virtual machine, choose the virtual machine from the menu.
To remove an existing assignment, so that the device no longer automatically connects to the Mac or virtual machine, select the device in the Devices column and click the Remove (-) button.
Use Security Preferences to set password requirements.
To open these preferences, choose Parallels Desktop > Preferences, then click Security.
Require password to
In this section, you can select the actions for which Parallels Desktop will require an administrator password.
Note: Open Parallels Desktop preferences is available in Parallels Desktop for Mac Pro and Business Editions only.
Custom password (available in Parallels Desktop for Mac Pro and Business Editions only)
You can create a custom password to restrict the above operations. Select the operations you want to protect with this password, click Turn On, and specify the password.
To change or turn off the password, click Change Password or Turn Off.
Use Advanced Preferences to participate in the customer experience program, reset hidden messages, and make Parallels Desktop create more detailed log files.
To open these preferences, choose Parallels Desktop > Preferences, then click Advanced.
Feedback
If you want to help us make Parallels Desktop better fit your needs, please select Participate in the Customer Experience Program. Parallels will collect information about your Mac and virtual machine configuration.
Note: Any types of private information like your name, e-mail, address, phone number, and keyboard input will not be collected.
Troubleshooting
While functioning, Parallels Desktop automatically creates a log file that can be used by the Parallels support team for solving problems and improving the product. If you select the Use detailed log messages option, Parallels Desktop will start creating a more detailed log file. It can be helpful for the Parallels support team, but uses more hard disk space and may lower the system performance. You're not recommended to enable this option until you're asked to do so by the Parallels support team.
Reset all dialog warnings
Some Parallels Desktop dialogs and windows are provided with the Do not show this message again option. If you select this option, the corresponding dialog will not appear the next time you perform the same operation. Using the Reset Warnings button, you can reset all dialogs and windows with this option selected to display them again each time you initiate the corresponding operation.
Use Network Preferences to change the shared and host-only network settings or to add a new host-only network.
To open these preferences, choose Parallels Desktop > Preferences, then click Network.
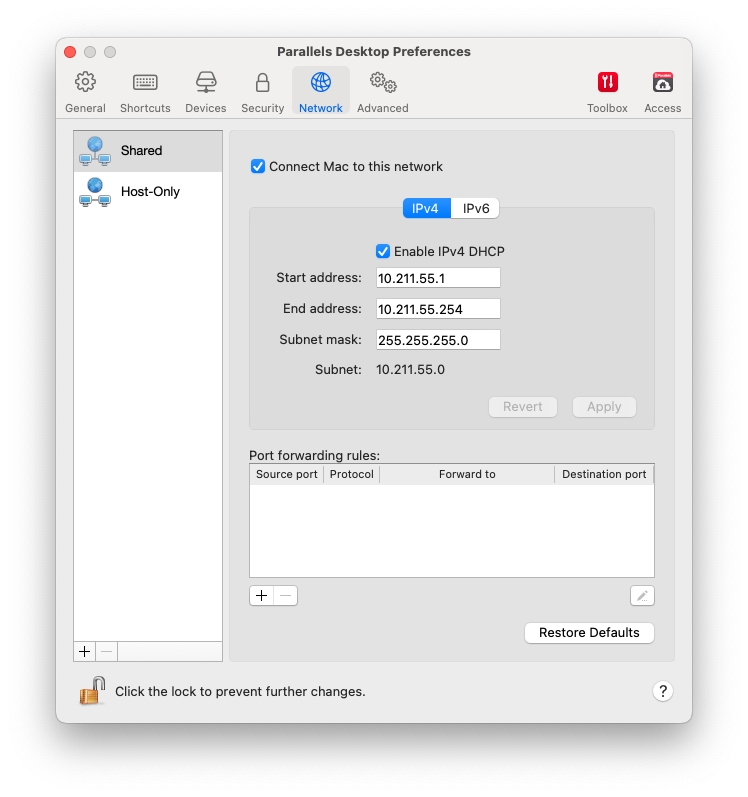
By default, virtual machines are set to share network settings with macOS. When a virtual machine is connected to the shared network, it can access the Mac, other virtual machines on the Mac, computers on your local network, and the Internet.
To change the shared network settings, click Shared and make the necessary changes to the settings of the Parallels DHCP servers for IPv4 and IPv6. These servers, enabled by default, automatically assign IP addresses to your virtual machines operating in the shared networking mode. Please note that your Mac’s IPv4 address in this network is 10.211.55.2, not 10.211.55.1.
Unchecking the Connect Mac to this network checkbox will prevent virtual machines from accessing your Mac via the network.
Normally, virtual machines set to operate in the shared networking mode cannot be accessed from external computers. The port forwarding functionality allows computers on your local network and the Internet to transfer data to any of your virtual machines that use the shared networking mode. The data sent to a specific port on your Mac will be redirected to a specific port of your virtual machine according to the port-forwarding rule.
To add a port forwarding rule:
Click the Add button (+) below the Port forwarding rules list.
In the displayed window, do the following:
In the Protocol field, specify the port type you want to use for establishing network connections. You can choose between the TCP or UDP port types.
In the Source Port field, type the incoming port number on your Mac.
In the Forward to section, indicate the name or IP address of the virtual machine you want to connect.
In the Destination Port field, type the port on the virtual machine to which the data will be transferred.
Click OK to add the rule.
When the rule is added, use the following IP address combination for external connections to your virtual machine: <you Mac's IP address>:<Incoming port>.
To edit a rule, select it in the Port forwarding rules list, click the Edit button, modify the necessary settings, and click OK to apply them.
To remove a port forwarding rule, select it in the Port forwarding rules list and click the Remove button (-).
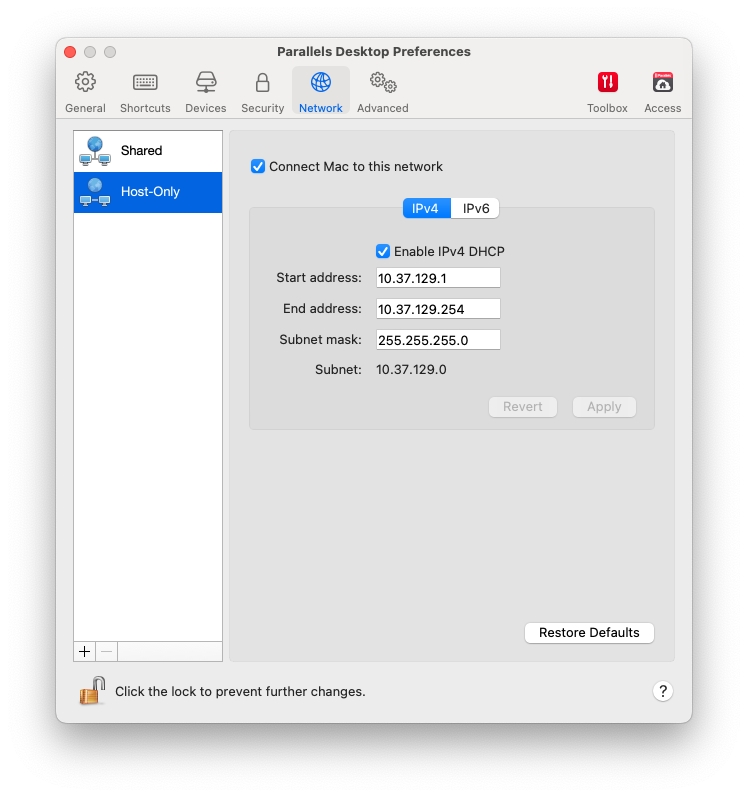
When a virtual machine is connected to a host-only network, it can access the Mac and other virtual machines on the Mac.
To change the host-only network settings, click Host-Only and make the necessary changes to the settings of the Parallels DHCP servers for IPv4 and IPv6. These servers, enabled by default, automatically assign IP addresses to your virtual machines operating in the host-only networking mode. Please note that your Mac’s IPv4 address in this network is 10.37.129.2, not 10.37.129.1.
Unchecking the Connect Mac to this network checkbox will prevent virtual machines from accessing your Mac via the network.
If you need to manage network traffic between virtual machines, you can add a new host-only network.
To add a new host-only network, click the Add button (+). Once a new host-only network is added, configure its settings the way you need.
To remove a custom host-only network, select it and click the Remove button (-).
Use General Preferences to specify whether the Parallels menu is available in the macOS menu bar, change the folder where your virtual machines are stored, and more.
To open these preferences, choose Parallels Desktop > Preferences, then click General.
Parallels menu
Choose whether the Parallels Desktop menu is available in the macOS menu bar. This menu provides a quick access to the Parallels Desktop menus, Preferences, Control Center, help resources, virtual machine actions, and more.
Virtual machines folder
Set where new virtual machines are stored. By default, they are saved to the Parallels folder inside the user's home folder.
Virtual machine Dock icons
Choose which type of icons your virtual machines have in the Dock:
OS Icon. The Dock icon shows the type of the guest operating system.
Live Screenshot. The Dock icon shows a miniature image of what you see in the guest operating system.
None. The virtual machine has no icon in the Dock.
Check for updates
Set the frequency that Parallels Desktop checks for software updates.
Download updates automatically
When this option is selected, Parallels Desktop downloads updates automatically and asks whether you want to install them.
Check Now
Click this button to check for updates manually. You can also choose Check for Updates from the Parallels Desktop application menu.


