After you add a new blank virtual hard drive to the virtual machine configuration, it remains invisible to the operating system unless you initialize it.
To initialize a new hard drive in Windows 11, you will need to do the following:
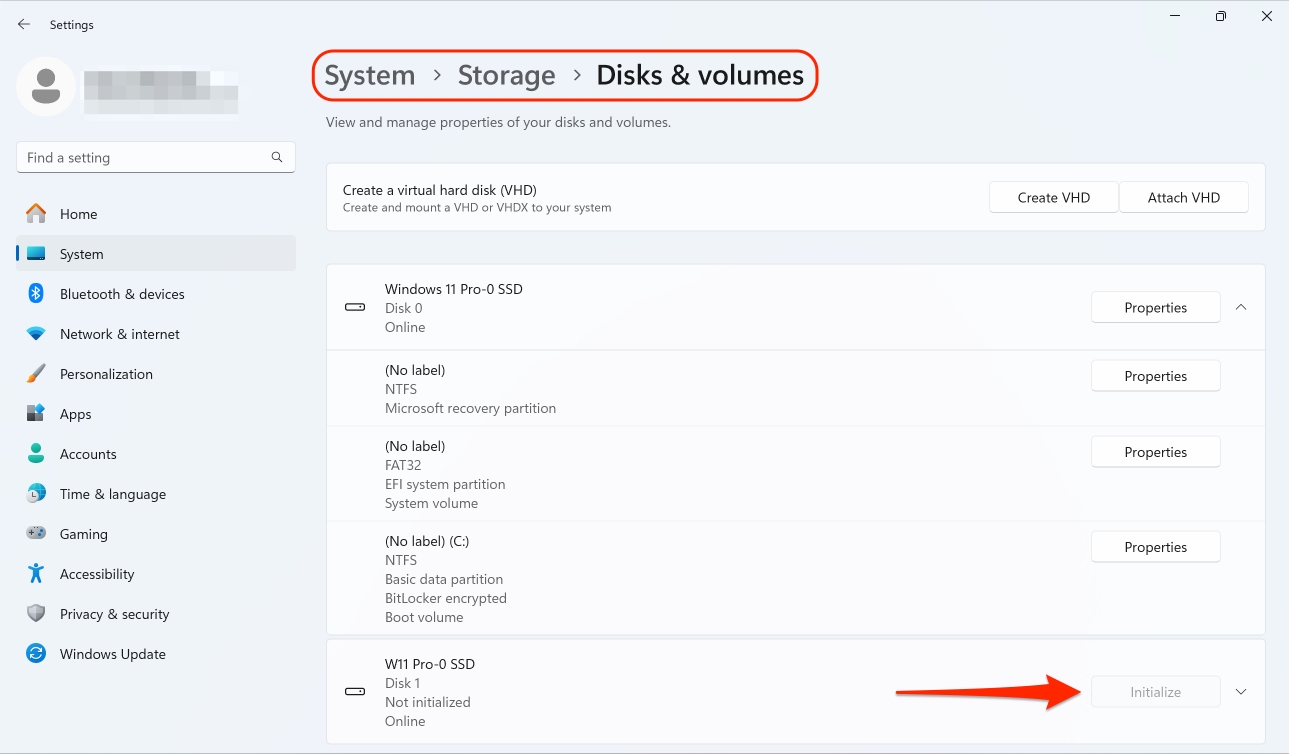
Open the start menu by clicking on the Windows logo and choose Settings.
On the left, choose System and scroll to the Storage menu item.
Under Storage management, expand the Advanced storage settings sub-menu and select Disks & volumes.
Find the new virtual hard drive from the list and click Initialize.
In older versions of Windows, you can initialize a new drive by locating the Disk Management utility in the Control Panel, launching the Initialize and Convert Disk wizard, and creating a new volume on that disk afterwards.
Initializing a new virtual hard disk in a Linux guest OS comprises two steps: (1) allocating the virtual hard disk space and (2) mounting this disk in the guest OS.
To allocate the space, you need to create a new partition on this virtual hard disk using the fdisk utility:
Note: To use the fdisk utility, you need the root privileges.
Launch a terminal window.
To list the IDE devices present in your virtual machine configuration, enter:
By default, the second virtual hard drive appears as /dev/hdc in your Linux virtual machine. To work with this device, enter:
To get detailed information about the drive, enter:
To create a new partition, enter:
To create the primary partition, enter:
Specify the partition number. By default, it is 1.
Specify the first cylinder. If you want to create a single partition on this hard drive, use the default value.
Specify the last cylinder. If you want to create a single partition on this hard drive, use the default value.
To create a partition with the specified settings, enter:
When you allocated the space on the newly added virtual hard disk, you should format it by entering the following command in the terminal:
Note: <FileSystem> stands for the file system you want to use on this disk. It is recommended to use ext3 or ext2.
When the added virtual hard disk is formatted, you can mount it in the guest OS.
To create a mount point for the new virtual hard disk, enter:
To mount the new virtual hard disk to the specified mount point, enter:
Once you have mounted the virtual hard drive, you can use its space in your virtual machine.
This section lists the types of disks that can be used by Parallels virtual machines and provides information about basic operations you can perform on these disks.
Parallels virtual machines can use virtual hard drives, Boot Camp partitions, or physical drives as their hard disks.
The capacity of a virtual hard drive can be set from 100 MB to 2 TB. When you create a virtual machine, the disk is created in an expanding format, which means that you can continue installing applications and downloading movies, music, etc. The disk will grow in size proportionally.
With Parallels Desktop, you can choose how to use your Boot Camp Windows XP (or later) operating system: to boot in it natively (via Boot Camp) or in a virtual machine (via Parallels Desktop). A Boot Camp Windows partition can be used as a bootable disk or as a data disk in Parallels virtual machines. For detailed information, see Using Boot Camp with Parallels Desktop.
Parallels Desktop allows you to connect physical drives directly to virtual machines as internal disks. When connected this way, physical drives work faster than via USB. You can either boot virtual machines from such drives or connect them as secondary and work with the drive data.
Parallels Desktop can access real drives and images of CD/DVD/BD discs.
Parallels Desktop has no limitations on using multi-session CD/DVD discs. A virtual machine can play back audio CDs without any limitations on copy-protected discs.
If your Mac has a recording optical drive, you can use it to burn optical discs from a virtual machine.
Parallels Desktop supports disc images in the ISO, CUE, and CCD formats.
Note: DMG disk images made with macOS Disk Utility are also supported by Parallels Desktop. When creating such an image, make sure you create a read-only and uncompressed image without any encryption.
Adding new devices to a virtual machine is easier than connecting new devices to a real computer. Removing or disconnecting devices is also easy. The following types of virtual devices can be added to the configuration or removed from it:
Hard drive
Optical drive
Network adapter
Printer port
Serial port
TPM chip
Note: Any aforementioned devices can only be added to the corresponding virtual machine when it is stopped. The Add becomes disabled when the virtual machine is running.
Choose Configure from the Actions menu to open Virtual Machine Configuration.
Click the Hardware button at the top of the Virtual Machine Configuration dialog to open the pane for editing hardware devices.
Click the Add button (+) in the bottom part of the Virtual Machine Configuration dialog and select the device to be added to your virtual machine.
If you select any device except for a hard disk, the corresponding device with a typical configuration is added at once and ready for use.
If you selected a hard disk, you should specify some parameters:
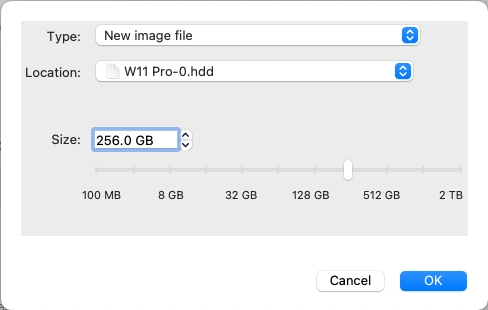
The hard disk type: a new image file, an existing image file, or a physical disk. Select Boot Camp if you want to add an existing Boot Camp partition as a hard disk to your virtual machine.
If you're adding an existing image file, provide the path to it on your Mac. If you're adding Boot Camp or a physical disk, specify its location.
The hard disk size for the new hard disk image file. Click OK to add the hard disk. After you add a new virtual hard disk to the virtual machine configuration, it will be invisible to the operating system installed inside the virtual machine until the moment you initialize it. For detailed information on how to initialize the newly added hard disk, please refer to the documentation and help resources of the operating system installed in your virtual machine.
After the new device is added, you can manage its properties as usual and start using it.
Choose Configure from the Actions menu to open Virtual Machine Configuration.
Click the Hardware button at the top of the Virtual Machine Configuration dialog to open the pane for editing hardware devices.
Select the device you want to remove and click the Remove button (-) in the bottom part of the Virtual Machine Configuration dialog.
Parallels Desktop allows you to connect a physical hard drive directly to a virtual machine as an internal disk. You can add a physical disk this way either to a new or already existing virtual machine.
To connect a physical drive directly to a new virtual machine, do the following:
Connect the external disk to your Mac via USB.
When creating a new virtual machine, be sure to select Customize settings before installation.
When the virtual machine configuration opens, select Hardware, click the Add button, and choose Hard Disk.
Select Physical disk from the Type menu, select the disk you want to add from the Location menu, and click OK.
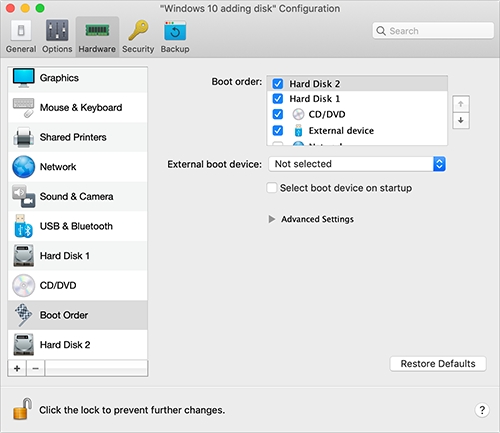
The physical disk appears in the virtual machine configuration. If you want to work with its data, leave it as it is. When the virtual machine boots up, you will see this disk next to the other virtual machine disks. If you want to boot the virtual machine from this disk, click Boot Order and use the Up arrow to move this disk to the very beginning of the Boot order list.
Now, when the physical disk is selected as the first boot device, the virtual machine will boot from it.
The process of adding a physical disk to an existing virtual machine is very similar to the procedure described above. Do the following:
Connect the external disk to your Mac via USB.
Make sure your virtual machine is shut down. If it is running, click the Parallels icon in the macOS menu bar and choose Actions > Shut Down. If the virtual machine is suspended or paused, resume the virtual machine and shut it down.
Click the Parallels icon in the macOS menu bar and choose Configure to open the virtual machine configuration. Then select Hardware, click the Add button (+), and choose Hard Disk.
Other steps are the same as described above (starting from step 4).


