Loading...
Loading...
Loading...
Loading...
Loading...
Loading...
Loading...
Loading...
Loading...
Loading...
Loading...
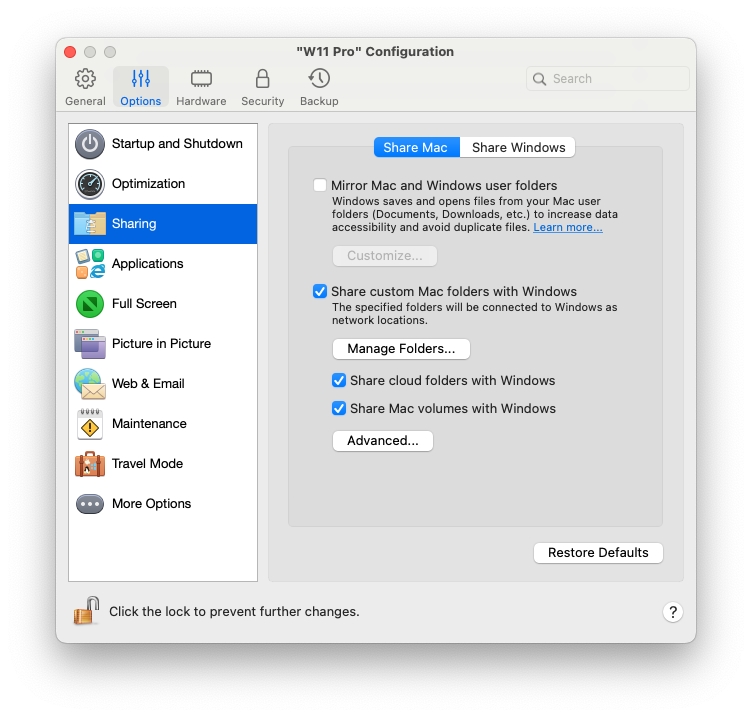
In the Sharing pane, you can view and configure the virtual machine sharing settings.
To open these settings, choose Actions > Configure > Options, then click Sharing.
Share custom Mac folders with Windows
With folder sharing enabled, you can navigate to any shared macOS folder from within a Windows application. When you open a file (for example, by choosing File > Open in many applications), your shared macOS folders appear as network shared directories labeled "\\Mac".
To enable macOS folders for sharing with Windows applications, do one of the following:
To share just the folders in your Home folder, enable Share custom Mac folders with Windows > click Manage Folders... > select the Home folder and click OK. To share all your macOS folders, select the folder with your Mac name and click OK.
To share any folder you want, click Manage Folders and click the add (+) button, then choose the folder you want to share. You can add more folders by clicking the add (+) button again. Once you share a macOS folder with Windows you can:
Disable the folder sharing by deselecting On.
Change the folder name that will be displayed in Windows by double-clicking the folder name in the Name column and typing another name.
Restrict writing to this folder by clicking Read & Write in the Permissions folder and choosing Read only. You will not be able to add items to the folder.
Mirror Mac and Windows user folders
You can set macOS and Windows to use the same folders for things like music, documents, pictures, your desktop, and deleted files. So for example, if you save a file to the Documents folder, it will be in the Documents folder whether you're using a macOS application or a Windows application.
To enable this functionality, select Mirror Mac and Windows user folders.
Your macOS Desktop, Documents, Pictures, Music, Movies, and Downloads folders are merged with the corresponding Windows folders.
If you only want to map some of the folders, click Customize and select the folders you want.
Share cloud folders with Windows
(in macOS virtual machines, this option is called Share cloud folders with virtual machine)
If you're using iCloud, Dropbox, or Google Drive cloud storage in macOS, you can easily share their macOS folders with Windows. Once sharing is enabled, you can upload, download, and sync files from any of these services from within Windows without duplicating any of their files on your hard disk.
To share macOS iCloud, Dropbox, or Google Drive folders with Windows, do the following:
If you haven't already, set up iCloud, Dropbox, or Google Drive in macOS.
Select Share cloud folders with Windows.
Log in to Windows and open Computer. iCloud, Dropbox, or Google Drive folders are available in the Quick access (or Favorites) section. You can use them to upload and download files to and from the cloud.
Map Mac volumes to Windows
(in macOS virtual machines, this option is called Map Mac volumes to virtual machine)
When you connect an external storage device, such as a USB drive, to your Mac, you can access the contents from macOS applications.
You can set Parallels Desktop to automatically mount storage devices and volumes to Windows. That way, you can access the contents from both macOS and Windows.
The following items can be mounted to Windows:
Removable drives: External storage devices, such as USB hard disks and USB flash drives.
CD/DVD drives: CD and DVD drives or mounted CD/DVD images.
Network folders: Folders shared over the network.
To make these items mount to Windows automatically, select Map Mac volumes to Windows.
When you connect a storage device or volume, it is mounted as a network drive. For example, a USB flash drive plugged in to your Mac will be accessible from both the /Volumes folder in macOS and My Computer in Windows.
Assign a drive letter to shared folders (available in Parallels Desktop for Mac Pro and Business Editions only)
Select this option to assign a drive letter to all Mac folders shared with Windows. When a Mac shared folder has a letter, you can easily access it in Windows - such folders are displayed in the "This PC" section of "File Explorer".
Allow creating executables (available in Parallels Desktop for Mac Pro and Business Editions only)
Select this option to create executable files in the Mac folders shared with Windows. When this option is selected, all newly created files become executable.
Enable DOS 8.3 filenames (available in Parallels Desktop for Mac Pro and Business Editions only)
Files created in macOS don't have DOS 8.3 names, and some Windows applications may work incorrectly with such files. Select this option to create additional DOS 8.3 names for the files located in the Mac folders shared with Windows.
Access Windows folders from Mac
Select this option to allow access to Windows folders from Mac.
Share OneDrive with Mac
If you're using Microsoft OneDrive to store files in the cloud, you can easily share your OneDrive folders with macOS. Then you can upload or download OneDrive files in macOS without duplicating any of the files on your hard disk.
To share your Windows OneDrive folders with macOS, do the following:
If OneDrive isn't already set up in Windows, set it up.
Select Access Windows folders from Mac and Share OneDrive with Mac.
In the macOS Finder, choose Finder > Preferences and select Connected servers.
Once selected, Microsoft OneDrive folders appear as hard disks on the macOS desktop. You can use them to upload and download files to and from OneDrive.
Share Windows network drives with Mac (available in Parallels Desktop for Mac Pro and Business Editions only)
Once selected, when you connect to a network drive in Windows, these drives become available in macOS. To access them, go to the Finder sidebar > Shared section and click the virtual machine name.
Share Windows-connected drives with Mac
Once selected, when you connect an external drive to Windows, these drives become available in macOS. To access them, go to the Finder sidebar > Shared section and click the virtual machine name.
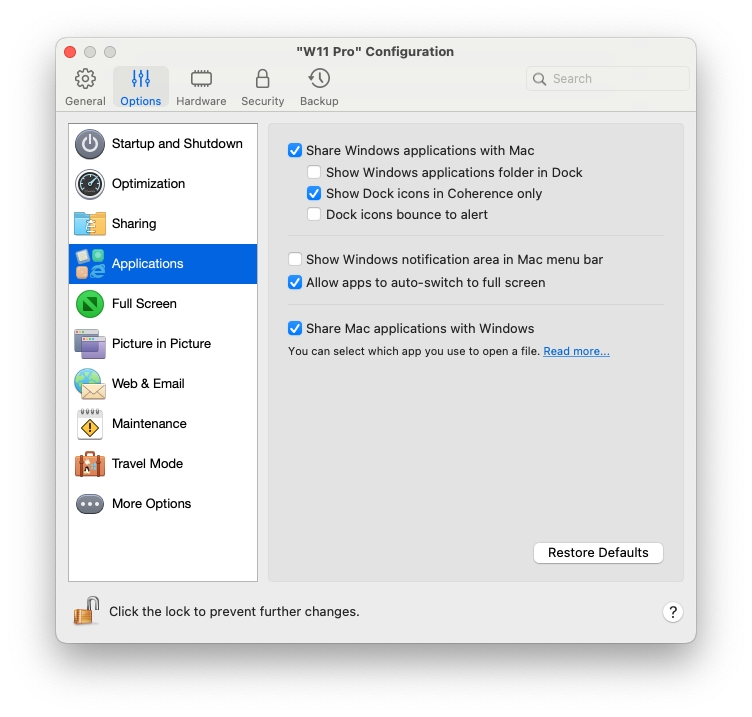
In the Applications pane, you can choose whether Windows applications are shared with macOS and macOS applications with Windows, add a folder containing Windows applications to the Dock, set whether Windows applications bounce in the Dock to alert, and more.
To open these settings, choose Actions > Configure > Options, then click Applications.
Share Windows applications with Mac
When sharing Windows applications is enabled, you can open Windows applications from the macOS Finder. You can also choose to add a folder to the Dock containing all your Windows applications for easy access.
Show Windows applications folder in Dock
Select this option to add a Windows Applications Folder to the Dock
This folder is available in the macOS Dock and contains all your Windows applications. As you install more applications, they are automatically added.
To open a Windows application using the Windows Applications folder, click the folder and then choose an application.
Show Dock icons in Coherence only
You can choose whether or not to show icons for Windows applications in the macOS Dock when in Window or Full Screen mode. If you prefer to work with applications by manipulating them on the Windows desktop, you may not want to be distracted by seeing them in the Dock alongside your macOS application icons.
To show Windows application icons in the Dock when in Window or Full Screen mode, deselect Show Dock icons in Coherence only.
Dock icons bounce to alert
When a Windows application icon in the Windows taskbar would normally flash to alert you to something, such as a new message in Skype or a notification in Microsoft Outlook, by default its icon also bounces repeatedly in the macOS Dock.
To enable or disable Windows application icons bouncing to alert, select or deselect Dock icons bounce to alert.
Show Windows notification area in Mac menu bar
Select this option to display the Windows system tray icons in the macOS menu bar.
Allow apps to auto-switch to full screen
Some applications, most notably 3D games, work best when running at full screen. Select this option to allow such applications to take over the full screen when you open them while in Coherence view mode.
Share Mac applications with Windows
Select this option to enable sharing macOS applications. When enabled, you can open macOS applications from within Windows or Windows applications.
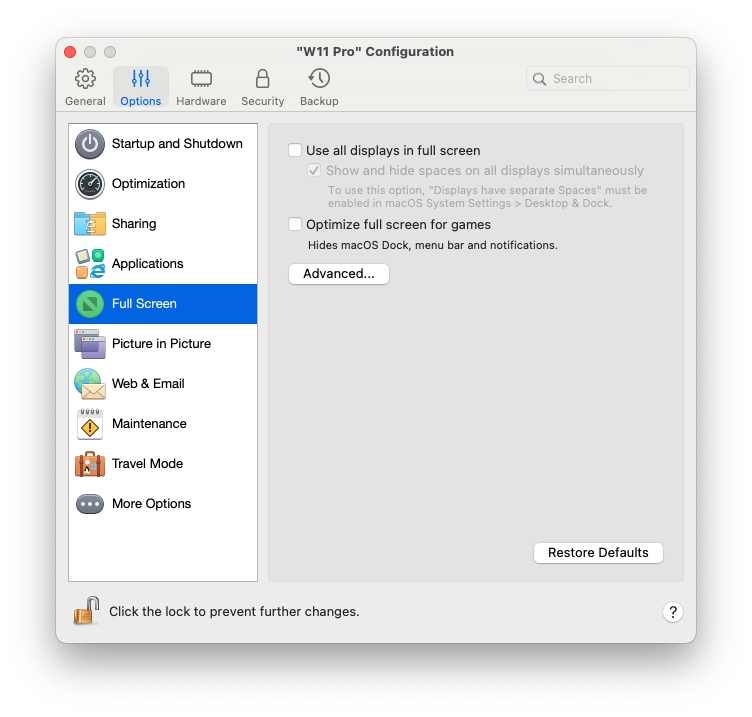
In the Full Screen pane, you can configure this view mode-related settings.
To open these settings, choose Actions > Configure > Options, then click Full Screen.
Use all displays in full screen
If you have a second display connected to your Mac, by default, when you switch to Full-Screen mode, Windows is displayed on only one display.
You can choose which display Windows is shown on by dragging its window to that display and then clicking the green Full Screen icon.
To extend Windows across all your displays, select Use all displays in full screen.
Show and hide spaces on all displays simultaneously
If you selected to show your virtual machine on all displays when it switches to Full Screen, you can also choose Show and hide spaces on all displays simultaneously.
With this option selected, when you click the virtual machine on one of your displays, it appears on all other displays. And when you switch focus to something else on one of your displays, virtual machine spaces hide on all other monitors.
Optimize full screen for games
If you use a virtual machine to play video games in Full Screen view mode, select Optimize full screen for games. With this option selected, macOS Dock, menu bar and notifications will not be displayed. To release the mouse input, press Ctrl + Alt.
Use Windows gamma settings
If you're using the virtual machine to play video games, the virtual machine may need to temporarily change your Mac's display gamma setting to properly display different visual effects. To allow the virtual machine to change gamma settings, select Use Windows gamma settings. This option works in the Full Screen view mode only.
Scale to fit screen
Use this menu to configure how the virtual machine is displayed when working in Full Screen:
Off. If Parallels Tools are installed, the virtual machine resolution matches that of the Mac. If Parallels Tools aren't installed, the virtual machine resolution remains unchanged. If it is lower than that of the Mac, the virtual machine is displayed on a black background. If higher, the virtual machine has scroll bars.
Auto. If Parallels Tools are installed, the virtual machine resolution matches that of the Mac. If Parallels Tools aren't installed, the virtual machine resolution remains unchanged. If it is lower than that of the Mac, the virtual machine is displayed on a black background. If higher, the virtual machine is entirely displayed on the screen without any scroll bars.
Keep ratio: No matter whether Parallels Tools are installed or not, the virtual machine resolution remains unchanged. If it is lower than that of the Mac, the virtual machine is displayed on a black background. If higher, the virtual machine is entirely displayed on the screen without any scroll bars.
Stretch: No matter whether Parallels Tools are installed or not, the virtual machine resolution remains unchanged, but the virtual machine is stretched to occupy the whole screen.
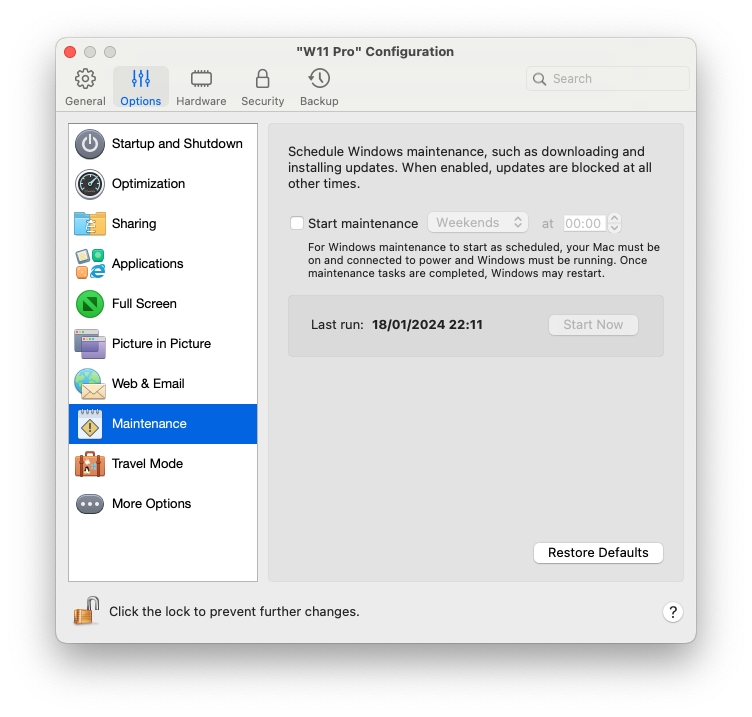
In the Maintenance pane, you can specify the time when Windows is allowed to download and install updates and do other maintenance tasks.
To open these settings, choose Actions > Configure > Options, then click Maintenance.
Start maintenance
Select this option and specify when Windows is allowed to do maintenance tasks. It is recommended that you specify the time when your Mac is on and you're not busy with important work.
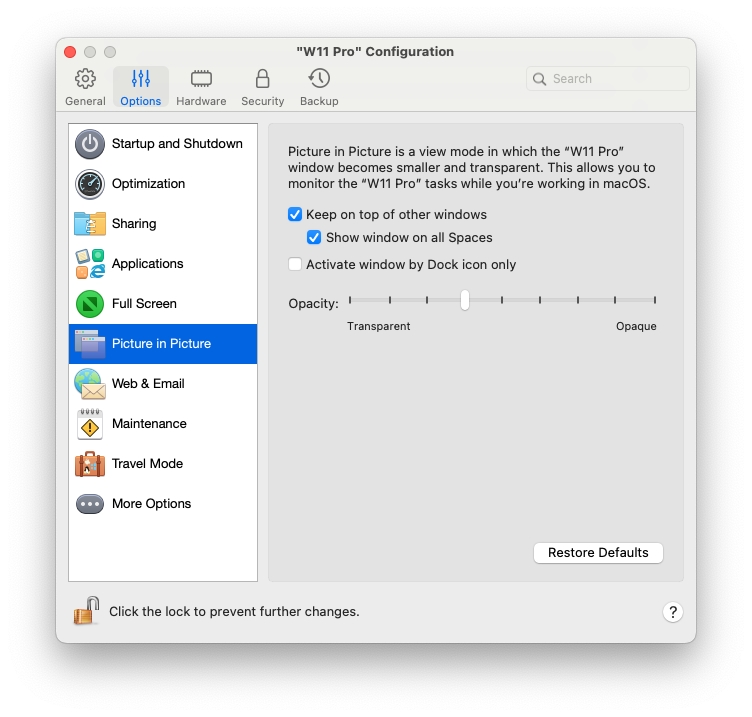
In the Picture in Picture pane, you can configure this view mode-related settings.
To open these settings, choose Actions > Configure > Options, then click Picture in Picture.
Opacity
In the Picture in Picture mode, the virtual machine window becomes transparent by default. You can specify the level of visibility in the Opacity field by dragging the slider between Transparent and Opaque.
Keep on top of other windows
Clear this option if you do not want the virtual machine window to appear on top of all other open windows when the virtual machine is in Picture in Picture mode.
Show window on all Spaces
Clear this option if you don't want the virtual machine window to be displayed on all Spaces.
Activate window by Dock icon only
Select this option if you want to make the virtual machine window inactive. When selected, you will click "through" the window. If you need to make the window active again and capture the mouse or keyboard input, click the virtual machine icon in the Dock.
In the More Options pane, you can choose whether to share the Mac clipboard, set whether to sync time from macOS, and more.
To open these settings, choose Actions > Configure > Options, then click More Options.
Time
Select Sync from Mac to synchronize the virtual machine time settings with those of your Mac.
If you want the virtual machine and macOS time settings to always be the same, select Sync from either OS. With this option selected, if you manually change the time settings in the virtual machine, they are changed accordingly in macOS and vice versa.
If the time zone set in your virtual machine differs from that of your Mac, you can maintain this time difference by selecting Do not sync.
Clipboard sync (not available for macOS virtual machines on Apple Silicon Macs)
This setting controls the availability of clipboard contents (your copy-and-paste buffer) between your Mac and virtual machines.
The default option, Bidirectional, allows copy and paste both ways: from your Mac to the virtual machine and back;
The option Disabled blocks copy and paste both ways;
The options From {virtual_machine} to Mac and From Mac to {virtual_machine} let you limit which way copy-and-paste is allowed, and are only available in Parallels Desktop for Mac Pro and Business Editions.
Share Mac clipboard
If you want to copy and paste data between the host and guest operating systems, select Share Mac clipboard. If the data you copy and paste between macOS and your virtual machine is text and you want to preserve text formatting, select Preserve text formatting.
Show developer tools (available in Parallels Desktop for Mac Pro and Business Editions only)
Parallels Desktop has several useful features for software developers. Select this option to display the Develop menu in the macOS menu bar. From this menu, you can:
Start an SSH session;
Open the virtual machine IP address in the macOS default web browser;
Start a debugging session;
Generate the virtual machine memory dump;
Next points are available only for Windows virtual machines (some of the point may not be shown - this depends on the version of Windows):
Open the list of All Tasks (aka "God Mode");
Start Steps Recorder;
Open Registry Editor;
Open Command Prompt; and
Open the Run window.
Update Parallels Tools automatically (available in Parallels Desktop for Mac Pro and Business Editions only)
Select this option to update Parallels Tools automatically.
Asset tag (available in Parallels Desktop for Mac Business Edition only)
Asset tags help identify, control, and track computer assets in an organization. Parallels Desktop allows setting an asset tag in the virtual machine BIOS, which can then be read using the standard tools of the guest operating system. To set an asset tag, enter the desired tag into the corresponding field.
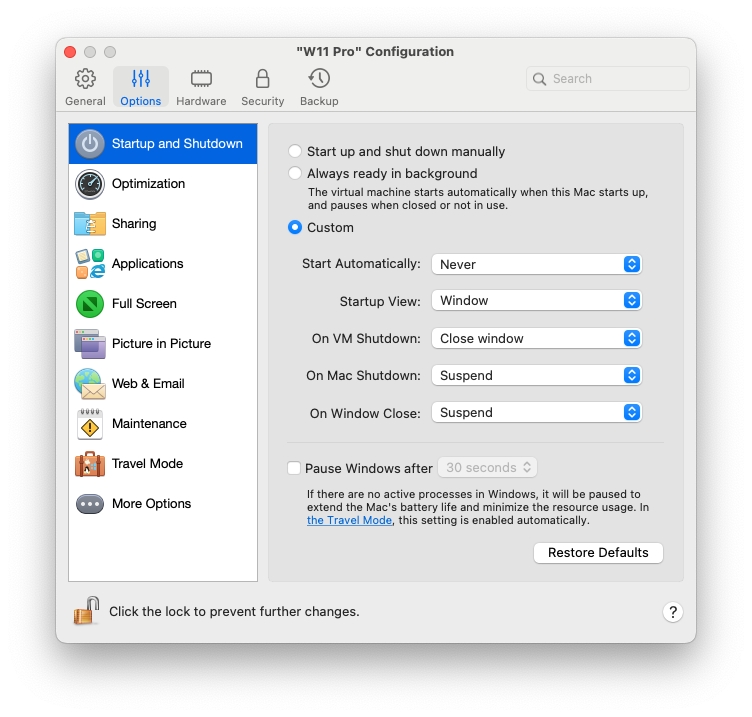
In the Startup and Shutdown pane, you can configure how the virtual machine starts or shuts down.
To open these settings, choose Actions > Configure > Options, then click Startup and Shutdown.
Start up and shut down manually
Select this option if you want to always start and shut down the virtual machine manually.
Always ready in background
Select this option if you want to make the virtual machine start automatically when the Mac starts.
Custom
If you want to specify not only how the virtual machine starts or shuts down but also the view mode and what happens on closing the virtual machine window, select Custom and specify the following:
Start Automatically. Use this menu to set whether the virtual machine starts automatically:
Never: The virtual machine never starts automatically.
When window opens: The virtual machine starts automatically when you open it from Control Center.
When Parallels Desktop starts: The virtual machine starts automatically when you start Parallels Desktop.
When Mac starts: The virtual machine starts automatically when you start the Mac. If you select this option, you can also configure the virtual machine to delay the startup.
When user logs in: Windows starts automatically when the macOS user logs in to macOS on the Mac startup.
Startup view. Use this menu to choose in which mode the virtual machine starts when you start the virtual machine or guest OS application.
On VM Shutdown. Use this menu to set what happens when you shut down your virtual machine:
Keep window open: If the virtual machine is set to appear in a separate window, the window stays open when you stop or shut down the virtual machine.
Close window: If the virtual machine is set to appear in a separate window, the window closes when you stop or shut down the virtual machine.
Quit Parallels Desktop: Parallels Desktop quits when you stop or shut down the virtual machine.
On Mac Shutdown. Use this menu to specify what happens when you shut down your Mac (available in Parallels Desktop for Mac Pro and Business Editions only).
On Window Close. Use this menu to set what happens when you close the Parallels Desktop window. These settings affect what happens only when the virtual machine is set to appear in a separate window.
Pause Windows after
If there are no active processes in Windows, it still consumes your Mac's CPU resources. Select this option and specify a period of inactivity after which Windows will be automatically paused. That way, less CPU resources are used by Windows services which allows you to save the battery and help the environment.
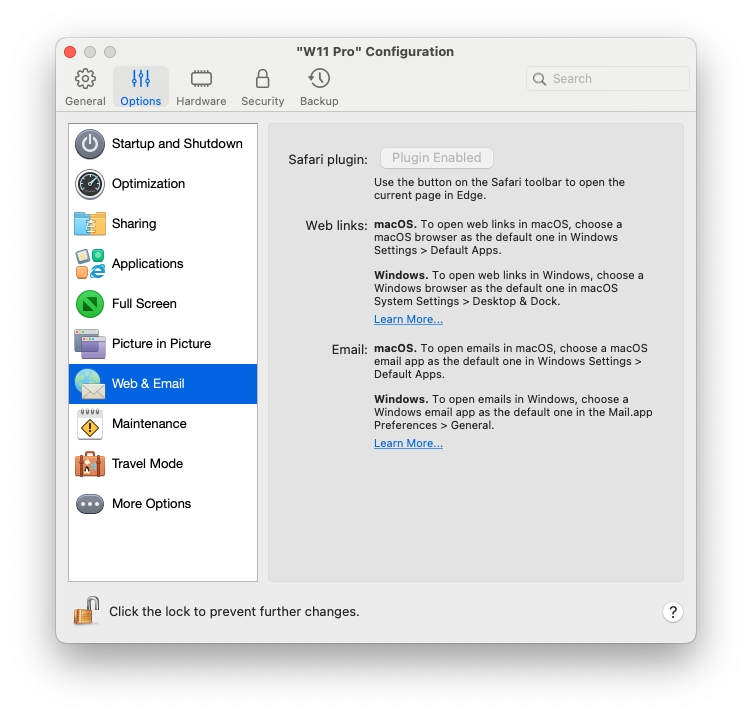
In the Web & Email pane, you can enable the plugin for Safari to open web pages in Microsoft Edge. You can also read how to set the links and emails that you open in Windows to always open in a macOS web browser or email app and vice versa.
To open this pane, choose Actions > Configure > Options, then click Web & Email.
Safari plugin
Some webpages work best when viewed in Microsoft Edge. If you are browsing in macOS using Safari, you can quickly open the current page in Microsoft Edge by doing the following:
Click Enable Plugin to enable the "Open in Edge" plugin.
Once the plugin is enabled, click the Open in Edge button in the Safari toolbar.
If Windows isn't already open, it starts up, and the page opens in Microsoft Edge.
In the Optimization pane, you can limit the virtual machine resource usage.
To open these settings, choose Actions > Configure > Options, then click Optimization.
Note: This tab is only available in Parallels Desktop for Mac Pro and Business Editions.
Resource usage
If your Mac lacks resources for running two or more virtual machines at a time, you can limit the virtual machine resource usage for the virtual machine doing more important work to have more resources. Drag the slider between Low, Medium, and No limit points. If you change this setting and don't like how Windows is performing, try a different setting.
Work with your virtual machine in Travel Mode to extend the battery life of your Mac. This mode is useful for those who travel a lot and often rely on their Mac's battery.
In the Travel Mode pane, you can configure when your virtual machine enters and quits Travel Mode. To open these settings, choose Actions > Configure > Options, then click Travel Mode.
Enter automatically
In this section, select when your virtual machine automatically enters Travel Mode. Choose one of the following:
Always when on battery power. Select this option if you want to switch the virtual machine to Travel Mode always when the Mac is unplugged and starts working on battery power.
When battery power is. In this menu, select the battery charge level at which the virtual machine enters Travel Mode.
Never. Select this option if you never want the virtual machine to switch to Travel Mode.
Quit automatically
In this section, select when your virtual machine automatically quits Travel Mode. Choose one of the following:
When connected to power. Select this option if you want the virtual machine to quit Travel Mode when the Mac is connected to power.
Never. Select this option if you never want the virtual machine to quit Travel Mode automatically. Only manual interaction is allowed.

