Loading...
Loading...
Loading...
Loading...
Loading...
Loading...
Loading...
Loading...
Loading...
Loading...
Loading...
Loading...
Loading...
Loading...
Loading...
Loading...
Loading...
Loading...
Loading...
Loading...
Loading...
Loading...
Loading...
Loading...
Loading...
Loading...
Loading...
Loading...
Loading...
This section describes all virtual machine settings available in Parallels Desktop.
In the Optimization pane, you can limit the virtual machine resource usage.
To open these settings, choose Actions > Configure > Options, then click Optimization.
Note: This tab is only available in Parallels Desktop for Mac Pro and Business Editions.
Resource usage
If your Mac lacks resources for running two or more virtual machines at a time, you can limit the virtual machine resource usage for the virtual machine doing more important work to have more resources. Drag the slider between Low, Medium, and No limit points. If you change this setting and don't like how Windows is performing, try a different setting.
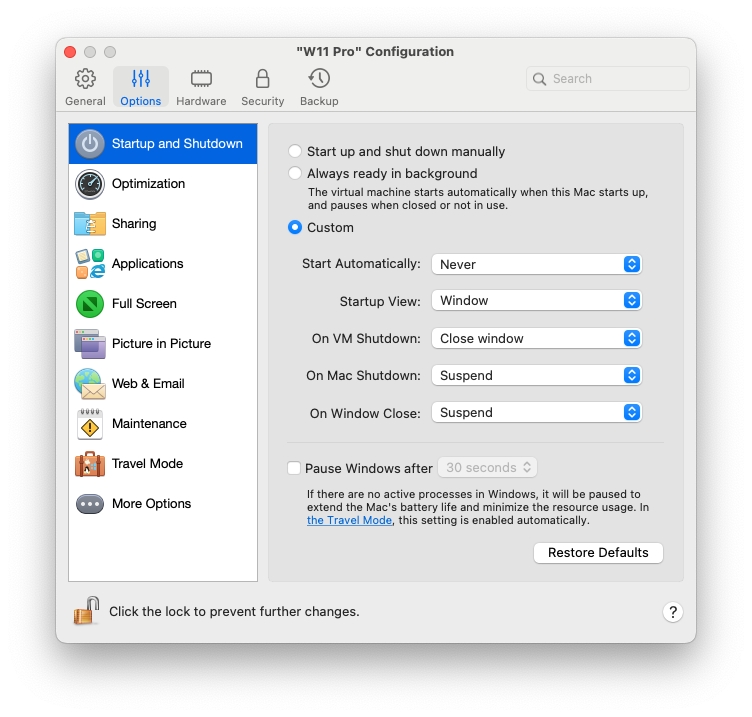
In the Startup and Shutdown pane, you can configure how the virtual machine starts or shuts down.
To open these settings, choose Actions > Configure > Options, then click Startup and Shutdown.
Start up and shut down manually
Select this option if you want to always start and shut down the virtual machine manually.
Always ready in background
Select this option if you want to make the virtual machine start automatically when the Mac starts.
Custom
If you want to specify not only how the virtual machine starts or shuts down but also the view mode and what happens on closing the virtual machine window, select Custom and specify the following:
Start Automatically. Use this menu to set whether the virtual machine starts automatically:
Never: The virtual machine never starts automatically.
When window opens: The virtual machine starts automatically when you open it from Control Center.
When Parallels Desktop starts: The virtual machine starts automatically when you start Parallels Desktop.
When Mac starts: The virtual machine starts automatically when you start the Mac. If you select this option, you can also configure the virtual machine to delay the startup.
When user logs in: Windows starts automatically when the macOS user logs in to macOS on the Mac startup.
Startup view. Use this menu to choose in which mode the virtual machine starts when you start the virtual machine or guest OS application.
On VM Shutdown. Use this menu to set what happens when you shut down your virtual machine:
Keep window open: If the virtual machine is set to appear in a separate window, the window stays open when you stop or shut down the virtual machine.
Close window: If the virtual machine is set to appear in a separate window, the window closes when you stop or shut down the virtual machine.
Quit Parallels Desktop: Parallels Desktop quits when you stop or shut down the virtual machine.
On Mac Shutdown. Use this menu to specify what happens when you shut down your Mac (available in Parallels Desktop for Mac Pro and Business Editions only).
On Window Close. Use this menu to set what happens when you close the Parallels Desktop window. These settings affect what happens only when the virtual machine is set to appear in a separate window.
Pause Windows after
If there are no active processes in Windows, it still consumes your Mac's CPU resources. Select this option and specify a period of inactivity after which Windows will be automatically paused. That way, less CPU resources are used by Windows services which allows you to save the battery and help the environment.
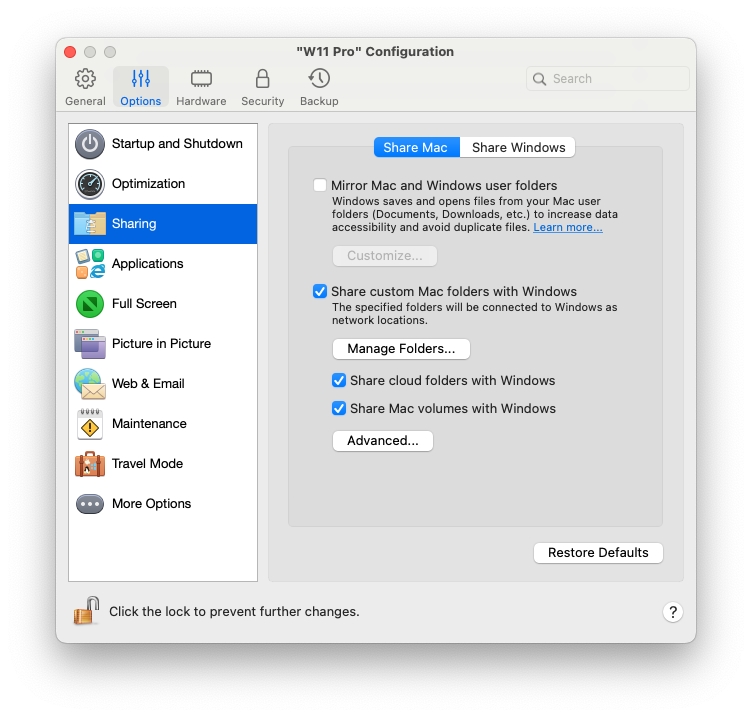
In the Sharing pane, you can view and configure the virtual machine sharing settings.
To open these settings, choose Actions > Configure > Options, then click Sharing.
Share custom Mac folders with Windows
With folder sharing enabled, you can navigate to any shared macOS folder from within a Windows application. When you open a file (for example, by choosing File > Open in many applications), your shared macOS folders appear as network shared directories labeled "\\Mac".
To enable macOS folders for sharing with Windows applications, do one of the following:
To share just the folders in your Home folder, enable Share custom Mac folders with Windows > click Manage Folders... > select the Home folder and click OK. To share all your macOS folders, select the folder with your Mac name and click OK.
To share any folder you want, click Manage Folders and click the add (+) button, then choose the folder you want to share. You can add more folders by clicking the add (+) button again. Once you share a macOS folder with Windows you can:
Disable the folder sharing by deselecting On.
Change the folder name that will be displayed in Windows by double-clicking the folder name in the Name column and typing another name.
Restrict writing to this folder by clicking Read & Write in the Permissions folder and choosing Read only. You will not be able to add items to the folder.
Mirror Mac and Windows user folders
You can set macOS and Windows to use the same folders for things like music, documents, pictures, your desktop, and deleted files. So for example, if you save a file to the Documents folder, it will be in the Documents folder whether you're using a macOS application or a Windows application.
To enable this functionality, select Mirror Mac and Windows user folders.
Your macOS Desktop, Documents, Pictures, Music, Movies, and Downloads folders are merged with the corresponding Windows folders.
If you only want to map some of the folders, click Customize and select the folders you want.
Share cloud folders with Windows
(in macOS virtual machines, this option is called Share cloud folders with virtual machine)
If you're using iCloud, Dropbox, or Google Drive cloud storage in macOS, you can easily share their macOS folders with Windows. Once sharing is enabled, you can upload, download, and sync files from any of these services from within Windows without duplicating any of their files on your hard disk.
To share macOS iCloud, Dropbox, or Google Drive folders with Windows, do the following:
If you haven't already, set up iCloud, Dropbox, or Google Drive in macOS.
Select Share cloud folders with Windows.
Log in to Windows and open Computer. iCloud, Dropbox, or Google Drive folders are available in the Quick access (or Favorites) section. You can use them to upload and download files to and from the cloud.
Map Mac volumes to Windows
(in macOS virtual machines, this option is called Map Mac volumes to virtual machine)
When you connect an external storage device, such as a USB drive, to your Mac, you can access the contents from macOS applications.
You can set Parallels Desktop to automatically mount storage devices and volumes to Windows. That way, you can access the contents from both macOS and Windows.
The following items can be mounted to Windows:
Removable drives: External storage devices, such as USB hard disks and USB flash drives.
CD/DVD drives: CD and DVD drives or mounted CD/DVD images.
Network folders: Folders shared over the network.
To make these items mount to Windows automatically, select Map Mac volumes to Windows.
When you connect a storage device or volume, it is mounted as a network drive. For example, a USB flash drive plugged in to your Mac will be accessible from both the /Volumes folder in macOS and My Computer in Windows.
Assign a drive letter to shared folders (available in Parallels Desktop for Mac Pro and Business Editions only)
Select this option to assign a drive letter to all Mac folders shared with Windows. When a Mac shared folder has a letter, you can easily access it in Windows - such folders are displayed in the "This PC" section of "File Explorer".
Allow creating executables (available in Parallels Desktop for Mac Pro and Business Editions only)
Select this option to create executable files in the Mac folders shared with Windows. When this option is selected, all newly created files become executable.
Enable DOS 8.3 filenames (available in Parallels Desktop for Mac Pro and Business Editions only)
Files created in macOS don't have DOS 8.3 names, and some Windows applications may work incorrectly with such files. Select this option to create additional DOS 8.3 names for the files located in the Mac folders shared with Windows.
Access Windows folders from Mac
Select this option to allow access to Windows folders from Mac.
Share OneDrive with Mac
If you're using Microsoft OneDrive to store files in the cloud, you can easily share your OneDrive folders with macOS. Then you can upload or download OneDrive files in macOS without duplicating any of the files on your hard disk.
To share your Windows OneDrive folders with macOS, do the following:
If OneDrive isn't already set up in Windows, set it up.
Select Access Windows folders from Mac and Share OneDrive with Mac.
In the macOS Finder, choose Finder > Preferences and select Connected servers.
Once selected, Microsoft OneDrive folders appear as hard disks on the macOS desktop. You can use them to upload and download files to and from OneDrive.
Share Windows network drives with Mac (available in Parallels Desktop for Mac Pro and Business Editions only)
Once selected, when you connect to a network drive in Windows, these drives become available in macOS. To access them, go to the Finder sidebar > Shared section and click the virtual machine name.
Share Windows-connected drives with Mac
Once selected, when you connect an external drive to Windows, these drives become available in macOS. To access them, go to the Finder sidebar > Shared section and click the virtual machine name.
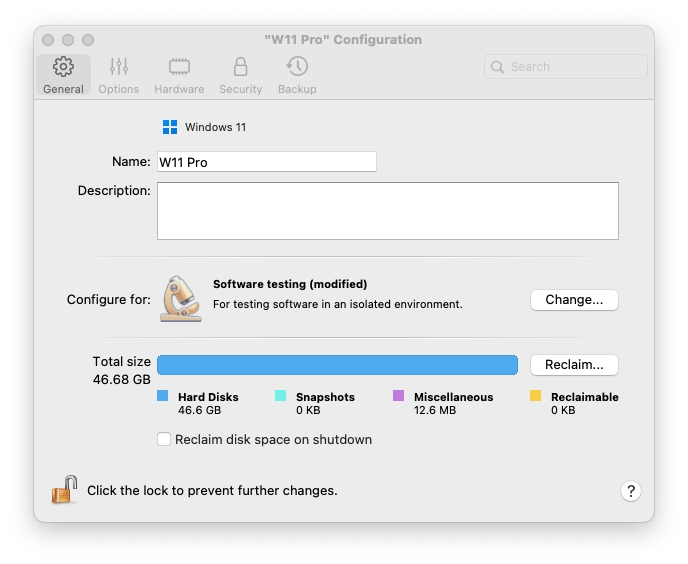
On the General tab of virtual machine configuration, you can edit the virtual machine name, configure the virtual machine to better fit your needs, reduce the virtual machine size, and more.
To open these settings, choose Actions > Configure, then click General.
Guest OS type
Click the menu at the top of the General tab to change the guest OS type and version. You may need to do this after upgrading the operating system (for example, from Windows 7 to Windows 10). The OS indicated in this menu must match the OS that is actually installed in the virtual machine. Otherwise, Parallels Tools may start working incorrectly.
Name
In this field, you can edit the virtual machine name.
Description
Use this field to add some description to your virtual machine. The description is displayed in Control Center together with the virtual machine name.
Configure for
Total size
Click Reclaim to compress the virtual machine hard disk(s) and remove unnecessary files to free up disk space.
Reclaim disk space on shutdown
Select this option to free up disk space automatically each time you shut down the virtual machine.
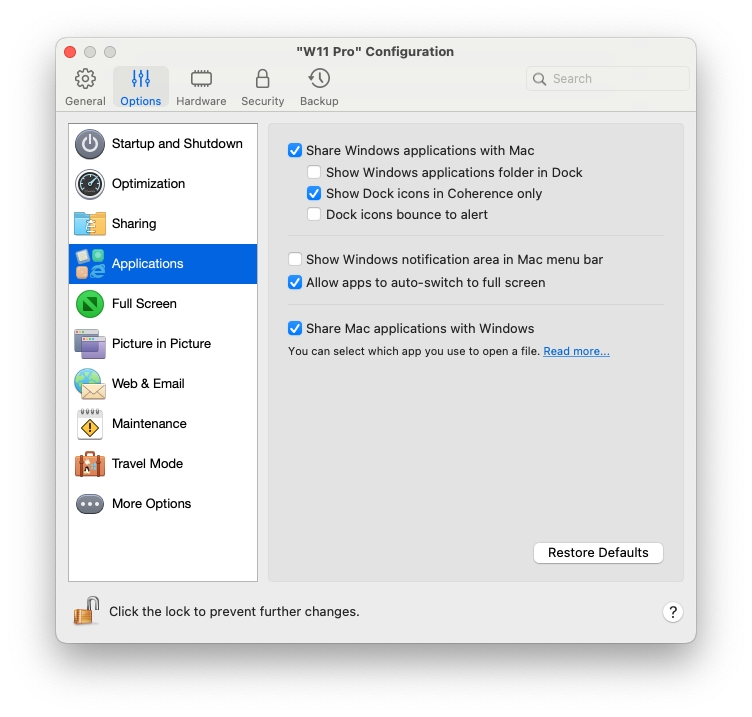
In the Applications pane, you can choose whether Windows applications are shared with macOS and macOS applications with Windows, add a folder containing Windows applications to the Dock, set whether Windows applications bounce in the Dock to alert, and more.
To open these settings, choose Actions > Configure > Options, then click Applications.
Share Windows applications with Mac
When sharing Windows applications is enabled, you can open Windows applications from the macOS Finder. You can also choose to add a folder to the Dock containing all your Windows applications for easy access.
Show Windows applications folder in Dock
Select this option to add a Windows Applications Folder to the Dock
This folder is available in the macOS Dock and contains all your Windows applications. As you install more applications, they are automatically added.
To open a Windows application using the Windows Applications folder, click the folder and then choose an application.
Show Dock icons in Coherence only
You can choose whether or not to show icons for Windows applications in the macOS Dock when in Window or Full Screen mode. If you prefer to work with applications by manipulating them on the Windows desktop, you may not want to be distracted by seeing them in the Dock alongside your macOS application icons.
To show Windows application icons in the Dock when in Window or Full Screen mode, deselect Show Dock icons in Coherence only.
Dock icons bounce to alert
When a Windows application icon in the Windows taskbar would normally flash to alert you to something, such as a new message in Skype or a notification in Microsoft Outlook, by default its icon also bounces repeatedly in the macOS Dock.
To enable or disable Windows application icons bouncing to alert, select or deselect Dock icons bounce to alert.
Show Windows notification area in Mac menu bar
Select this option to display the Windows system tray icons in the macOS menu bar.
Allow apps to auto-switch to full screen
Some applications, most notably 3D games, work best when running at full screen. Select this option to allow such applications to take over the full screen when you open them while in Coherence view mode.
Share Mac applications with Windows
Select this option to enable sharing macOS applications. When enabled, you can open macOS applications from within Windows or Windows applications.
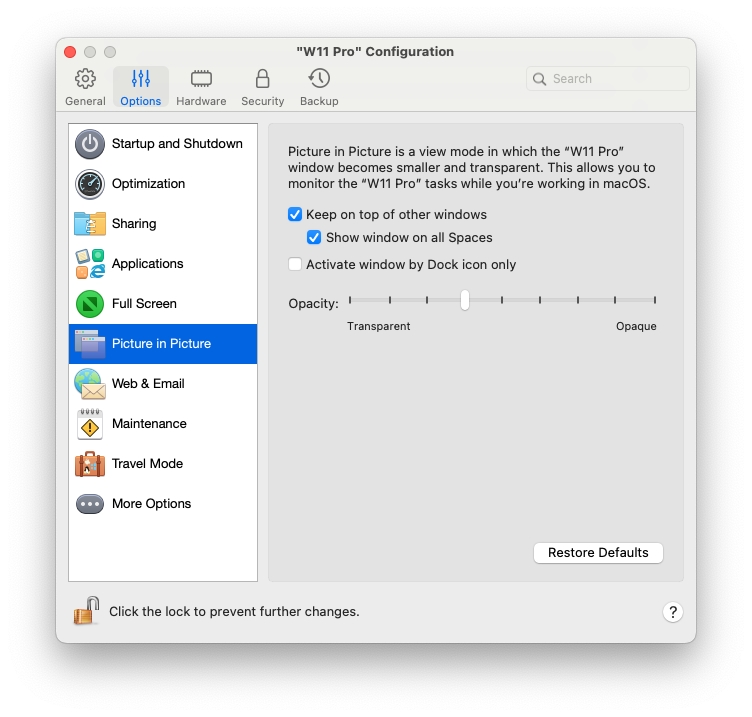
In the Picture in Picture pane, you can configure this view mode-related settings.
To open these settings, choose Actions > Configure > Options, then click Picture in Picture.
Opacity
In the Picture in Picture mode, the virtual machine window becomes transparent by default. You can specify the level of visibility in the Opacity field by dragging the slider between Transparent and Opaque.
Keep on top of other windows
Clear this option if you do not want the virtual machine window to appear on top of all other open windows when the virtual machine is in Picture in Picture mode.
Show window on all Spaces
Clear this option if you don't want the virtual machine window to be displayed on all Spaces.
Activate window by Dock icon only
Select this option if you want to make the virtual machine window inactive. When selected, you will click "through" the window. If you need to make the window active again and capture the mouse or keyboard input, click the virtual machine icon in the Dock.
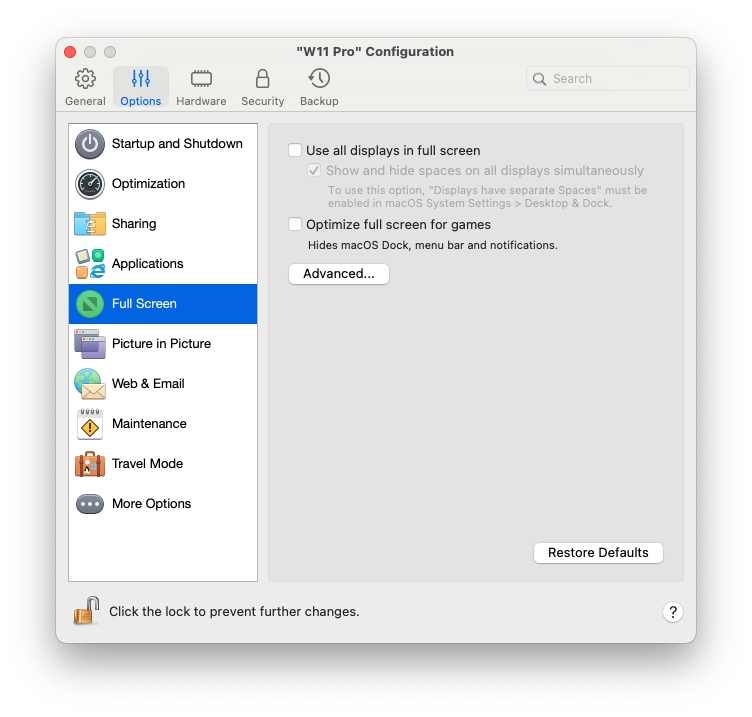
In the Full Screen pane, you can configure this view mode-related settings.
To open these settings, choose Actions > Configure > Options, then click Full Screen.
Use all displays in full screen
If you have a second display connected to your Mac, by default, when you switch to Full-Screen mode, Windows is displayed on only one display.
You can choose which display Windows is shown on by dragging its window to that display and then clicking the green Full Screen icon.
To extend Windows across all your displays, select Use all displays in full screen.
Show and hide spaces on all displays simultaneously
If you selected to show your virtual machine on all displays when it switches to Full Screen, you can also choose Show and hide spaces on all displays simultaneously.
With this option selected, when you click the virtual machine on one of your displays, it appears on all other displays. And when you switch focus to something else on one of your displays, virtual machine spaces hide on all other monitors.
Optimize full screen for games
If you use a virtual machine to play video games in Full Screen view mode, select Optimize full screen for games. With this option selected, macOS Dock, menu bar and notifications will not be displayed. To release the mouse input, press Ctrl + Alt.
Use Windows gamma settings
If you're using the virtual machine to play video games, the virtual machine may need to temporarily change your Mac's display gamma setting to properly display different visual effects. To allow the virtual machine to change gamma settings, select Use Windows gamma settings. This option works in the Full Screen view mode only.
Scale to fit screen
Use this menu to configure how the virtual machine is displayed when working in Full Screen:
Off. If Parallels Tools are installed, the virtual machine resolution matches that of the Mac. If Parallels Tools aren't installed, the virtual machine resolution remains unchanged. If it is lower than that of the Mac, the virtual machine is displayed on a black background. If higher, the virtual machine has scroll bars.
Auto. If Parallels Tools are installed, the virtual machine resolution matches that of the Mac. If Parallels Tools aren't installed, the virtual machine resolution remains unchanged. If it is lower than that of the Mac, the virtual machine is displayed on a black background. If higher, the virtual machine is entirely displayed on the screen without any scroll bars.
Keep ratio: No matter whether Parallels Tools are installed or not, the virtual machine resolution remains unchanged. If it is lower than that of the Mac, the virtual machine is displayed on a black background. If higher, the virtual machine is entirely displayed on the screen without any scroll bars.
Stretch: No matter whether Parallels Tools are installed or not, the virtual machine resolution remains unchanged, but the virtual machine is stretched to occupy the whole screen.
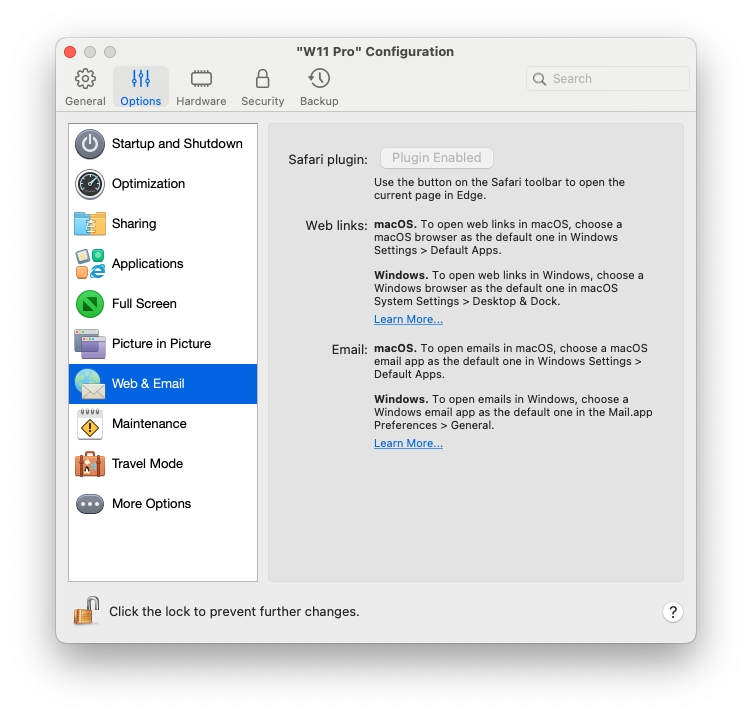
In the Web & Email pane, you can enable the plugin for Safari to open web pages in Microsoft Edge. You can also read how to set the links and emails that you open in Windows to always open in a macOS web browser or email app and vice versa.
To open this pane, choose Actions > Configure > Options, then click Web & Email.
Safari plugin
Some webpages work best when viewed in Microsoft Edge. If you are browsing in macOS using Safari, you can quickly open the current page in Microsoft Edge by doing the following:
Click Enable Plugin to enable the "Open in Edge" plugin.
Once the plugin is enabled, click the Open in Edge button in the Safari toolbar.
If Windows isn't already open, it starts up, and the page opens in Microsoft Edge.
Work with your virtual machine in Travel Mode to extend the battery life of your Mac. This mode is useful for those who travel a lot and often rely on their Mac's battery.
In the Travel Mode pane, you can configure when your virtual machine enters and quits Travel Mode. To open these settings, choose Actions > Configure > Options, then click Travel Mode.
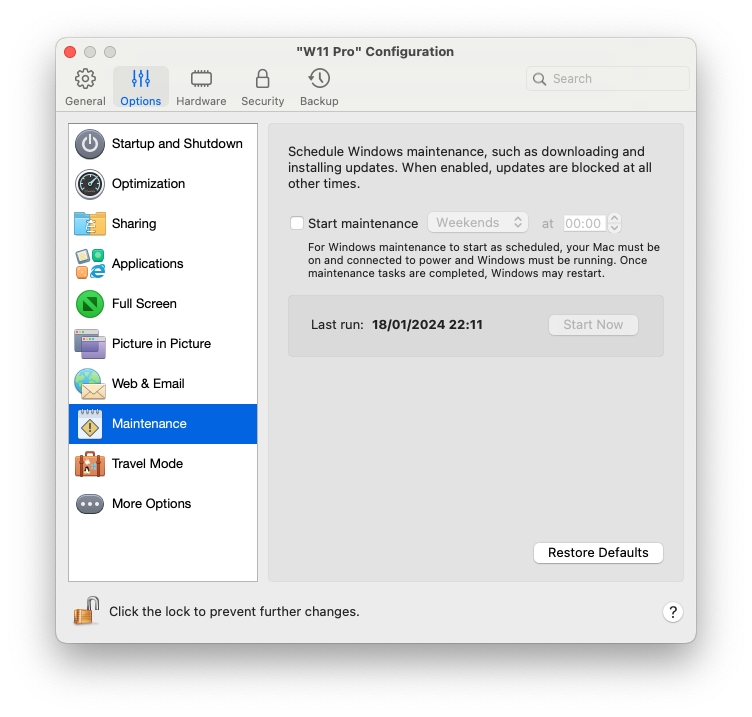
In the Maintenance pane, you can specify the time when Windows is allowed to download and install updates and do other maintenance tasks.
To open these settings, choose Actions > Configure > Options, then click Maintenance.
In the More Options pane, you can choose whether to share the Mac clipboard, set whether to sync time from macOS, and more.
To open these settings, choose Actions > Configure > Options, then click More Options.
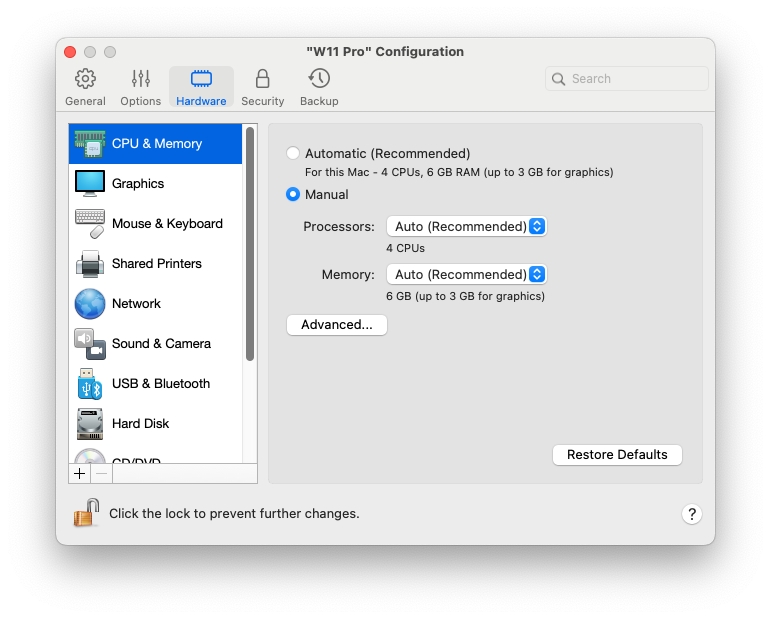
In the CPU & Memory pane, you can view and configure the CPU- and memory-related settings.
To open these settings, choose Actions > Configure > Hardware, then click CPU & Memory.
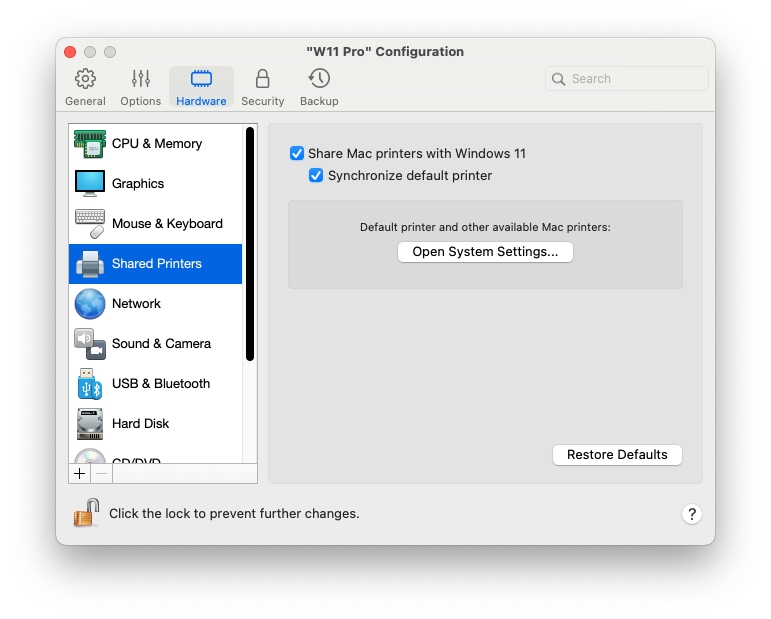
In the Shared Printers pane, you can share the Mac printer with the virtual machine, sync the default printer, and more.
To open these settings, choose Actions > Configure > Hardware, then click Shared Printers.
Use this option to choose a that better fits your needs. Click Change and select what for you usually use the virtual machine. The virtual machine settings will be optimized according to your needs.
Enter automatically
In this section, select when your virtual machine automatically enters Travel Mode. Choose one of the following:
Always when on battery power. Select this option if you want to switch the virtual machine to Travel Mode always when the Mac is unplugged and starts working on battery power.
When battery power is. In this menu, select the battery charge level at which the virtual machine enters Travel Mode.
Never. Select this option if you never want the virtual machine to switch to Travel Mode.
Quit automatically
In this section, select when your virtual machine automatically quits Travel Mode. Choose one of the following:
When connected to power. Select this option if you want the virtual machine to quit Travel Mode when the Mac is connected to power.
Never. Select this option if you never want the virtual machine to quit Travel Mode automatically. Only manual interaction is allowed.
Start maintenance
Select this option and specify when Windows is allowed to do maintenance tasks. It is recommended that you specify the time when your Mac is on and you're not busy with important work.
Time
Select Sync from Mac to synchronize the virtual machine time settings with those of your Mac.
If you want the virtual machine and macOS time settings to always be the same, select Sync from either OS. With this option selected, if you manually change the time settings in the virtual machine, they are changed accordingly in macOS and vice versa.
If the time zone set in your virtual machine differs from that of your Mac, you can maintain this time difference by selecting Do not sync.
Clipboard sync (not available for macOS virtual machines on Apple Silicon Macs)
This setting controls the availability of clipboard contents (your copy-and-paste buffer) between your Mac and virtual machines.
The default option, Bidirectional, allows copy and paste both ways: from your Mac to the virtual machine and back;
The option Disabled blocks copy and paste both ways;
The options From {virtual_machine} to Mac and From Mac to {virtual_machine} let you limit which way copy-and-paste is allowed, and are only available in Parallels Desktop for Mac Pro and Business Editions.
Share Mac clipboard
If you want to copy and paste data between the host and guest operating systems, select Share Mac clipboard. If the data you copy and paste between macOS and your virtual machine is text and you want to preserve text formatting, select Preserve text formatting.
Show developer tools (available in Parallels Desktop for Mac Pro and Business Editions only)
Parallels Desktop has several useful features for software developers. Select this option to display the Develop menu in the macOS menu bar. From this menu, you can:
Start an SSH session;
Open the virtual machine IP address in the macOS default web browser;
Start a debugging session;
Generate the virtual machine memory dump;
Next points are available only for Windows virtual machines (some of the point may not be shown - this depends on the version of Windows):
Open the list of All Tasks (aka "God Mode");
Start Steps Recorder;
Open Registry Editor;
Open Command Prompt; and
Open the Run window.
Update Parallels Tools automatically (available in Parallels Desktop for Mac Pro and Business Editions only)
Select this option to update Parallels Tools automatically.
Asset tag (available in Parallels Desktop for Mac Business Edition only)
Asset tags help identify, control, and track computer assets in an organization. Parallels Desktop allows setting an asset tag in the virtual machine BIOS, which can then be read using the standard tools of the guest operating system. To set an asset tag, enter the desired tag into the corresponding field.
CPU and memory allocation
If you're using Windows 10 or later, Parallels Desktop allocates the required number of CPUs and amount of memory to the virtual machine automatically so that you get the optimal performance and good experience. It is recommended that you use the default settings.
However, if you are not satisfied with the virtual machine's performance, you can manually specify how much CPU and memory can be consumed by your virtual machine. Select Manual and choose the desired values from the corresponding fields.
Virtual machines created and run in Parallels Desktop for Mac Standard Edition are limited to 4 vCPU cores and 8GB of vRAM. For the Pro and Business Editions, the limitations are as follows:
• Up to 32 vCPU cores for Intel Macs and up to 18 vCPU cores for Apple silicon Macs (maximum tested number);
• Up to 128GB of RAM for Intel Macs; for Apple Silicon Macs, it is:
• Up to 63GB if the host runs macOS 12 Monterey and/or doesn’t implement the 39-bit intermediate address space (base versions of M1 and M2 chips);
• Up to 128GB in all other cases.
Please note that more is not always better. First, try to work with your virtual machine using the default settings. If it is slow, try to add more memory and/or increase the number of CPUs. If the virtual machine becomes faster, it's ok. If not, try to change the CPU and memory allocation some other way. It is not easy to provide more straightforward instructions because the virtual machine performance depends on the Mac's hardware, which apps are running on your Mac, which apps are running in the virtual machine, etc.
If you have a virtual machine with Windows 8.1 or earlier, Linux or macOS operating system, you can choose how much CPU and memory can be consumed by the virtual machine using the Processors and Memory menus.
Extended memory limit This option is available only in Parallels Desktop for Mac Pro and Business Editions installed on a Mac with an Intel processor
This option allows you to allocate more memory to a virtual machine than your Mac physically has. Use this option with care (or your system may significantly slow down) and only on rare occasions, e.g., when you're trying to set up a database on a virtual machine and the installer claims that you don't have enough memory.
Hypervisor
This menu is available only on Mac computers equipped with an Intel processor. Virtual machines created on Apple Silicon Macs always use the Apple hypervisor
In this menu, you can choose whether to use the hypervisor from Parallels or from Apple. It is recommended that you use the Parallels hypervisor.
Adaptive Hypervisor
Select this option to set Parallels Desktop to automatically optimize performance for the virtual machine or macOS depending on which application you're working with at the moment. When you're using a virtual machine app, more resources are given to the virtual machine, and when you're using a macOS application, more resources are given to macOS.
Enable nested virtualization
This menu is available only in Parallels Desktop for Mac Pro and Business Editions installed on a Mac with an Intel processor provided that the virtual machine is configured to use the Parallels hypervisor.
Select this option to enable nested virtualization support. Parallels Desktop allows you to run:
Hyper-V virtual machines inside Windows 8 or newer, and Windows Server 2012 or newer virtual machines;
Parallels Desktop inside a macOS virtual machine;
VMware ESXi virtual machines;
Xen and kernel-based virtual machines in versions of Linux that support Xen and KVM.
If you use Parallels virtual machines to build, debug, and test applications, enable nested virtualization to install and work in:
Android emulator for Visual Studio;
iPhone emulator for Visual Studio;
Xamarin.Android;
Android Studio;
Embarcadero RAD Studio;
Docker for Windows;
Microsoft Visual Studio + TwinCat 3 (support for TwinCat 3 is being tested, and there may be some bugs).
Share Mac printers with Windows
Select this option to share the printer connected to your Mac with the virtual machine.
Synchronize default printer
By default, virtual machines are set to use the same default printer as your Mac.
To use a different default printer for your virtual machine, deselect Synchronize default printer. After that, you can set a new default printer in the guest OS the way you normally would.
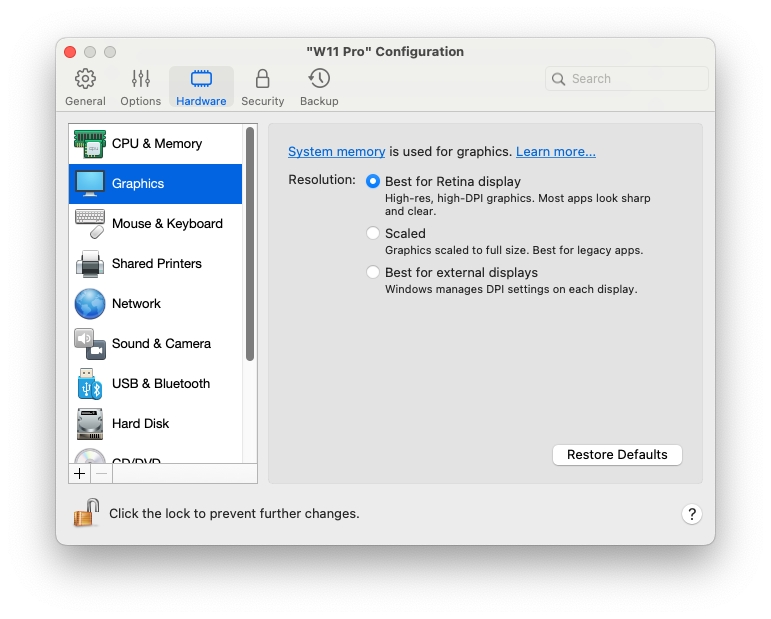
In the Graphics pane, you can view and configure the amount of video memory available to the virtual machine video card, set resolution, and more.
To open these settings, choose Actions > Configure > Hardware, then click Graphics.
Memory
If you have a virtual machine running Windows 7 or earlier, Linux, or macOS, you can set the amount of video memory that will be available to the virtual machine using the Memory menu.
Resolution
If you're working with Windows 7 or later on a Mac with a Retina display, you can choose how Windows is displayed on the screen:
Best for Retina display. Windows resolution matches that of the Retina display, and the DPI setting increases. Windows interface elements and text are clear, sharp, and full-size. This option is supported by Windows 7 and later.
Scaled. Windows resolution and DPI settings don't change. Instead, Windows is scaled to full size. As a result, Windows interface elements and text are not sharp. This option is useful for Windows applications that don't support high-DPI settings and appear small onscreen.
Best for external displays. Use this option if you're working with Windows on multiple displays, one of which is non-Retina. The option is supported by Windows 8 and later.
For Windows XP:
If you're working with Windows XP on a Mac with a Retina display, Windows becomes scaled, but its resolution doesn't change. As a result, Windows interface elements and text are not sharp.
However, you can enable full (2880x1800) Retina resolution for Windows by selecting Enable Retina resolution. At such a high resolution, Windows interface elements and text become sharp but small.
3D acceleration
This menu is available for Linux virtual machines only, and the 3D acceleration option is enabled by default. If you are experiencing issues with GUI in Linux, you may start the debugging process by selecting Off from the 3D acceleration menu.
For Linux guest operating systems, Parallels Desktop supports OpenGL 4.1 (Compatibility Profile).
In Windows virtual machines, this menu is not available because 3D acceleration is considered stable and is permanently enabled. For Windows, Parallels Desktop supports OpenGL 4.1 (Compatibility Profile) and DirectX 11.1.
As for macOS, virtual machines with macOS 12 Monterey and later running on Mac computers with macOS 12 Monterey and later support Metal graphics. The only condition is that such a virtual machine must have Parallels Tools installed.
Always use high-performance graphics
(not available on Apple Silicon Macs)
This option is accessible only if your Mac supports graphics switching. Select this option for better performance or deselect for better battery life.
In the Sound & Camera pane, you can view and configure the sound device parameters and share the Mac's camera with the virtual machine.
To open these settings, choose Actions > Configure > Hardware, then click Sound & Camera.
Sound Output
Use the Sound Output list to choose the necessary device:
Default. Select this option if you want to use the output device set as default in macOS.
Built-in Output. Select this option if you want to use one of the output devices from your Mac.
Disable. Select this option if you want to disable the output device.
Microphone
Use the Microphone list to choose the necessary device:
Default. Select this option if you want to use the microphone set as default in macOS.
Built-in Microphone. Select this option if you want to use the built-in microphone.
Disable. Select this option if you want to disable the microphone.
Sync volume with Mac
For Windows XP and later with Parallels Tools installed, you can set Windows and macOS volume levels to remain the same. With the Sync volume with Mac option selected, if you manually change the volume level in Windows, it is changed accordingly in macOS and vice versa.
If Parallels Tools are not installed, this option is called Use Mac sound volume. When it is selected, Windows has the same sound volume as in macOS.
Share Mac camera with Windows
Use this option to enable or disable camera sharing.
Type
From the Type menu, you can select the type of sound card you want to use in the virtual machine. You can choose between AC'97 and HD Audio.
In the Network pane, you can view and configure the virtual machine network adapter-related settings.
To open these settings, choose Actions > Configure > Hardware, then click Network.
Source
Use this menu to choose one of the following network types for the virtual machine network adapter:
Shared Network. Select this option to enable the Network Address Translation (NAT) feature for the virtual machine. In this case, your virtual machine will share whatever network connection is currently used by your Mac.
Bridged Network. Select this option to allow the virtual machine to access the local network and Internet through one of the network adapters installed on your Mac. In this case, the virtual machine is treated as a stand-alone computer on the network and should be configured in the same way as a real one. You can choose the physical adapter where the virtual machine adapter will be bridged in the list below the Bridged Network option.
Host-Only Network. Select this option to allow the virtual machine to connect to your Mac and the virtual machines residing on it and to make it invisible outside the Mac. If this option is selected, the virtual machine cannot connect to the Internet.
Disconnect. Fully disconnect the virtual machine from any networks.
Network Conditioner (not available on macOS virtual machines)
Use this option to imitate behavior characteristic of particular types of network connections listed in the Profile drop-down menu. You can set up a Custom profile and click the Configure button to adjust speeds, latencies, and packet loss as you see fit.
Advanced -> MAC
In the MAC field, you can change the MAC address currently assigned to the virtual machine. MAC addresses are automatically generated during the creation of the virtual machine. However, you can modify the default MAC address by typing another value in the MAC field or clicking the Generate button. When entering a new MAC address, make sure that it is unique within your network. This option is for advanced users only.
Advanced -> Type (only available on Intel Macs)
You can use it to change the type of the network interface card. It is not recommended that you change the default setting unless the Parallels support team tells you to do so. This option is for advanced users only.
On Apple Silicon Macs, virtual machines are configured to always use the Virtio network adapter.
Advanced -> Open Network Preferences
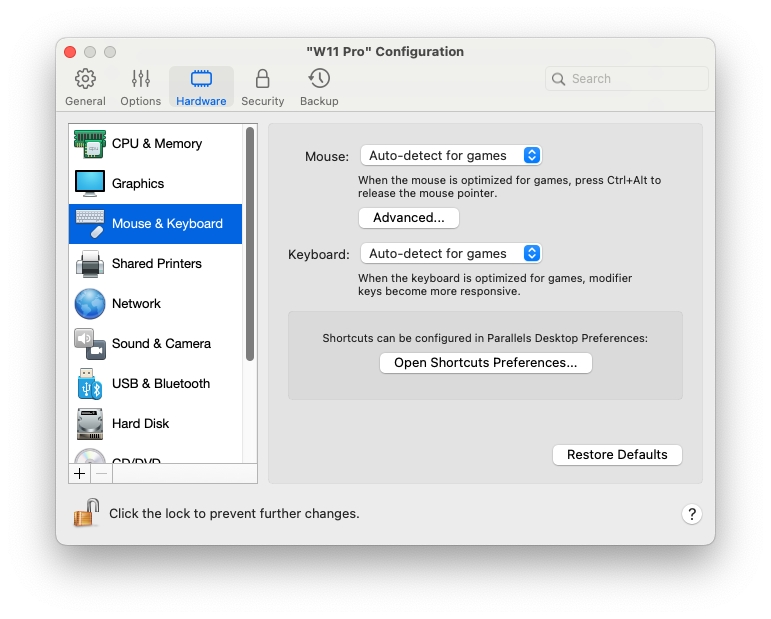
In the Mouse & Keyboard pane, you can view and configure the mouse- and keyboard-related settings.
To open these settings, choose Actions > Configure > Hardware, then click Mouse & Keyboard.
Mouse
If you play games in a virtual machine, the Mouse menu allows you to set how to use a mouse:
Auto-detect for games. This is a recommended default setting. If you're working with a guest OS application, the mouse moves freely between the guest operating system and macOS. However, when you start a game, the mouse input is automatically captured in the virtual machine so that you couldn't move the mouse to macOS by mistake and automatically released when you quit the game.
Optimize for games. If your mouse accidentally moves to macOS when you're playing a game, select this option to make the mouse work in the virtual machine only. To release the mouse input and switch to macOS, press Ctrl + Alt.
Don't optimize for games. In some rare cases, Parallels Desktop may detect an application as a game and the mouse starts working incorrectly with the application. If you have this problem, choose Don't optimize for games.
Mouse pointer sticks at window edges
When working with a virtual machine in Window view mode, you may often need to move the mouse pointer to the edges of the virtual machine window to display various guest OS items: for example, to display the Start menu in Windows 8, hidden taskbar in Windows XP, or macOS menu bar when any of the guest macOS applications is running in full screen.
The Mouse pointer sticks at window edges option makes the mouse pointer pause for a while at the edges of the virtual machine window and you won't move the mouse outside of the virtual machine window by mistake. To move past the edge, just move the mouse quickly.
Keyboard
Choose Optimize for games from the Keyboard menu if you actively use the modifier keys Option (Alt), Ctrl, and Shift in action games. When this option is selected, signals from these keys are processed immediately.
Linux virtual machines on both Intel and Apple Silicon Macs have been known to have occasional issues with scrolling sensitivity, where a mouse pointer may start to behave erratically when using a trackpad for scrolling. If you encounter such a problem, you may adjust the scrolling sensitivity to your liking by executing the following command in macOS Terminal:
$ defaults write "com.parallels.Parallels Desktop" "HID Host Hook.Scroll Sensitivity" X
where X is the inverse scrolling sensitivity value. The default one is 20, and the maximum is 120. Make note that 120 means the lowest possible sensitivity. With the value set to 120, you would need to work the trackpad very energetically to scroll in the Linux VM.
Note: This command only works in Parallels Desktop for Mac 19.3 or newer and affects the scrolling sensitivity only in virtual machines, not your main macOS system.
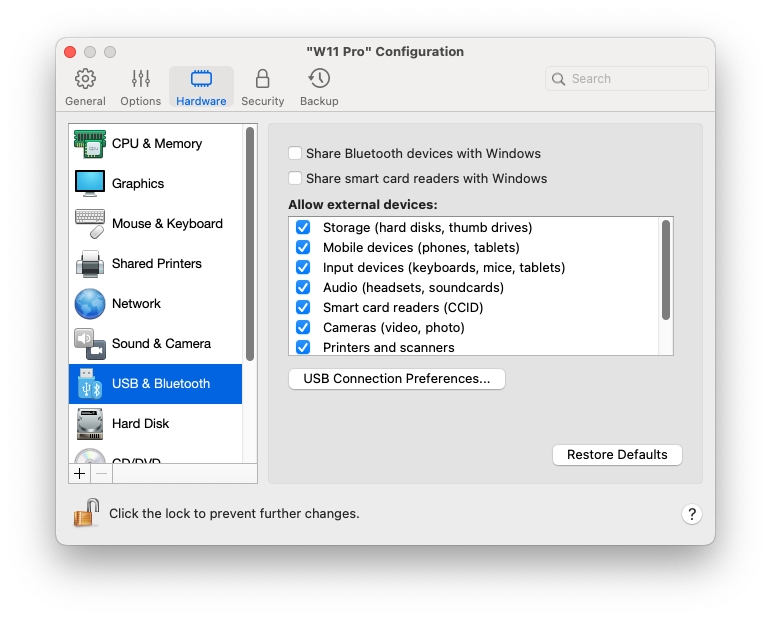
In the USB & Bluetooth pane, you can view and configure the USB- and Bluetooth-related settings.
To open these settings, choose Actions > Configure > Hardware, then click USB & Bluetooth.
Share Bluetooth devices with Windows
Use this option to enable or disable Bluetooth devices sharing.
Share smart card readers with Windows
When this option is selected, you can use your Mac's smart card readers in Windows.
Please note that you will be able to use only those smart card readers that function properly in macOS (i.e. have the necessary drivers installed).
Allow external devices (available in Parallels Desktop for Mac Business Edition only)
Use this list to specify what devices can be connected to the virtual machine via USB.
Enable USB 3.1
On Apple Silicon Macs, USB 3.1 support is always enabled. Otherwise, the keyboard and mouse will not work in virtual machines.
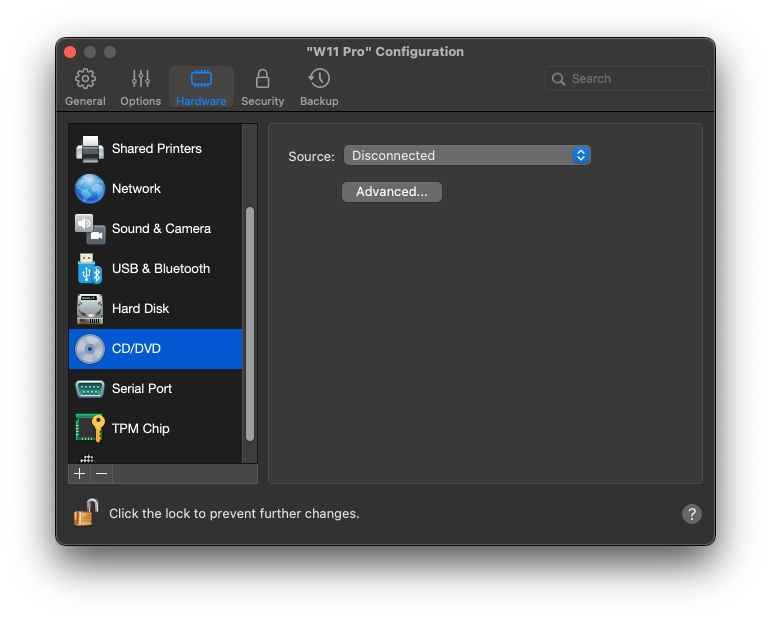
In the CD/DVD pane, you can view and configure the virtual machine CD/DVD-ROM settings.
To open these settings, choose Actions > Configure > Hardware, then click CD/DVD.
Source
Use this field to specify the source device or image file that emulates the virtual machine CD/DVD drive:
To use a physical CD/DVD drive as the virtual machine CD/DVD drive, select the physical device name from the list.
To use an image file as the virtual machine CD/DVD drive, choose the image file from the list, or click Choose an image file and specify the path to the desired image file.
Location
Use this field to specify the type of interface for connecting the device. This option is for advanced users only.
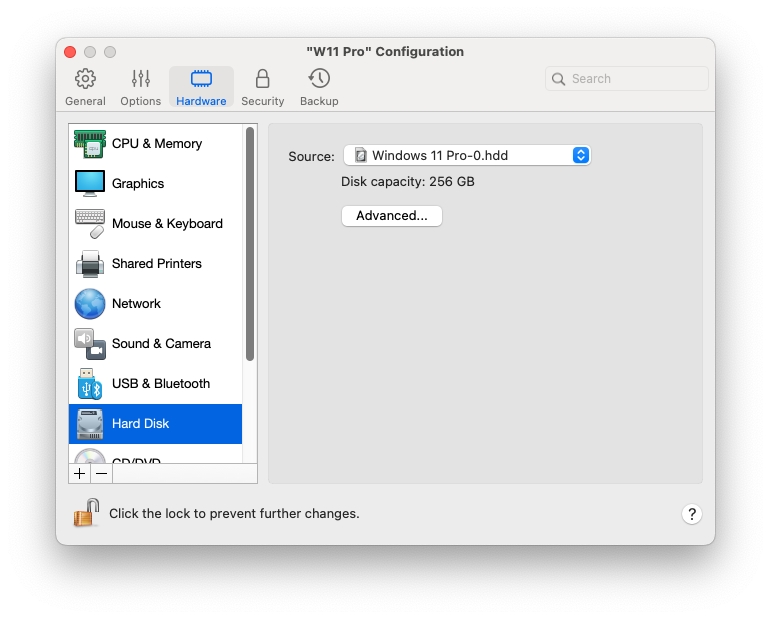
In the Hard Disk pane, you can view and configure the virtual machine's hard disk-related settings.
To open these settings, choose Actions > Configure > Hardware, then click Hard Disk.
Source
Use this field to specify the virtual hard disk file (.hdd) that emulates the virtual machine hard disk:
To use the Boot Camp partition, select it from the list.
To use a virtual hard disk file, choose it from the list, or click Choose an image file and specify the path to the desired image file (.hdd).
Properties
Click this button to edit the hard disk size.
Location
Use this field to specify the type of interface for connecting the hard disk. This option is for advanced users only.
Enable TRIM
In most cases, the space that the virtual machine takes up on your hard disk expands as you add files and other data but isn't reduced when you delete data. To set Parallels Desktop to automatically reduce disk space, select Enable TRIM. This option may affect the performance of HDD (but not SSD) disks.
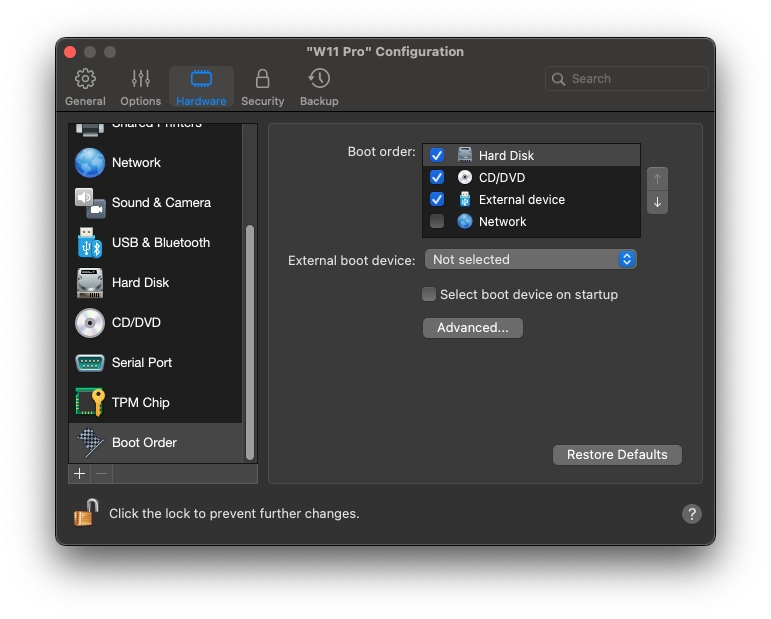
In the Boot Order pane, you can view and configure the virtual machine boot sequence, that is, the order in which the virtual machine will try to load the operating system from different boot devices.
To open these settings, choose Actions > Configure > Hardware, then click Boot Order.
Boot order
Use this list to edit the boot order settings. The currently supported boot devices are listed below:
Hard Disk. Select this device if you want the virtual machine to boot up from its virtual hard disk drive.
CD/DVD-ROM. Select this device if you want the virtual machine to boot up from the media connected to its virtual CD/DVD-ROM drive.
External device. Select this device if you want the virtual machine to boot up from a bootable external device (USB, FireWire, Thunderbolt, etc.) connected to your Mac. Once selected, choose the device from the External boot device menu located below.
Floppy Disk. Select this device if you want the virtual machine to boot up from a floppy disk image connected to its virtual floppy disk drive.
Network. Select this device if you want your virtual machine to boot from a network adapter using PXE (Pre-Execution Environment).
Every time you start the virtual machine, it tries to boot from the device specified as the first one in the Boot order list. If the virtual machine cannot boot from the first device (for example, no media is connected to it), the virtual machine proceeds to the second device in the list and tries to boot from this device, and so on.
In this list, you can perform the following operations:
Change the currently set boot sequence by selecting the name of the corresponding boot device and moving it up or down using the arrows to the right of the list.
Remove a boot device from the sequence by clearing the check box next to its name.
External boot device
If you chose External device from the Boot order menu, use this menu to select the external boot device.
Select boot device on startup
If you choose this option, you will see the following message at the virtual machine startup: "Press ESC to select boot device". If you press ESC pending 5 seconds, you will be able to select a boot device. If you do not press ESC, the virtual machine will try to boot from the devices specified in the Boot order list.
Boot flags
The Boot flags field is intended to specify the flags that can change the virtual machine system's behavior. The Parallels customer support team can use the system flags when something goes wrong in your virtual machine. It is not recommended to type anything into this field without being instructed to do so by the customer support staff.
In the Printer pane, you can view and configure the virtual machine printer port settings.
To open these settings, choose Actions > Configure > Hardware, then click Printer.
Source
In the Source field, specify the source device that emulates this printer port:
Printers. You can use any of the printers connected to your Mac in your virtual machine. Select the appropriate printer from the list.
Output File. You can emulate the virtual machine printer port by using an output file. Choose an output file from the list or click Choose an output file and specify the path to the desired output file.
Port
In the Port field, choose the port type. If available, it is recommended that you use USB. Connecting a printer to a virtual machine via USB ensures a faster data transfer rate than connecting it via LPT.
The Trusted Platform Module (TPM) added to the virtual machine configuration allows you to protect your data from unauthorized access and use additional Windows security features such as BitLocker and Windows Hello.
When you add TPM to a virtual machine, it becomes enabled by default.
Note: All Windows 11 virtual machines are created with TPM enabled by default and cannot boot without it.
It is not recommended that you add TPM if you don't plan to use BitLocker. If you added TPM by mistake and didn't set up BitLocker in Windows, you can remove TPM without drastic consequences. However, if you set up BitLocker and then remove TPM, you may encounter boot and login problems - Windows will ask you to enter the recovery key on boot. To learn what you should do in this case, please read this knowledgebase article.
Note: The TPM-related information is stored in the Mac Keychain. You cannot start the virtual machine on another Mac without this information unless that Mac is logged into the same iCloud account and the Keychain synchronization option is enabled. To transfer the TPM-related information manually, consult the KB article mentioned above.
In the Serial Port pane, you can view and configure the virtual machine serial port settings.
To open these settings, choose Actions > Configure > Hardware, then click Serial Port. If Serial Port is not present, click + to add one, then follow the directions below to configure it.
Source
In the Source field, select the source device that emulates this serial port:
Physical Serial Port. To connect the virtual machine serial port to one of the existing serial ports on your Mac, choose the appropriate port.
Socket. To connect two virtual machines through the sockets, choose the appropriate socket. If there are no sockets available, click New socket and specify its name in the Enter a socket name field. You should also configure the role the virtual machine will play in the connection by selecting the necessary role in the Mode list. Selecting Server enables you to use this virtual machine to direct the other one. Selecting Client enables you to direct this virtual machine from the other one.
Output File. To connect the virtual machine serial port to an output file, choose the appropriate output file or click Choose an output file to locate the necessary file.
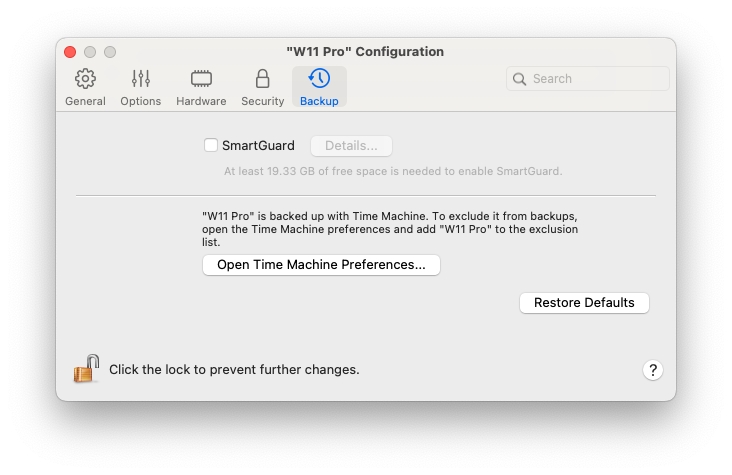
On the Backup tab of virtual machine configuration, you can automate saving the virtual machine snapshots and choose whether the virtual machine is backed up with Time Machine.
To open these settings, choose Actions > Configure, then click Backup.
On the Security tab of virtual machine configuration, you can isolate the virtual machine from your Mac, choose whether to save or discard the changes you made while working with the virtual machine, set password requirements for certain tasks, and more.
To open these settings, choose Actions > Configure, then click Security.
If you have a virtual machine running Windows 8 or later, Parallels Desktop uses system memory for graphics. To increase the amount of graphics memory allocated to your virtual machine, increase the amount of system memory in the pane.
If any of your Windows or Linux apps claim to require a higher version of DirectX or OpenGL, please let us know about this application on the Parallels . To access the forum, either click Help > Suggest a Feature or search our forum for the latest relevant topic.
This button forwards you to the Network tab of the Parallels Desktop preferences panel. See for more information.
If your smart card reader works in macOS but for some reason doesn't appear in Windows, please try to connect it using the Devices > USB & Bluetooth menu as .
This option is available only on Mac computers with an Intel processor. It enables USB 3.1 support and is selected by default. However, if you but it is not detected or doesn't work, try to deselect this option, restart the virtual machine, and connect the device once again.

SmartGuard
If you want to create virtual machine snapshots automatically, select SmartGuard > Details and specify the details: how often snapshots are made, how many snapshots are stored, and whether you want to be notified before a new snapshot is created.
Time Machine Preferences
By default, Time Machine automatically backs up your virtual machine together with macOS files.
To exclude the virtual machine from Time Machine backups, open the Time Machine preferences and add your virtual machine to the exclusion list.
If you later need to back up your virtual machine again, open the Time Machine preferences and remove the virtual machine from the exclusion list.
Encrypt with password
Use this setting to specify, change or turn off the password your virtual machine is encrypted with.
Expiration date (available in Parallels Desktop for Mac Business Edition only)
If your virtual machine is encrypted, you can set an expiration date after which the virtual machine becomes expired.
Allow changing guest OS password in Terminal (available in Parallels Desktop for Mac Business Edition only)
Select this option to be able to change the guest OS password in Terminal.
Always lock Windows on suspend (available in Parallels Desktop for Mac Business Edition only)
Select this option if you want to lock Windows on suspend. Once the virtual machine is resumed, you’ll have to log in to Windows to unlock it.
Isolate Windows from Mac
Select this option to isolate the virtual machine from macOS, so that they no longer share folders, profiles, and applications, connected external devices are no longer automatically accessible by the guest OS, the virtual machine and Mac no longer synchronize volume, and you can no longer copy or move objects between the virtual machine and macOS. Isolating your virtual machine from macOS may provide a higher level of security by not allowing compromised items from one OS to come into contact with the other.
Rollback mode (available in Parallels Desktop for Mac Pro and Business Editions only)
Use this menu to specify whether the virtual machine is started in Rollback mode. This mode allows you to save or discard the changes you made while working with the virtual machine:
Disable. Select this option if you don’t want to work with the virtual machine in Rollback mode.
Discard changes. Select this one if you don’t want to save the changes.
Ask me what to do. Select this option if you want to decide whether to save the changes. When shutting down the virtual machine, you will be shown a message asking whether to save or discard the changes.
Require password to
For added security, you can select the actions for which Parallels Desktop will require an administrator password.
Custom password (available in Parallels Desktop for Mac Pro and Business Editions only)
Use this setting to provide a custom password that will be required to perform the actions from the Require password to section.
