Parallels Desktop Enterprise Edition Administrator's Guide
ProductsSupportDocumentation
  • Introduction
  • Upgrading from Business Edition
    • How to Trial Enterprise Edition with Existing Business Edition Per-user License
    • What Happens after a Trial Ends
    • Migrating from Business Edition to Enterprise Edition
    • Migrating from per-device to per-user licensing
  • Getting Started
    • Creating a Business Account and Registering Your License
    • Dividing Users into Groups with Sublicenses
    • Configuring Golden Images and Policies in the Management Portal
    • Installing and Activating Parallels Desktop
  • Configuring the Single Sign-On (SSO) integration with Parallels My Account
    • Prerequisites
    • Starting the Integration Process in Parallels My Account
      • Configuring SSO Integration with Azure/Entra ID
      • Configuring SSO Integration with Okta
      • Configuring SSO Integration with Ping Identity
      • Configuring SSO Integration with JumpCloud
      • Configuring SSO Integration with Google Workspace
    • [OPTIONAL] How to Divide Users into Groups and Assign Them Sublicenses
    • Troubleshooting the SSO Activation
  • Creating and Uploading Virtual Machine Images
  • Mass Deployment of Parallels Desktop and Virtual Machines
    • Deploying via an Invitation Email
    • Mass Deployment Using Mac Management Tools
      • [RECOMMENDED] Deploying Parallels Desktop via MDM App Catalogs Using Configuration Profiles
        • Creating and Editing a Configuration Profile in iMazing
        • Deploying Parallels Desktop via MDM App Catalog (as seen in Jamf Pro)
      • [ALTERNATIVE] Mass Deployment via Deployment Package
        • Prerequisites
        • Supported Mac Management Tools
        • Preparing the Autodeploy Package
          • Downloading the Autodeploy Package
          • Specifying a License Key
          • [OPTIONAL] Adding the Parallels Desktop Installation Image
          • [OPTIONAL] Adding a Virtual Machine
            • Installing Parallels Tools
            • Preparing Windows for Mass Deployment
            • Common Configuration Options
          • Adding Windows Application Stubs
          • Configuring Deployment Options
          • Single Application Mode
          • [MANDATORY] Creating a Flat Package
          • Testing the Autodeploy Package
        • Deploying the Package to Macs
          • Example: Jamf Pro
            • Automating Parallels Desktop Initial Setup with a Configuration Profile
          • Using a Script to Change VM Options
    • Enrolling Virtual Machines in Azure Active Directory
  • Parallels Management Portal
    • Golden Images
    • Policies
    • User Groups
    • Virtual Machines
    • Providing Feedback
  • Parallels Desktop for Mac Enterprise Edition Features
    • [DEPRECATED] Using Configuration Profiles
      • Creating a Configuration Profile
      • Applying a Configuration Profile to a License Key
      • Provisioning a Corporate VM Image
        • Creating a Configuration Profile
        • Installing a VM Image on a Mac
      • Enabling Major Version Upgrades
        • Creating a Configuration Profile
    • Participating in the Customer Experience Program
    • Locking a Virtual Machine on Suspend
    • Activating Using a Corporate Account
    • Restricting a Virtual Machine Configuration with a Custom Password
    • Restricting User Actions in Parallels Desktop
    • Setting an Asset Tag in the Virtual Machine BIOS
    • Using Custom Graphics and Links in the Control Center
    • Hiding Developer Tools in the Parallels Desktop GUI
    • Encrypting a Virtual Machine
    • Single Application Mode
    • Setting an Expiration Date on a Virtual Machine
    • Enforcing USB Device Policies
    • Resetting the Guest OS Password
    • Setting Up a Local Update Server
      • Setting Up a Local Web Server
      • Creating the Parallels Update XML File
      • Configuring Individual Macs
    • Configuring Parallels Desktop Update Branch
    • Customizing the Support Center Option
Powered by GitBook

Other Resources

  • Community Forum
  • Knowledge Base
  • Request Support

Social Media

  • Facebook
  • Twitter/X
  • YouTube
  • LinkedIn

© 2025 Parallels International GmbH. All rights reserved.

On this page
Export as PDF
  1. Mass Deployment of Parallels Desktop and Virtual Machines

Deploying via an Invitation Email

PreviousMass Deployment of Parallels Desktop and Virtual MachinesNextMass Deployment Using Mac Management Tools

Last updated 2 months ago

To invite users to install Parallels Desktop via email:

  1. Log in to your Parallels account at .

  2. On the Dashboard page, locate the Parallels Desktop for Mac Enterprise Edition product card and click the Invite Users button.

  3. In the dialog that opens, select a license key that you want to use to activate Parallels Desktop on users' computers and click Next.

  4. In the Invite Parallels Desktop Users dialog, specify the following options:

    • Language of Invitation: Select a language for the instructions in the invitation email.

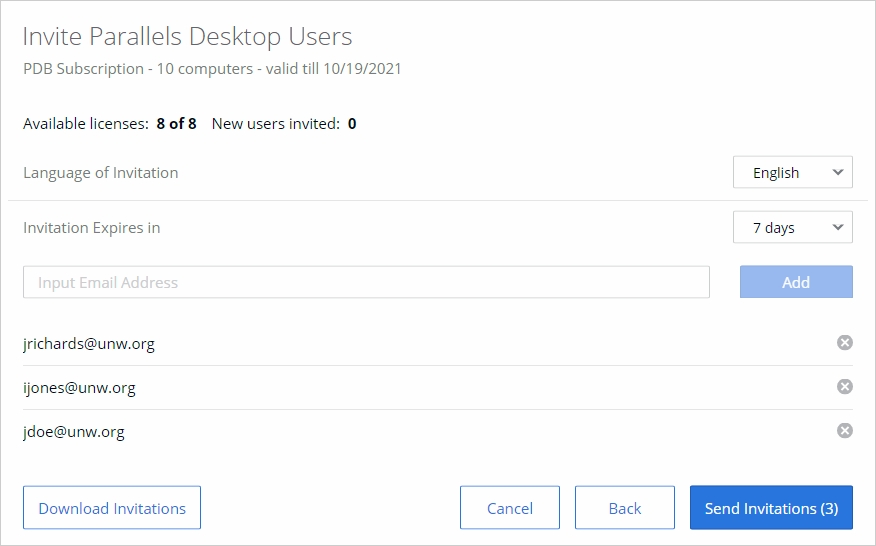
    • Invitation Expires in: Use the drop-down list to select when the invitation should expire. After it expires, the temporary activation code included in it will no longer work.

    • Email address: Type a user's email address and click Add. Repeat for all intended users. You can also specify a CSV file containing email addresses of your users. The CSV file must contain a single column (a valid email address) with multiple rows (one email address on each row). Please note that if the number of users included in this list exceeds the number of available licenses for the specified key, the activation of Parallels Desktop will happen on a first-come, first-served basis.

    • The Download Invitations button allows you to save the invitation email information to a CSV file. The information includes email addresses that you specified, a temporary activation code (generated individually for each user), and the Parallels Desktop download URL (also generated individually for each user). You can use the information in the downloaded file to create your own invitation email or to answer helpdesk questions, should any arise.

  5. Click Send Invitations to send the email to users.

The invitation email that the users receive contains the following information:

  • Installation instructions and a link from which a user can download the Parallels Desktop installation file.

  • A temporary activation code. The code will be used automatically when a user installs Parallels Desktop on their computer. If for any reason automatic activation fails, the user can use the code included in the mail to manually activate Parallels Desktop. Please note that this is not the actual license key that you selected when you created the invitation email. This is only a temporary activation code with a limited scope and duration. The real license key is never shown to your Parallels Desktop users.

Note: Each code can only be used once, to activate Parallels Desktop on one computer and should not be shared. To activate on another computer, send another invitation.

Once the users have installed and activated Parallels Desktop on their computers, you will be able to see the list of active installations in your Parallels account.

Setting Up a Virtual Machine

Once Parallels Desktop is installed on a Mac computer, the user needs to set up a virtual machine to run Windows on their Mac. This can be accomplished using one of the following methods:

  • A user can create and configure a virtual machine and install Windows in it manually.

  • An administrator can prepare a virtual machine and put it on a corporate network storage from where users can download it to their computers.

An administrator can set up a Configuration Profile and provision a virtual machine to end users through it. For more information see and . This is the recommended method.

Using Configuration Profiles
Provisioning a corporate VM image
https://my.parallels.com/