Loading...
Loading...
Loading...
Loading...
Loading...
Loading...
Loading...
To view your SPLA subscription(s):
Visit Parallels My Account at https://my.parallels.com and log in using your email address and password.
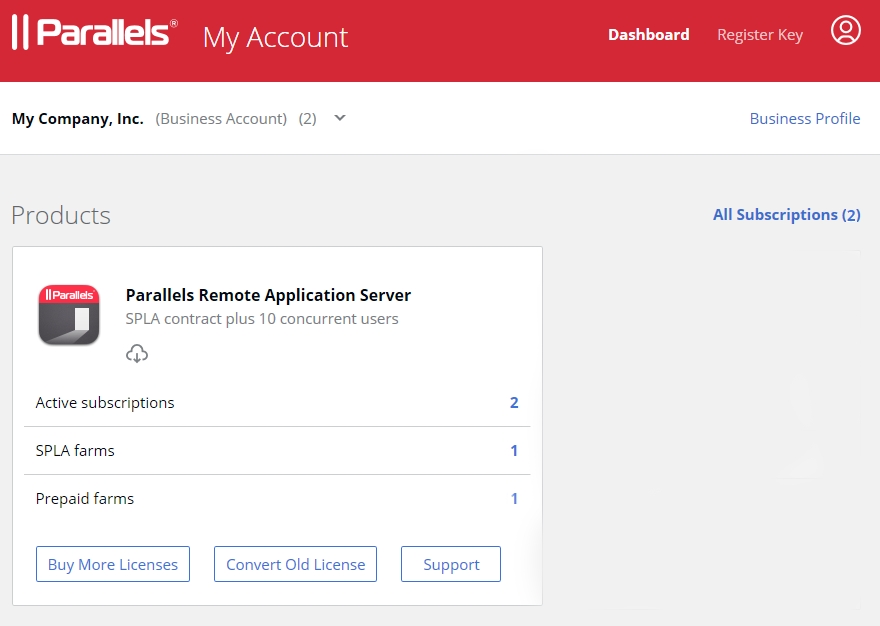
On the Dashboard page, which is your account home page, locate the Parallels Remote Application Server product card. If you don't see the Dashboard page, click Dashboard on the page header.
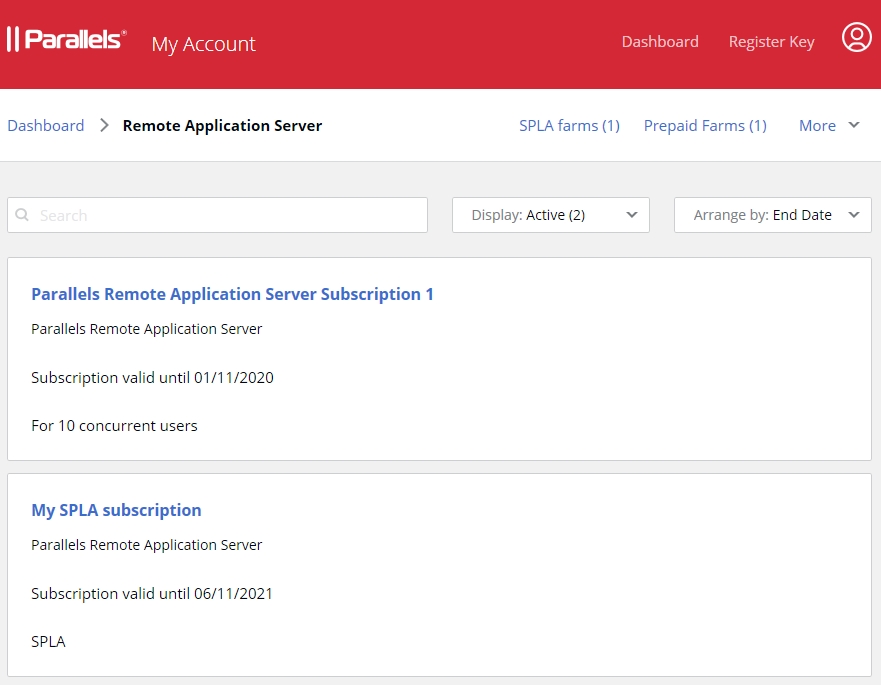
To view the list of subscriptions that you own, click the Active subscriptions row. The subscription list page opens. Note that on the screenshot below there are two Parallels RAS subscriptions. One is the prepaid subscription and the other is SPLA. You will see one or the other, or both types, depending on what you own.
Review the information and then click your SPLA subscription name to view the subscription details page.
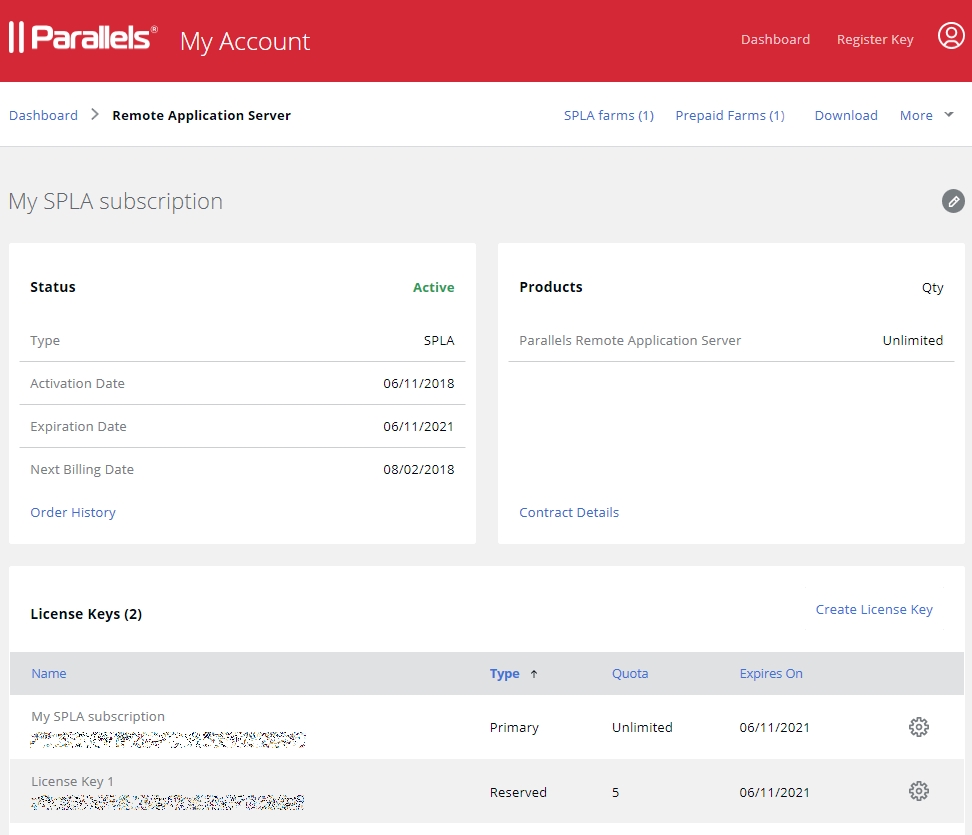
The Subscription Details page contains general subscription information, such as status, type (e.g. SPLA), activation and expiration dates. The Next billing date field displays the date on which the current billing period ends and an invoice is prepared and emailed to the service provider.
The action links allow you to see your order history and contract details.
The License Keys section displays information about the Primary key that came with your subscription and one or more additional license keys (also known as sublicenses), if available. You create additional keys yourself by clicking the Create License Key link above the list. For more information, see Creating Additional License Keys.
You can sort the list by one of the license key properties by clicking on the desired column heading. Other important items on this page are described later in this guide.
To modify the subscription name, click the icon (at the top of the page) and then type a new name. This name is for display only. It does not affect anything.
Parallels My Account allows you to manage your SPLA subscriptions. Using your Parallels account you can perform the following tasks:
View your Parallels SPLA subscription(s).
View subscription details, including the license key(s), status, effective dates, next billing date.
View the list of Parallels RAS farms associated with a subscription with the peak number of concurrent user connections for each farm during the current and previous billing periods.
View farm details, including daily peak usage numbers for the current or previous billing periods.
Set a concurrent users limit on a license key that you give to your clients by creating additional license keys.
View and download your SPLA contract agreement.
To view license usage for an SPLA farm:
Make sure you are signed in to Parallels My Account.
On the Dashboard page, locate the Parallels Remote Application Server product card and click the SPLA farms row.
In the Farms list, find the farm of interest and click its name in the Farm Name column.
In the dialog that opens, the General tab page displays the farm information. This is the same information that is displayed in the Farms list from where you opened this dialog.
Click the Usage tab (at the top). The usage statistics tab page opens.
The Usage tab page contains the following information:
Billing Period: Allows you to choose a billing period for which to display the information.
Status in this Period: The farm status during the selected billing period (e.g. Active, Deactivated).
Peak Usage: The peak number of concurrent connections for the entire billing period. The daily usage statistics are also available and are described below.
The table in the lower portion of the dialog displays the daily usage numbers for the selected billing period. The Last Report column contains the date of the report. The Peak Usage column contains the peak usage number for that date. You can sort the list by either column in ascending or descending order.
You can receive reports about individual license usage. Reports allow you to monitor license usage for each license key. If you create additional license keys (sublicenses), reports can help you make a decision whether there's a possible need to increase the number of individual licenses for a particular license key.
A report is sent via email that includes the summary of the license usage and a CSV file that contains the same information as the Farms list described in section Manage SPLA farms.
If reporting is configured for a primary license key, reports include the data for all farms activated with this key or additional license keys. If reporting is configured for an additional license key, reports contain only the data for farms activated with this license key.
Note: The data represented by the report is not a bill. It is provided for reference only.
To enable and configure license usage reports:
Log in to Parallels My Account.
On the Dashboard page, locate the Parallels Remote Application Server product card and click on Active subscriptions row.
Click the name of your SPLA subscription to open the subscription details page.
In the License Keys section, find the license key of interest and click the icon at the end of the row.
In the dialog that opens, select the Reports tab.
Select the Send license reports option. After this, you can configure the following settings:
Language: language in which the report will be composed and sent.
When usage is: condition for receiving a report. You can select one of the following options:
Any: reports are sent regardless of license usage.
>= n user: reports are sent when the peak number of concurrent users is the specified number or higher.
>= n% of threshold: reports are sent when the peak number of concurrent users is the specified percentage of the number of concurrent users assigned to the sublicense or higher. This option only applies to sublicenses with the set number of assigned users.
How often: when you want to receive the reports. You can select one of the following options:
Daily: once per day.
Weekly: once per week on the specified day.
Monthly: once per month on the specified day.
At the end of the billing period: once per month when the billing cycle ends.
Send sooner if the condition is met: whether you want to receive a report when the condition specified in the When usage is drop-down list is met even if it happens before the date specified in the How often drop-down list. A report is sent once per day. You will also receive a report on the date specified in the How often drop-down list.
The list of email addresses of recipients that should receive the reports. You can specify up to 10 addresses.
Click Save.
When you sign up a client under an SPLA agreement, you have the ability to set a limit on how many concurrent users will be able to connect to the client's farm. This is achieved by creating additional license keys, also known as sublicenses.
Note: Please note that grace periods (expiration time) apply only to the primary license key.
When you create a license key, you can set the maximum allowed number of concurrent users and a custom expiration date for it. This way a client will not be able to go over the specified limit and use more licenses that you agree to provide them with.
For a single Site with 250 concurrent users or less, license checks are performed in real-time. For all other use cases, license checks are done periodically, which means that the specified license cap value should not be considered a hard limit.
To create a license key:
Log in to Parallels My Account.
On the Dashboard page, locate the Parallels Remote Application Server product card and click on Active subscriptions row.
Click the name of your SPLA subscription to open the subscription details page.
In the License Keys section, click the Create License Key button.
The License Key dialog opens where you can create a license key as described below.
The License Key dialog consists of three tab pages: General, License Administrators, and Reports.
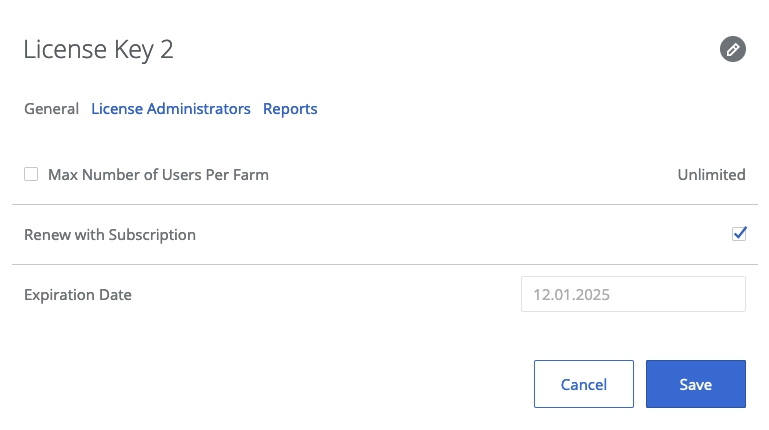
On the General tab page, select the Max Number of Users Per Farm option and then specify the number of individual licenses (concurrent users) you want to assign to the new key.
To set the expiration date for the license key, do one of the following:
To renew the key with your SPLA subscription, select the Renew with Subscription option. The license key expiration date will be the same as your SPLA subscription. When the subscription renews, the key will be renewed with it.
To set a custom expiration date, clear the Renew with Subscription option and then set the date in the field provided. The key that you are creating will expire on the specified date.
See Configuring license usage reports.
The License Administrators tab page allows you to assign one or more administrators to the license key. This is useful if you have more than one administrator in your organization and would like to give them rights to manage a particular license key.
Please note that before you can assign an administrator to a license key, you have to invite them to join your organization's business account. For the instructions on how to do it, please read the Inviting users to join a business account section.
To assign an administrator to the license key, expand the drop-down list box, select an administrator, and click the Add button. Click Save to save your changes and close the dialog.
As the administrator of a business account, you can invite other users in your organization to join it. Once a user joins the account, you can grant them rights to manage all or specific license keys.
To invite a user to join the business account:
On the Dashboard, click Business Profile in the upper right and then click Users (also in the upper right).
The Business Account Users list is displayed:
Click Invite Users.
In the dialog that opens, select a language of invitation, then type the email address of a user and click Add. You can invite more than one user at the same time. Once the list of users is complete, click the Send Invitations button.
When a user receives the email, it will contain instructions and a link to join the business account. Clicking on the link will open the following Parallels My Account dialog in a web browser:
If the user already has a personal account, he/she will need to enter their current password. If the user doesn't have an account, they must choose and type a password to create a personal account. The user then clicks Join account to join and log in to Parallels My Account.
There are two types of business account membership:
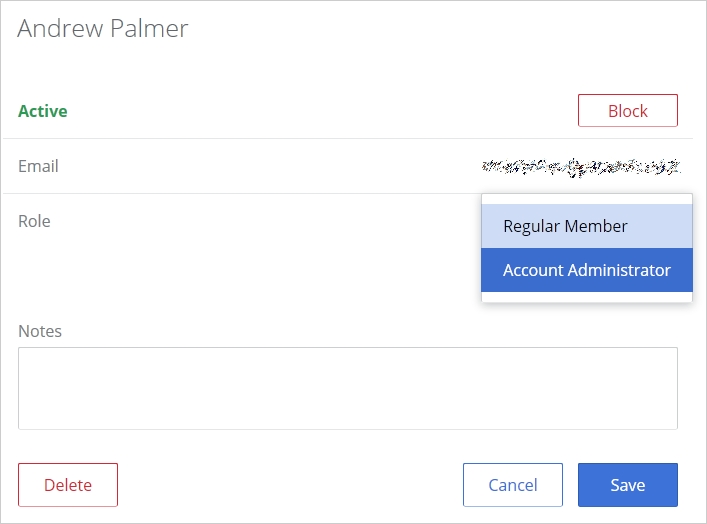
Regular Member. When a user accepts the invitation, they are initially granted privileges of a regular member. A regular member cannot manage any of the subscriptions or licenses and must be either promoted to the account administrator (see below for details) or granted rights to manage a particular license key (see Creating additional license keys).
Account Administrator. An account administrator has full privileges to manage all of the available subscriptions and licenses.
To promote a user to the administrator of a business account, you need to do the following:
Open the Business Account Users list (see above) and click the user name you want to promote.
The dialog displaying the user membership information opens.
Click the Role drop-down menu and select Account Administrator.
Use the Notes box to enter a note if desired and click Save to save the information.
The user needs to log off and then log on again for the new role to take effect.
To manage Parallels RAS farms that were activated using your Parallels SPLA license key:
Make sure you are signed in to Parallels My Account.
On the Dashboard page, locate the Parallels Remote Application Server product card and click the SPLA farms row.
The page opens displaying information about Parallels RAS farms associated with the selected SPLA subscription. The list may include active and deactivated farms, if any. The page is described in details below.
The name of the SPLA subscription in the upper left is a drop-down menu. You can click it and choose a license key for which the farm information should be displayed. The menu will always contain the subscription itself (i.e. the Primary key) but may also contain one or more additional license keys if you have created any. When you select one or more keys, the Farms list is populated with Parallels RAS farms associated with the selected key(s).
The Next billing date field displays the date on which the current billing period ends and an invoice is prepared and emailed to the service provider. You can click the Details link to see the subscription details page, which was described in the previous section of this guide.
The Billing Period drop-down menu in the upper-right allows you to select a billing period for which to display the information. The Farms table is populated with the information for the selected billing period.
To see the information for active farms only, click the Farms drop-down menu (above the list) and select Active.
The Display drop-down menu allows you see farms where the license key will expire soon or has already expired, so you can easily identify these farms and take appropriate actions.
The Farms list contains the following information:
Farm name: Farm name. You can change it by clicking the name and then clicking on the "pencil" icon and typing a new name.
Current Status: Farm status (e.g. Active, Deactivated).
Farm ID: The ID of the farm.
Server ID: The server ID of the primary Connection Broker in the Licensing Site.
App Version: Parallels RAS version number.
Activation Date: The farm activation date.
Last Report Received: The date on which the farm last contacted Parallels cloud.
Peak Usage: The peak number of concurrent connections for the selected billing period.
Current Activation Key: The license key that is currently being used by the farm.
Used Activation Key: The most recent license key that was used to activate the farm during the selected billing period.
Notes: Notes that you can enter yourself if needed. To add notes, click the farm name (the Farm Name column) and then use the Notes field in the dialog that opens.
If you don't see some of the columns described above, it means they are hidden. Click the "gear" icon (on the right side above the list) and then select the columns to be displayed.
To enable the Actions drop-down menu, select one or more farms in the list (check the box in the first column). The menu gives you options to Deactivate the select farm(s) and to Save the List to a CSV file. Note that you can also deactivate a farm by clicking its name in the Farm Name column and then clicking the Deactivate button in the dialog that opens.

